Quick Start Guide Kurzanleitung Guide de démarrage rapide Guida di avvio rapida Guía de instalación T2150 T2250 Matrix Printer
U1-2-en.fm Seite 2 Freitag, 9. Oktober 2009 10:15 10 Important Information This equipment generates and uses radio frequency energy and if not installed and used properly, that is, in accordance with the manufacturer's instructions, may cause interference in radio and television reception.
Quick Start-up Table of contents Table of contents Operator’s Manual QUICK START-UP Table of contents Introduction Symbols used Important safety instructions Using the Online-CD-ROM Contents of the Online CD-ROM Troubleshooting 2 2 2 3 3 3 Printer at a glance 4 Installation Unpacking the printer Placing your printer Checking the printer voltage Connecting the printer Switching on the printer 5 5 6 7 8 8 Control panel Online mode Offline mode Setup mode 9 9 9 10 Changing the ribbon cassette 11
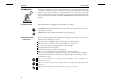
Introduction Quick Start-up Introduction ! Ah ha! ➤ Symbols used This Operator’s Manual is intended as a quick introduction into working with the printer and is to enable also unexperienced users to handle the device properly. It describes the most important functions of the printer and contains the essential information for your everyday work with the printer.
Quick Start-up Introduction ➤ Using the First install the Adobe Acrobat Reader on your hard disk unless the program has already been installed. To install it, follow the steps described in the README file in the READER directory. Online-CD-ROM To start the online documentation, call the Windows Explorer and double click on the START.PDF file. Then follow the instructions and menus on the screen.
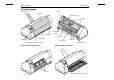
Printer at a glance Quick Start-up Printer at a glance Paper support Top cover Front cover Ribbon cassette Latches ll to en op pu Power inlet and fuse ll to Power switch en op pu Tear edge Bottom cover Control panel Rear cover Printhead Manual single sheet feeder closed Interface connector Printer in fanfold paper mode Printer in single sheet mode ll to en op pu Tractor 1 Manual single sheet feeder open 4
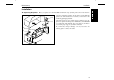
Quick Start-up Installation Installation ➤ Unpacking the printer Place your printer on a solid base.Make sure that the “Up” symbols point to the correct direction. ➁ ➀ ➃ Open the packaging and take out the ribbon cassette. Pull the printer out of the cardboard box towards you and remove the remaining packaging material. Check the printer for any visible transport damage and completeness.
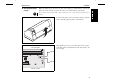
Installation Quick Start-up ➤ Placing your printer Place the printer on a solid, flat and non-slip surface in such a way that it cannot fall down. Make sure to facilitate access to the control panel and the paper input trays and to leave sufficient space for the paper ejected. If you expect that frequent forward and reverse feeds will occur, you should place the printer as shown in the figure, if possible.
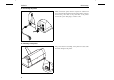
Quick Start-up Installation ➤ Checking the printer Make sure that the device has been set to the correct voltage (e.g. 230 V in Europe, 120 V in the USA). To do this, check the type plate above the power inlet at the back of the printer. voltage Never switch on the printer if the voltage setting is incorrect, since this may result in severe damage. STOP You can set the printer to the correct mains voltage yourself. To do this, cautiously place the printer on its back side.
Installation Quick Start-up ➤ Connecting the printer Make sure that the printer and the computer are switched off and connect the data cable between the printer and the computer. Connect the power cable to the power inlet of the printer. Connect the power cable plug to a mains socket. ➤ Switching on the printer The power switch for switching on the printer is located at the front bottom right of the printer.
Quick Start-up Control panel Control panel The control panel and the keys are used for controlling printer operation. The upper line of the display shows whether the printer is in Online or Offline mode and the paper path selected (Tractor1 or Single). ➤ Online mode Online 1 2 After switching on, the printer is automatically set to online mode. Only in this mode it can receive data from the computer.
Control panel Quick Start-up ➤ Setup mode Adjust Menu 1 2 In this mode, the following settings are available: Paperway Char 3 4 Online Setup Setup key: Sets the printer to setup mode, in which the following settings can be selected: Menu key (1): Other menu settings. Adjust key (2): Tear position, first printing line and print head gap. Paperway key (3): Paper path. Char key (4): Font and number of characters per inch. Access to the other menu settings (Menu) may be disabled by the manufacturer.
Quick Start-up Changing the ribbon cassette Changing the ribbon cassette Remove all the paper from the printer and make sure that the printer is switched off before opening the cover. Press the two slide latches, raise the top cover to an angle of 90 degrees relative to the top cover of the printer and remove it. 90° Cautiously slide the print head carriage to the left stop (viewed from the printer front). STOP The print head becomes hot during printing.
Changing the ribbon cassette Quick Start-up Turn the coloured ribbon feed knob at the right of the new ribbon cassette in the direction of the arrow in order to take up slack of the ribbon. Slightly tilt the ribbon cassette forwards in such a way that it is parallel to the housing top and thread in the ribbon in front of the print head. Locate the two projections in the left and right guide rails of the printer and gently press down on both sides until it clicks into place.
Quick Start-up Paper handling Paper handling This section describes how to set the paper type, load fanfold paper and single sheets, transport paper and move the paper to the tear position. ➤ Paper path quick You can change the paper type either from an application program, by means of the paper path quick selection feature or in the Setup menu.
Paper handling ➤ Loading paper Quick Start-up Your printer can print both fanfold paper and single sheets. For information on the paper sizes you can use, please refer to page 24 (Paper specifications). You should only use those paper types which are approved for this printer. For more information, refer to the User Guide on the online CD-ROM. Fanfold paper en ll to pu op Make sure that the printer is set for fanfold paper printing.
Quick Start-up Paper handling Align the right-hand tractor to the width of the paper and insert the paper. Make sure that it is inserted by the same length as on the left-hand tractor in order to avoid any paper jam. Close the tractor flap and slide the tractor to the right until the paper is slightly tensioned.
Paper handling Quick Start-up Single sheets Make sure that the printer is set to single sheet mode. If necessary, change the paper type (see page 13, Paper path quick selection). Press the latch at the middle of the front cover. The single sheet input tray opens downwards. en ll to pu op Install the paper support as required for the paper width. You can use an additional paper support in order to position wide single sheets properly (see Accessories, page 24).
Quick Start-up Paper handling ➤ Paper transport Loaded paper can be transported in the printer in several ways. Offline Tractor1 Park LF/FF 1 2 3 4 Online Setup Make sure that the printer is in offline mode; press the Online key, if necessary Key Park (1): If fanfold paper is loaded in the printer, it is fed to the tear position. If a single sheet is loaded, it is ejected.
Paper handling Quick Start-up ➤ Moving the paper to You can use the Tear key to move the paper to the tear position. the tear position Online 1 2 Tractor1 Tear 3 4 Online Make sure that the printer is in online mode. Press the Tear (4) key. The printer moves the perforation edge of the fanfold paper to the tear edge (see below).
Quick Start-up Settings Settings This section describes how to set the tear position, the first printing line, the print head gap as well as the font and the character density. ➤ Setting the tear If the tear position of the paper is not aligned with the tear edge of the printer, you can adjust it. Loaded paper may have to be torn and repositioned to the park position. position Adjust Menu 1 2 Paperway Char 3 4 Online Setup Press the Tear (4) key.
Settings Quick Start-up ➤ Setting the first You can use the TOF function for setting the position of the first printing line for each paper source and each menu individually. printing line (TOF) Before using the TOF function (if fanfold paper is used), you should first set the tear position (see above). Adjust Menu 1 2 Paperway Char 3 4 Online Setup TOF Head 1 Tear 2 3 4 FormAdj= 12/72"* Set < > Exit 1 2 3 Default TOF 0–220/72" Readjusted TOF 20 4 Press the Setup key.
Quick Start-up Settings ➤ Setting the print head gap The printer features automatic print head gap adjustment to the thickness of the paper used (AGA funcion). In setup mode, you can enter a correction value to modify the head gap determined automatically. This correction is useful for modifying the appearance of the type face and the impact force for multi-layer paper. The AGA (automatic gap adjustment) function must be set to “always” or “once”.
Settings Quick Start-up ➤ Selecting character density and font Adjust Menu 1 2 Font Paperway Char 3 4 You can use the CPI key in setup mode to select the number of characters per inch to be printed. You can use the Font key to select fonts. Press the Setup key, then the Char (4) key. Online Setup Press the CPI (3) or Font (2) key (in our example, press CPI).
Quick Start-up Printing out status page Printing out status page Make sure that blank paper is inserted in the valid paper source (default is Tractor 1). Keep the key 4 depressed for approx. 5 seconds while turning on the printer. After completion of the initialization the printer pulls the paper in print position and begins with the printout. The status page contains important informations which facilitates the solution of problems or errors for the service technician.
Quick Start-up Specifications ➤ Printer specifications Printing method Serial with 24-needle print head Printing width Narrow printer Wide printer Print speed (in bidirectional mode) DPQ 500 cps at 10 cpi CPQ 225 cps at 10 cpi NLQ 180 cps at 10 cpi LQ 90 cps at 10 cpi Printing rate 430 pages/h; 7,2 pages/min (ECMA) Character density 5 / 6 / 7,5 / 8,6 / 10 / 12 / 15 / 17,1 / 20 cpi Resolution (max.
Quick Start-up ➤ Paper specifications Accessories Fanfold paper tractor 1 Continuous single forms Continuous set of forms (requires individual testing) Paper weight No. of copies Form thickness (max.) 60–120 g/m2 1+5 0.60 mm Single sheet input tray Continuous single forms Continuous set of forms (requires individual testing) Paper weight No. of copies Form thickness (max.) 80–120 g/m2 1+5 0.60 mm Sets of forms H SI L G N E Sets of forms can only be processed if the top edge is bound.
Der schnelle Einstieg Inhaltsverzeichnis Inhaltsverzeichnis Bedienungsanleitung DER SCHNELLE EINSTIEG Inhaltsverzeichnis Einführung Zu den verwendeten Symbolen Wichtige Sicherheitshinweise Arbeiten mit der Online-CD-ROM Was ist auf der Online-CD-ROM Fehlersuche 2 2 2 3 3 3 Auf einen Blick 4 Installation Drucker auspacken Drucker aufstellen Druckerspannung überprüfen Drucker anschließen Drucker einschalten 5 5 6 7 8 8 Bedienfeld Online-Modus Offline-Modus Setup-Modus 9 9 9 9 Farbbandkassette wech
Einführung Der schnelle Einstieg Einführung ! Ah ha! ➤ Zu den verwendeten Die Bedienungsanleitung dient dem schnellen Einstieg in das Arbeiten mit dem Drucker und soll auch dem ungeübten Benutzer den Umgang mit dem Gerät ermöglichen. Sie beschreibt die wichtigsten Funktionen des Druckers und enthält unerläßliche Informationen für die alltägliche Arbeit mit dem Gerät.
Der schnelle Einstieg ➤ Arbeiten mit der Online-CD-ROM Einführung Installieren Sie zuerst den Adobe Acrobat Reader auf Festplatte, falls dieses Programm nicht schon vorhanden ist. Befolgen Sie zur Installation die in der Readme-Datei im Verzeichnis READER aufgeführten Schritte. Doppelklicken Sie zum Starten der Online-Dokumentation im Windows-Explorer auf die Datei START.PDF. Folgen Sie dann der Bedienerführung.
Auf einen Blick Der schnelle Einstieg Auf einen Blick Papierstütze Obere Abdeckung Vordere Abdeckung Farbbandkassette Rasthaken ll to en op pu Netzanschluß und Sicherung ll to Netzschalter en op pu Abreißkante Untere Abdeckung Bedienfeld Hintere Abdeckung Druckkopf Manueller Einzelblatteinzug, geschlossen Schnittstellenstecker Drucker im Endlospapierbetrieb Drucker im Einzelblattbetrieb ll to en op pu Traktor 1 Manueller Einzelblatteinzug, geöffnet 4
Der schnelle Einstieg Installation Installation ➤ Drucker auspacken Den verpackten Drucker auf eine stabile Unterlage stellen. Darauf achten, daß die Symbole für ,,Oben“ in die richtige Richtung zeigen. ➁ ➀ ➃ ➂ Verpackung öffnen und Farbbandkassette entnehmen. Drucker nach vorne aus dem Karton herausziehen, und die restliche Verpackung entfernen. Überprüfen Sie den Drucker auf sichtbare Transportschäden und Vollständigkeit.
Installation Der schnelle Einstieg ➤ Drucker aufstellen Den Drucker auf einer stabilen, ebenen und rutschfesten Oberfläche so aufstellen, daß er nicht herunterfallen kann. Der Zugang zum Bedienfeld und den Papiereinzügen muß gewährleistet und genügend Platz für das ausgeworfene Papier vorhanden sein. Wird Endlospapier häufig vor- und zurücktransportiert, den Drucker möglichst so aufstellen, wie im Bild gezeigt.
Der schnelle Einstieg Installation ➤ Druckerspannung Vergewissern Sie sich, daß das Gerät auf die richtige Spannung eingestellt ist (z.B. 230 V in Europa, 120 V in den USA). Siehe dazu das Typenschild über dem Netzanschluß auf der Rückseite des Druckers. überprüfen Niemals den Drucker einschalten, wenn er nicht auf die richtige Spannung eingestellt ist, da dies zu schweren Schäden führen kann. STOP Sie können den Drucker selbst auf die richtige Spannung einstellen.
Installation Der schnelle Einstieg ➤ Drucker anschließen Stellen Sie sicher, daß Drucker und Computer ausgeschaltet sind und verbinden Sie mit Ihrem Datenkabel Drucker und Computer. Verbinden Sie das Netzkabel wie im Bild gezeigt mit der Anschlußbuchse des Druckers. Stecken Sie den Stecker des Netzkabels in eine Steckdose. ➤ Drucker einschalten Der Netzschalter, mit dem der Drucker eingeschaltet wird, befindet sich rechts unten auf der Vorderseite des Druckers.
Der schnelle Einstieg Bedienfeld Bedienfeld Über das Bedienfeld und seine Tasten steuern Sie die Arbeit mit dem Drucker. Die obere Zeile der Anzeige gibt Aufschluß darüber, ob der Drucker sich im Online- oder im Offline-Modus befindet und welcher Papierweg (Traktor1 oder Einzel) gewählt ist. ➤ Online-Modus Online 1 2 Nach dem Einschalten geht der Drucker automatisch in den Online-Modus. Nur in diesem Modus kann er Daten vom Computer empfangen.
Farbbandkassette wechseln Farbbandkassette wechseln Der schnelle Einstieg Entfernen Sie alles Papier aus dem Drucker und stellen Sie vor dem Öffnen der Abdeckung sicher, daß der Drucker ausgeschaltet ist. Die zwei Verrieglungsschieber drücken, die obere Abdeckung im Winkel von 90 Grad zur Druckeroberseite nach oben klappen und herausnehmen. 90° Den Druckkopfschlitten vorsichtig bis zum Anschlag nach links (von der Druckervorderseite aus betrachtet) schieben.
Der schnelle Einstieg Farbbandkassette wechseln Den farbigen Spannknopf an der rechten Seite der neuen Farbbandkassette in Pfeilrichtung drehen, um das Farbband zu spannnen. Die Farbbandkassette etwas nach vorne neigen, so daß sie parallel zur Gehäuseoberseite liegt, und Farbband vor Druckkopf einführen. Dann mit beiden Zapfen in die linke und rechte Führungsschiene des Druckers legen und vorsichtig auf beiden Seiten nach unten drücken, bis sie einrastet.
Papierhandhabung Der schnelle Einstieg Papierhandhabung In diesem Abschnitt wird bechrieben, wie Sie die Papierart einstellen, Endlospapier und Einzelblätter einlegen, Papier transportieren und Papier in die Abreißposition fahren. ➤ Papierweg- Der Papierwegwechsel kann entweder über ein Anwendungsprogramm, über die PapierwegSchnellumschaltung oder im Menü Setup vorgenommen werden.
Der schnelle Einstieg Papierhandhabung ➤ Papier einlegen Ihr Drucker kann sowohl mit Endlospapier als auch mit Einzelblättern betrieben werden. Informationen über zulässige Papierformate finden Sie auf Seite 23 (Papierspezifikationen). Bitte verwenden Sie nur Papier, das für diesen Drucker geeignet ist. Nähere Informationen finden Sie im Benutzerhandbuch auf der Online-CD-ROM. Endlospapier ll to pu ll to en op Sicherstellen, daß der Drucker auf Endlospapierbetrieb eingestellt ist.
Papierhandhabung Der schnelle Einstieg Rechten Traktor auf Papierbreite ausrichten und Papier einlegen. Darauf achten, daß es auf gleicher Höhe wie im linken Traktor liegt, da sonst Papierstau auftritt. Traktorklappe schließen, Traktor nach rechts schieben, bis Papier leicht gespannt ist. STOP Papier weder zu straff spannen, da sonst Transportlöcher ausreißen können, noch zu locker führen, da es sich in diesem Fall wölbt und Probleme bei der Zuführung auftreten können. Anschließend Traktor arretieren.
Der schnelle Einstieg Papierhandhabung Einzelblätter Sicherstellen, daß Drucker auf Einzelblattbetrieb eingestellt ist. Gegebenenfalls die Papierart wechseln (siehe Seite 12, Papierweg-Schnellumschaltung). Auf den Druckverschluß in der Mitte der vorderen Abdeckung drücken. Die Einzelblattzuführung klappt nach unten auf. en ll to pu op Papierstütze entsprechend der Papierbreite anbringen.
Papierhandhabung Der schnelle Einstieg ➤ Papiertransport Eingelegtes Papier kann auf unterschiedliche Weise im Drucker transportiert werden. Offline Traktor1 Park LF/FF 1 2 3 4 Online Setup Sicherstellen, daß sich der Drucker im Betriebszustand Offline befindet; gegebenenfalls Taste Online drücken Taste Park (1): Befindet sich Endlospapier im Drucker, wird es in Abreißposition transportiert. Befindet sich ein Einzelblatt im Drucker, wird es ausgeworfen.
Der schnelle Einstieg Papierhandhabung ➤ Papier in Abreiß- Endlospapier wird mit der Taste Tear in Abreißposition gefahren. position fahren Online 1 2 Traktor1 Tear 3 4 Online Sicherstellen, daß der Drucker Online ist. Taste Tear (4) drücken. Der Drucker fährt die Perforationskante des Endlospapiers an die Abreißkante (siehe unten).
Einstellungen Der schnelle Einstieg Einstellungen In diesem Abschnitt wird beschrieben, wie Sie die Abreißposition, die erste Druckzeile, den Druckkopfabstand sowie die die Schriftart und die Zeichendichte einstellen. ➤ Abreißposition Stimmt die Abreißposition des Papiers nicht mit der Abreißkante des Druckers überein, kann sie eingestellt werden. Eingelegtes Papier muß gegebenenfalls abgerissen und in Parkposition zurückgefahren werden. einstellen Adjust Menü 1 2 Pap.
Der schnelle Einstieg Einstellungen ➤ Erste Druckzeile Mit der TOF-Funktion kann für jeden Papiereinzugsschacht und jedes Menü einzeln die Position der obersten Druckzeile eingestellt werden. einstellen (TOF) Vor Ausführen der TOF-Funktion sollte (bei Verwendung von Endlospapier) vorher die Abreißposition eingestellt werden (siehe oben). Adjust Menü 1 2 Pap.Weg Char 3 4 Online Setup TOF Kopf 1 Tear 2 3 4 FormAdj= 12/72"* Setze< > Exit 1 2 3 4 1.
Einstellungen Der schnelle Einstieg ➤ Druckkopfabstand Der Drucker ist mit einer Funktion – genannt AGA– ausgestattet, die den Druckkopfabstand automatisch auf die verwendete Papierdicke einstellt. Im Setup-Modus kann ein Korrekturwert zum automatisch ermittelten Kopfabstand eingegeben werden. Mit dieser Korrektur wird das Schriftbild und die Durchschlagskraft bei mehrlagigem Papier verändert. einstellen Die AGA-Funktion muß auf ,,immer” oder ,,einmal” gestellt sein.
Der schnelle Einstieg Einstellungen ➤ Zeichendichte und Mit der Taste CPI kann im Setup-Modus die Anzahl der Zeichen eingestellt werden, die pro Zoll ausgedruckt werden. Mit der Taste Font können Schriftarten ausgewählt werden. Schriftart wählen Adjust Menü 1 2 Font Pap.Weg Char 3 4 Taste Setup und anschließend Taste Char (4) drücken. Online Setup H C ST U ED Taste CPI (3) oder Font (2) drücken, in unserem Beispiel CPI.
Statusseite beim Einschalten ausdrucken Der schnelle Einstieg Die Statusseite enthält alle gewählten Menü-Einstellungen sowie die im Drucker installierte Steuersoftware und Zeichengeneratoren. Stellen Sie sicher, dass im aktuellen Papierweg (Standardvoreinstellung ist Traktor 1) unbedrucktes Papier eingelegt ist. Halten Sie beim Einschalten des Druckers Taste 4 für ca. 5 Sekunden gedrückt. Nach Abschluß der Initialisierung zieht der Drucker das Papier in Druckposition und beginnt mit dem Ausdruck.
Der schnelle Einstieg Technische Daten Technische Daten ➤ Druckerspezifikationen Druckprinzip seriell mit 24-Nadel Druckkopf Druckbreite Schmaler Drucker 80 Zeichen bei 10 cpi Breiter Drucker 136 Zeichen bei 10 cpi Druckgeschwindigkeit (in bidirektionalem Modus) DPQ 500 cps bei 10 cpi CPQ 225 cps bei 10 cpi NLQ 180 cps bei 10 cpi LQ 90 cps bei 10 cpi Druckleistung 430 Seiten/h; 7,2 Seiten/min (ECMA) Zeichendichten 5 / 6 / 7,5 / 8,6 / 10 / 12 / 15 / 17,1 / 20 cpi Auflösung (max.
Technische Daten ➤ Papierspezifikationen Der schnelle Einstieg Endlospapier Traktor1 Einfachformat Formularsatz bitte individuell testen Papiergewicht Zahl der Durchschläge Formularsatzdicke (maximal) 60–120 g/m2 1+5 0,60 mm Einzelblattzufuhr Einfachformat Formularsatz bitte individuell testen Papiergewicht Zahl der Durchschläge Formularsatzdicke (maximal) 80–120 g/m2 1+5 0,60 mm Formularsätze Formularsätze können nur in kopfseitig kantenverleimter Ausführung verarbeitet werden.
Der schnelle Einstieg Zubehör Zubehör Bestellnummer Farbbandkassetten schmaler Drucker (3,5 Mio. Zeichen) 060 426 Farbbandkassetten breiter Drucker (5 Mio. Zeichen) 060 425 Zusätzliche Papierstütze 052 127 Weiteres Zubehör finden Sie im Benutzerhandbuch auf der Online-CD-ROM.
Initiation rapide Table des matières Table des matières Manuel d’utilisation INITIATION RAPIDE Table des matières Introduction Symboles utilisés Consignes importantes de sécurité Utilisation du CD-ROM Online Que contient le CD-ROM Online Recherche des pannes 2 2 2 3 3 3 Vue d’ensemble 4 Installation Déballage de l’imprimante Mise en place de l’imprimante Vérifier la tension de l’imprimante Connexion de l’imprimante Mise sous tension de l’imprimante 5 5 6 7 8 8 Panneau de commande Mode Online Mode
Introduction Initiation rapide Introduction Ce manuel d’utilisation est une initiation rapide sur la manière d’utiliser l’imprimante et permet également aux utilisateurs inexpérimentés de se servir de l’imprimante. Il décrit les fonctions principales de l’imprimante et contient des informations indispensables à connaître pour le travail quotidien avec l’imprimante.
Initiation rapide ➤ Utilisation du CD-ROM Online Introduction Installer d’abord l’Adobe Acrobat Reader sur le disque dur dans la mesure où ce programme n’est pas déjà disponible. Pour l’installation, suivre les opérations détaillées dans le fichier Readme du répertoire READER. Pour démarrer la documentation Online dans l’Explorateur Windows , double-cliquez sur le fichier START.PDF. Suivre ensuite le guide utilisateur.
Vue d’ensemble Initiation rapide Vue d’ensemble Guide-papier Capot supérieur Capot avant Cartouche du ruban encreur Leviers de verrouillage ll to en op pu Prise secteur et fusible ll to Interrupteur secteur en op pu Capot inférieur Arête de séparation Tête d’impression Panneau de commande Capot arrière Alimentation feuille à feuille manuelle fermée Connecteur d’interface Imprimante en mode feuille à feuille Imprimante en mode continu ll to en op pu Tracteur 1 Alimentation feuille à fe
Initiation rapide Installation Installation ➤ Déballage de l’imprimante Placer l’imprimante emballée sur un support stable. Veiller à ce que les symboles «Haut» soient orientés dans la bonne direction. ➁ ➀ ➃ Ouvrir l’emballage et sortir la cartouche du ruban encreur. Sortir l’imprimante du carton d’emballage vers vous et enlever le reste de l’emballage. Vérifier si l’imprimante est complète et en parfait état.
Installation Initiation rapide ➤ Mise en place de Placer l’imprimante sur un support stable, plan et antidérapant de façon à ce qu’elle ne puisse pas tomber. Veiller à ce que le panneau de commande et les magasins d’alimentation en papier soient aisément accessibles et à ce qu’il y ait suffisamment de place pour l’éjection du papier. l’imprimante Si du papier continu est fréquemment avancé et reculé, installer si possible l’imprimante comme illustré sur la figure.
Initiation rapide Installation ➤ Vérifier la tension de Assurez-vous que l’imprimante est réglée à la tension appropriée (p. ex. 230 V pour l’Europe, 120 V pour les USA). Voir la plaque signalétique placée au-dessus de la prise secteur au dos de l’imprimante. l’imprimante STOP Ne jamais mettre l’imprimante sous tension quand celle-ci n’est pas correcte car ceci pourrait entraîner de graves endommagements. Vous pouvez régler vous-mêmes l’imprimante à la tension correcte.
Installation Initiation rapide ➤ Connexion de l’imprimante Assurez-vous que l’imprimante et l’ordinateur sont hors tension et raccorder l’imprimante à l’ordinateur à l’aide de votre câble de données. Raccorder le câble secteur à la prise femelle de l’imprimante, comme sur la figure. Raccorder le connecteur du câble secteur à une prise. ➤ Mise sous tension de l’imprimante L’interrupteur secteur, qui sert à la mise sous tension de l’imprimante, se trouve sur la face avant de l’imprimante, en bas à droite.
Initiation rapide Panneau de commande Panneau de commande Le panneau de commande et les touches permettent de contrôler le fonctionnement de l’imprimante. La première ligne de l’affichage indique si l’imprimante se trouve en mode Online ou Offline et la fonction papier sélectionnée (Tract 1 ou Insert). ➤ Mode Online Online 1 2 Dès que l’imprimante est mise sous tension, elle passe automatiquement en mode Online. Elle ne peut recevoir des données de l’ordinateur que dans ce mode.
Panneau de commande Initiation rapide ➤ Mode Setup Dans ce mode, les réglages suivants sont disponibles: Ajuster Chem-Pap Menu Char 1 2 3 4 Online Setup Touche Setup: Règle l’imprimante en mode Setup dans lequel les réglages suivants peuvent être sélectionnés: Touche Menu (1): autres paramètres de menu. Touche Ajuster (2): position de séparation, première ligne d’impression et écartement de la tête d’impression. Touche Chem-Pap (3): fonction papier.
Initiation rapide Remplacement de la cartouche du ruban encreur Remplacement de la cartouche du ruban encreur Enlever tout le papier de l’imprimante. Avant d’ouvrir le capot, assurez-vous que l’imprimante est hors tension. Pousser les deux leviers de verrouillage, relevez le capot supérieur à 90° par rapport à la face supérieure de l’imprimante et déposez-le. 90° Pousser avec précaution le chariot de tête d’impression vers la butée gauche (vu de l’avant de l’imprimante).
Remplacement de la cartouche du ruban encreur Initiation rapide en ll to op pu Tourner la molette de tension de couleur à droite de la nouvelle cartouche du ruban encreur dans le sens de la flèche pour tendre le ruban encreur Incliner légèrement vers l’avant la cartouche du ruban encreur pour qu’elle soit parallèle à la face supérieure du carter et introduisez le ruban encreur devant la tête d’impression. Introduire les deux ergots dans les glissières situées à gauche et à droite de l’imprimante.
Initiation rapide Manipulation du papier Manipulation du papier Cette partie explique comment régler le type de papier, mettre en place le papier continu et l’alimentation feuille à feuille, transporter le papier et déplacer le papier en position de séparation. ➤ Sélection rapide du Vous pouvez changer de type de papier soit grâce à un programme d’application, la sélection rapide de la fonction papier, soit via le menu Setup. Cette partie décrit la sélection rapide.
Manipulation du papier Initiation rapide ➤ Chargement du papier Votre imprimante peut aussi bien imprimer sur du papier continu que sur du papier feuille à feuille. Pour des informations concernant les formats de papier autorisés, consulter la page 24 (Spécifications du papier). N’utiliser que du papier approprié pour cette imprimante. Pour d’autres informations, consulter le guide d’utilisateur sur le CD-ROM Online.
Initiation rapide Manipulation du papier Ajuster le tracteur de droite sur la largeur du papier et charger le papier. Veiller à ce qu’il soit à la même hauteur que dans le tracteur de gauche pour éviter un bourrage de papier. Refermer le volet du tracteur. Pousser le tracteur vers la droite jusqu’à ce que le papier soit légèrement tendu.
Manipulation du papier Initiation rapide Papier feuille à feuille Assurez-vous que l’imprimante est réglée sur le mode feuille à feuille. Changer le type de papier si nécessaire (voir page 13, Sélection rapide du chemin de papier). Appuyer sur le verrouillage au milieu du capot avant. Le guide feuille à feuille s’ouvre vers le bas. en ll to pu op Positionner le guide-papier en fonction de la largeur du papier.
Initiation rapide Manipulation du papier ➤ Transport du papier Offline Tract 1 Park LF/FF 1 2 3 4 Le papier chargé peut être transporté de différentes façons dans l’imprimante. Online Setup Assurez-vous que l’imprimante se trouve en mode Offline. Appuyer sur la touche Online si nécessaire Touche Park (1): Si du papier continu est chargé dans l’imprimante, il est alimenté dans la position de séparation. Si une feuille simple est chargée dans l’imprimante, elle est alors éjectée.
Manipulation du papier Initiation rapide ➤ Déplacement du papier Le papier continu est transporté en position de séparation en appuyant sur la touche Coupe. en position de séparation Online 1 Tract 1 Coupe 2 3 4 Online Assurez-vous que l’imprimante est en mode Online. Appuyer sur la touche Coupe (4). L’imprimante déplace l’arête de perforation du papier continu sur l’arête de séparation (voir ci-dessous).
Initiation rapide Réglages Réglages Cette partie décrit le réglage de la position de séparation, de la première ligne d’impression, de l’écartement de la tête d’impression, ainsi que de la police et de la densité des caractères. ➤ Réglage de la position Si la position de séparation du papier n’est pas alignée sur l’arête de séparation de l’imprimante, vous pouvez la régler. Déchirer le papier chargé si nécessaire et le replacer en position d’attente.
Réglages Initiation rapide ➤ Réglage de la première ligne d’impression (TOF) La fonction TOF permet de régler la position de la première ligne d’impression pour chaque bac de chargement de papier et chaque menu individuellement. Régler tout d’abord la position de séparation (voir ci-dessus) avant d’utiliser la fonction TOF (papier continu).
Initiation rapide Réglages ➤ Réglage de l’écartement de la tête d’impression L’imprimante est équipée d’une fonction (appelée AGA) qui permet d’ajuster automatiquement l’écartement de la tête d’impression sur l’épaisseur de papier utilisé. En mode Setup, vous pouvez entrer une valeur de correction pour modifier l’écartement de la tête d’impression défini automatiquement. Cette correction permet de modifier l’aspect de l’écriture et la force de claquage sur du papier multicouche.
Réglages Initiation rapide ➤ Sélection de la densité des La touche CPI du mode Setup permet de sélectionner le nombre de caractères à imprimer caractères et de la police Ajuster Chem-Pap Menu Char 1 2 Police 3 4 par pouce. La touche Police permet de sélectionner les polices. Appuyer sur la touche Setup puis sur la touche Char (4). Online Setup Appuyer sur la touche CPI (3) ou Police (2), CPI dans l’exemple représenté.
Impression de la page de statut Impression de la page de statut Status Print 1 2 3 La page de statut contient tous réglages de menu choisis ainsi que le logiciel de gestion et le générateur de caractères. Online 4 Initiation rapide Setup Assurez-vous, que du papier vide est inseré dans la source de papier active (réglage initial: Tract 1). Tenez la touche 4 enfoncée pendant environ 5 secondes.
Initiation rapide Données techniques Données techniques ➤ Spécifications de l’imprimante Méthode d’impression série avec tête matricielle à 24 aiguilles Largeur d’impression Version étroites: 80 caractères pour 10 cpi Version larges: 136 caractères pour 10 cpi Vitesse d’impression (en mode bidirectionnel) DPQ 500 cps pour 10 cpi CPQ 225 cps pour 10 cpi NLQ 180 cps pour 10 cpi LQ 90 cps pour 10 cpi Puissance d’impression 430 pages/h; 7,2 pages/min (ECMA) Densités des caractères 5 / 6 / 7,5 / 8,6
Accessoires ➤ Spécifications du papier Initiation rapide Papier continu tracteur1 Formulaire simple Liasse de formulaires (doit être testée individuellement) grammage nombre de copies epaisseur de formulaire (maxi) 60–120 g/m2 1+5 0,60 mm Alimentation feuille à feuille Formulaire simple Liasse de formulaires (doit être testée individuellement) grammage nombre de copies epaisseur de formulaire (maxi) 80–120 g/m2 1+5 0,60 mm Liasses de formulaires Seules les liasses de formulaires dont les bords d’en
Per cominciare subito Indice Indice Istruzioni per l’uso PER COMINCIARE SUBITO Indice Introduzione Simboli utilizzati Indicazioni di sicurezza importanti Utilizzo del CD-ROM online Cosa c’è sul CD-ROM online Diagnostica 2 2 2 3 3 3 Vista d’insieme 4 Installazione Estrazione della stampante dall’imballaggio Installazione della stampante Controllare la tensione della stampante Collegamento della stampante Accensione della stampante 5 5 6 7 8 8 Pannello comandi Modo Online Modo Offline Modo Setup 9
Introduzione Per cominciare subito Introduzione Le presenti istruzioni per l’uso consentono di cominciare subito a lavorare con la stampante, anche a utenti inesperti. Vi sono descritte le principali funzioni della stampante e vi sono riportate le informazioni indispensabili per il lavoro giornaliero con la stessa.
Per cominciare subito ➤ Utilizzo del CD-ROM online Introduzione Se Adobe Acrobat Reader non è già caricato, installare innanzitutto questo programma sul disco fisso. Per l’installazione, attenersi alle indicazioni riportate nel file Readme, nella directory READER. Per lanciare la documentazione online in Windows Explorer cliccare due volte sul file START.PDF. Attenersi quindi alle indicazioni di guida per l’utente.
Vista d’insieme Per cominciare subito Vista d’insieme Supporto carta Coperchio superiore Coperchio anteriore Cartuccia nastro Ganci ll to en op pu ll to Interruttore di accensione en op pu Presa di alimentazione e fusibile Bordo di strappo Coperchio inferiore Testina di stampa Coperchio posteriore Connettore di interfaccia Pannello comandi Ingresso fogli singoli manuale, chiuso Stampante configurata per alimentazione moduli continui ll to Stampante configurata per alimentazione fogli singo
Per cominciare subito Installazione Installazione ➤ Estrazione della stampante dall’imballaggio Collocare la stampante su una superficie stabile. Fare attenzione che i simboli ,,Alto“ siano rivolti nella direzione corretta. ➁ ➀ ➃ ➂ Aprire l’imballaggio ed estrarre la cartuccia del nastro. Estrarre la stampante dal cartone dal davanti, e rimuovere gli altri materiali di imballaggio. Verificare che la stampante non abbia riportato danni dovuti al trasporto e che la documentazione sia completa.
Installazione Per cominciare subito ➤ Installazione della Collocare la stampante su una superficie stabile, piana e non scivolosa, in modo da evitare che cada a terra. Verificare che vi sia un agevole accesso al pannello comandi, ai punti di alimentazione della carta e che vi sia sufficiente spazio per l’uscita della carta. stampante Se si utilizzano frequenti comandi di avanzamento e ritorno della carta a moduli continui, collocare la stampante il più possibile come mostrato nella figura.
Per cominciare subito Installazione ➤ Controllare la tensione della stampante STOP Verificare che la stampante sia impostata sulla tensione adeguata (ad esempio 230 V in Europa, 120 V negli USA). A questo proposito, si veda la targhetta-tipo posta sopra la presa di alimentazione, sul retro della stampante. Non accendere mai la stampante se non con la tensione corretta, poichè questo potrebbe causare seri danni. E possibile effettuare da soli la regolazione della corretta tensione per la stampante.
Installazione Per cominciare subito ➤ Collegamento della stampante Verificare che la stampante e il computer siano spenti, e collegarli con l’apposito cavo di trasmissione dati. Collegare il cavo di rete come mostrato nella figura alla presa della stampante. Inserire la spina del cavo di rete in una presa. ➤ Accensione della stampante L’interruttore di rete, con il quale si può accendere la stampante, è posto a destra in basso, sul lato anteriore della stampante.
Per cominciare subito Pannello comandi Pannello comandi Tramite il pannello comandi e i suoi tasti si può controllare il lavoro con la stampante. La prima riga del display indica se la stampante si trova nel modo Online o Offline e qual è il percorso carta selezionato (Trattor1, trascinamoduli 1, o Foglio, fogli singoli). ➤ Modo Online Online 1 2 Una volta accesa, la stampante si commuta automaticamente nel modo Online. Solo in questo modo operativo può ricevere i dati dal computer. Trattor1 Stp.
Pannello comandi Per cominciare subito ➤ Modo Setup In questa modalità operativa sono possibili le seguenti impostazioni: Regolaz Dir.Cart Menu Char 1 2 3 4 Online Setup Tasto Setup: Commuta la stampante nel modo Setup, in cui si possono effettuare le seguenti impostazioni: Tasto Menu (1): Ulteriori impostazioni di menu. Tasto Regolaz (2): Posizione di strappo, prima riga di stampa e distanza testina di stampa. Tasto Dir.Cart (3): Percorso carta.
Per cominciare subito Come cambiare la cartuccia nastro Come cambiare la cartuccia nastro Rimuovere tutta la carta dalla stampante e verificare, prima di aprire il coperchio, che la stampante sia spenta. Esercitare pressione sui due cursori di regolazione, aprire il coperchio superiore a 90° rispetto alla superficie superiore della stampante e rimuoverlo. 90° Spostare la testina di stampa fino al fermo di sinistra (visto dal lato anteriore della stampante).
Come cambiare la cartuccia nastro Per cominciare subito Ruotare nel senso della freccia la manopola tendinastro, posta sulla destra della nuova cartuccia, per tendere il nastro. Inclinare lievemente la cartuccia del nastro in avanti in modo da posizionarla parallelamente al lato superiore dell’incastellatura e far passare il nastro davanti alla testina di stampa.
Per cominciare subito Modalità di gestione della carta Modalità di gestione della carta In questa sezione sono descritte le modalità di impostazione del tipo di carta, caricamento di moduli continui e fogli singoli, trasporto carta e posizionamento della carta nella posizione di strappo. ➤ Commutazione rapida Il tipo di carta può essere cambiato attraverso il programma applicativo, attraverso il sistema di cambio rapido del percorso carta oppure dal menu Setup.
Modalità di gestione della carta Per cominciare subito ➤ Caricamento della carta La stampante utilizza sia moduli continui sia singoli fogli. Per maggiori informazioni sui formati di carta ammissibili, si rimanda alla pagina 24 (Specifiche della carta). Utilizzare esclusivamente carta di tipo idoneo per questa stampante. Per maggiori informazioni, si rimanda al Manuale dell’utente sul CD-ROM online. Moduli continui en ll to pu op Se necessario, rimuovere il supporto carta.
Per cominciare subito Modalità di gestione della carta Regolare la posizione del trascinamoduli destro in funzione della larghezza della carta e inserire la carta. Fare attenzione a posizionarla alla stessa altezza osservata per il trascinamoduli di sinistra, altrimenti vi è il rischio di inceppamento. Richiudere il coperchietto del trascinamoduli e spingere il trascinamoduli verso destra fino a tendere leggermente la carta.
Modalità di gestione della carta Per cominciare subito Fogli singoli Verificare che la stampante sia settata sul modo di funzionamento fogli singoli. Se necessario, cambiare il percorso carta (vedere pagina 13, Commutazione rapida del percorso carta). Esercitare pressione al centro del coperchio anteriore. La guida fogli singoli si apre verso il basso. en ll to pu op Applicare i supporti carta corrispondenti alla larghezza della carta.
Per cominciare subito Modalità di gestione della carta ➤ Trasporto carta La carta caricata può essere trasportata in vari modi all’interno della stampante. Offline Trattor1 Park LF/FF 1 2 3 4 Verificare che la stampante sia Offline; se necessario, premere il tasto Online. Online Setup Tasto Park (1): Se nella stampante è caricata carta a moduli continui, questa viene trasportata nella posizione di strappo. Se nella stampante è caricato un foglio singolo, questo viene espulso.
Modalità di gestione della carta Per cominciare subito ➤ Posizionamento della Il tasto Stp. consente di posizionare la carta a moduli continui nel punto di strappo. carta nel punto di strappo Online 1 Trattor1 Stp. 2 3 4 Online Verificare che la stampante sia Online. Premere il tasto Stp. (4). La stampante posiziona la perforazione dei moduli continui in corrispondenza del bordo di strappo (vedi sotto). Setup Il display passa dall’indicazione … Positione Stp.
Per cominciare subito Impostazioni Impostazioni Questa sezione descrive come impostare la posizione di strappo, la prima riga di stampa, la distanza della testina di stampa, il font e la densità dei caratteri. ➤ Impostazione della Se la posizione di strappo della carta non corrisponde al bordo di strappo della stampante, la si può regolare. La carta deve essere a volte strappata e riportata nella posizione di parcheggio. posizione di strappo Regolaz Dir.
Impostazioni Per cominciare subito ➤ Impostazione della prima Con la funzione TOF, si può impostare la posizione della prima riga di stampa specificamente riga di stampa (TOF) per ogni cassetto di alimentazione della carta e per ogni menu. La posizione di strappo va impostata (vedere sopra) prima di eseguire la funzione TOF (moduli continui). Regolaz Dir.Cart Menu Char 1 2 3 4 Online Setup TOF Test. 1 Stp. 2 3 4 Sel. 12/72" * OK < > Esci 1 2 3 4 Online Premere il tasto TOF (3).
Per cominciare subito Impostazioni ➤ Regolazione della distanza La stampante è dotata di una speciale funzione che regola automaticamente la distanza della de la testina di stampa testina di stampa in funzione dello spessore della carta utilizzata (denominata di seguito ,,funzione AGA“). Nel modo Setup, la distanza della testina settata in automatico può essere corretta immettendo il relativo valore di rettifica.
Impostazioni Per cominciare subito ➤ Selezione temporaneamente della densità e del tipo di carattere Regolaz Dir.Cart Menu Char 1 2 Fonte 3 4 Con il tasto CPI, dal modo Setup si può impostare il numero di caratteri che verrà stampato per pollice. Con il tasto Fonte si può scegliere il tipo di carattere. Premere il tasto Setup e quindi il tasto Char (4). Online Setup Premere il tasto CPI (3) o Fonte (2), nel nostro esempio CPI.
Per cominciare subito Pagina di stato Pagina di stato 1 2 3 Online 4 Setup Verificare che la carta in bianco è inserita nella fonte di carta valida (regolazione di difetto: Trattor1). Tenere premuto il tasto 4 per ca. 5 secondi. Dopo che la compilazione dell'inizio lo stampatore tiri la carta nella posizione di stampa e comincia a stampare. La pagina di stato contiene importanti informazioni che facilitano i tecnici di assistenza nella risoluzione di un problema o di un'anomalia.
Per cominciare subito Dati tecnici Dati tecnici ➤ Specifiche della stampante Principio di stampa seriale con testina di stampa a 24 aghi Larghezza di stampa Stampante più stretto: 80 caratteri 10 cpi Stampante più largo:136 caratteri 10 cpi Velocità di stampa (nel modo bidirezionale) DPQ 500 caratteri/secondo a 10 cpi CPQ 225 caratteri/secondo a 10 cpi NLQ 180 caratteri/secondo a 10 cpi LQ 90 caratteri/secondo a 10 cpi Produttività 430 pagine/ora; 7,2 pagine/min (ECMA) Densità caratteri 5 / 6 /
Accessori ➤ Specifiche della carta Per cominciare subito Carta a moduli continui per trascinamoduli 1 Semplice Modulistica (da provare singolarmente) Fogli singoli per alimentazione con guida Semplice Modulistica (da provare singolarmente) Modulistica Grammatura Numero di copie Spessore modulo (max.) 60–120 g/m2 1+5 0,60 mm Grammatura Numero di copie Spessore modulo (max.) 80–120 g/m2 1+5 0,60 mm Si possono utilizzare esclusivamente moduli con bordo incollato in testa.
Introducción rápida Contenido Contenido Instrucciones de Servicio INTRODUCCION RAPIDA Introducción Símbolos convencionales Instrucciones de seguridad importantes Utilizar la documentación en línea en el disco CD-ROM Qué incluye la documentación en línea en el disco CD-ROM Detección de errores 2 2 2 3 3 Vista de conjunto 4 Instalación Desembalar la impresora Colocar la impresora Comprobar la tensión de la impresora Conectar la impresora Encender la impresora 5 5 6 7 8 8 3 Panel de mando Modo Onli
Introducción Introducción rápida Introducción ! Ah ha! ➤ Símbolos convencionales STOP Las presentes instrucciones de servicio sirven como introducción rápida al uso de la impresora y para poner en condiciones de manejar el equipo incluso al usuario inexperimentado. Comprenden una descripción de las funciones esenciales de la impresora e incluyen las informaciones indispensables para el trabajo diario con el equipo.
Introducción rápida ➤ Utilizar la documentación en línea en el disco CD-ROM Introducción Empiece con la instalación del Adobe Acrobat Reader en el disco duro si no se ha instalado ya. Para instalar siga las instrucciones contenidas en el archivo README en el directorio READER. Para entrar en la documentación en línea, active el Windows Explorer y haga doble clic sobre el archivo START.PDF. Entonces siga el guía del usuario.
Vista de conjunto Introducción rápida Vista de conjunto Cubierta superior Apoyo de papel Tapa delantera Cartucho de cinta Cierres ll to en op pu Conexión de corriente eléctrica y fusible ll to en op pu Interruptor de la red Panel de mando Hoja de corte Tapa inferior Cubierta posterior Dispositivo de alimentación de hojas sueltas manual, cerrado Impresora en estado para papel continuo Cabeza de impresión Conexión de interface Impresora en estado para hojas sueltas ll to en op pu Tracto
Introducción rápida Instalación Instalación ➤ Desembalar la impresora Ponga la impresora embalada sobre una base estable. Asegúrese de que los símbolos de “Arriba” indican la dirección correcta. ➁ ➀ ➃ Abra el embalaje y quite el cartucho de cinta. Saque la impresora del cartón hacia delante y quite el resto del material de embalaje. Compruebe la impresora en cuanto a daño evidente de transporte y en cuanto a integridad.
Instalación Introducción rápida ➤ Colocar la impresora Coloque la impresora sobre una base estable, plano y antideslizante, de manera que no puede caigar al suelo. Hay que facilitar el acceso al panel de mando y los mecanismos de alimentación de papel, y hay que proveer espacio suficiente para el papel expulsado. Si el papel continuo se arrastra con frecuencia hacia delante y atrás, intente colocar la impresora según se muestra en la figura.
Introducción rápida Instalación ➤ Comprobar la tensión Asegúrese de que el equipo ha sido ajustado para la tensión correcta de la red (p. ej. 230 V en de la impresora Europa, 120 V en los EE.UU.). Véase el rótulo encima de la conexión de corriente eléctrica en la parte trasera de la impresora. Nunca encienda la impresora si su ajuste de tensión de la red está incorrecta porque puede causar daño grave. STOP Ud. mismo puede poner la impresora a la tensión de alimentación correcta.
Instalación Introducción rápida ➤ Conectar la impresora Asegúrese de que la impresora y el ordenador estén apagados y conecte el cable de datos entre la impresora y el ordenador. Conecte el cable de la red a la conexión de corriente eléctrica de la impresora según la figura. Conecte la clavija de la cable de la red a un enchufe. ➤ Encender la impresora El interruptor de la red, con el cual se enciende la impresora, se encuentra a la derecha abajo en el frente de la impresora.
Introducción rápida Panel de mando Panel de mando Se manda la operación mediante el panel de mando y los pulsadores correspondientes. La línea de arriba del visualizador indica si la impresora está en modo Online (en línea) u Offline (fuera de línea) y el origen de papel seleccionado (Tractor1 o Sueltas). ➤ Modo Online Online 1 2 Después de encender la impresora, se pone al modo Online automaticamente. Sólo en este modo puede recibir datos del ordenador.
Panel de mando Introducción rápida ➤ Modo Setup En este modo, se pueden ajustar los parámetros siguientes: Ajustar Aliment. Menú Char 1 2 3 4 Online Setup Pulsador Setup: Pone la impresora al modo Setup, en el cual pueden se leccionarse los ajustes siguientes: Pulsador Menú (1): Opciones adicionales. Pulsador Ajustar (2): Posición de corte, primera línea de impresión y distancia de cabeza. Pulsador Aliment. (3): Origen de papel. Pulsador Char (4): Fuente y número de caracteres por pulgada.
Introducción rápida Cambiar el cartucho de cinta Cambiar el cartucho de cinta Quite todo el papel de la impresora y asegúrese de que la impresora esté apagada antes de abrir la cubierta. Presione los dos cierres, levante la cubierta superior a un ángulo de 90 grados relativo al lado superior de la impresora y quite la cubierta. 90° Empuje el carro de la cabeza a la izquierda hasta el tope con cuidado (visto del frente de la impresora).
Cambiar el cartucho de cinta Introducción rápida Gire el botón tensor colorado a la derecha del cartucho de cinta nuevo en el sentido de la flecha para tensar la cinta. Incline la caseta un poco hacia delante de manera que esté paralela con el lado superior de la caja, e insierte la cinta delante de la cabeza de impresión. Insierte el cartucho con las espigas en los rieles-guía a la izquierda y la derecha de la impresora y presionar abajo con cuidado hasta que se engatilla.
Introducción rápida Manejo del papel Manejo del papel En este capítulo se describe cómo se selecciona el tipo de papel, se coloca papel continuo y hojas sueltas, se transporta papel y se arrastra papel a la posición de corte. ➤ Selección rápida del Puede cambiarse el tipo de papel o por un programa de aplicación o por selección rápida del origen de papel o mediante el menú Setup.
Manejo del papel ➤ Cargar papel Introducción rápida Su impresora puede procesar papel continuo así como hojas sueltas. Para más informaciones sobre los tamaños de papel admisibles, véase página 24 (Especificaciones del papel). Sólo utilice los tipos de papel adecuados para esta impresora. Para más informaciones, véase guía del usuario en el disco CD-ROM. Papel continuo en ll to pu op Asegúrese de que la impresora esté en modo de servicio para papel continuo.
Introducción rápida Manejo del papel Ajuste el tractor derecho para alinearlo a la anchura del papel utilizado y coloque el papel. Asegúrese de que esté posicionado igual como en el tractor izquierdo para evitar cualquier atasco de papel. Cierre la abrazadera de papel, empuje el tractor hacia la derecha para tensar ligeramente el papel.
Manejo del papel Introducción rápida Hojas sueltas Asegúrese de que la impresora esté en modo de servicio para hojas sueltas. Si fuese necesario, cambie el tipo de papel (véase página 13, Selección rápida del origen de papel). Presione sobre el punto de cierre en el centro de la tapa delantera. El dispositivo de alimentación de hojas sueltas se abre hacia abajo. en ll to pu op Instale el apoyo de papel de acuerdo con la anchura del papel.
Introducción rápida Manejo del papel ➤ Arrastre de papel Se puede avanzar el papel en la impresora de varias maneras. Offline Tractor1 Park LF/FF 1 2 3 4 Online Setup Asegúrese de que la impresora esté en estado Offline. Si fuese necesario, presione el pulsador Online Pulsador Park (1): Si se encuentra papel continuo en la impresora, se lo transporta a la posición de corte. Si se encuentra una hoja suelta en la impresora, se la expulsa.
Manejo del papel Introducción rápida ➤ Transportar el papel a Se transporta el papel continuo a la posición de corte con el pulsador Tirar. la posición de corte Online 1 2 Tractor1 Tirar 3 4 Online Asegúrese de que la impresora esté en modo Online. Presione el pulsador Tirar (4). La impresora posiciona la línea de perforación del papel continuo a la hoja de corte (véase abajo).
Introducción rápida Ajustes Ajustes En este capítulo se describe cómo se ajustan la posición de corte, la primera línea de impresión, la distancia de cabeza de impresión, como también la fuente y la densidad de caracteres. ➤ Ajustar la posición Si la posición de corte del papel no coincida con la hoja de corte de la impresora, se puede ajustarla. Si papel está cargado, hay que cortarlo y posicionarlo a la posición de aparcamiento. de corte Ajustar Aliment.
Ajustes Introducción rápida ➤ Ajustar la primera Con la función TOF se puede ajustar la posición de la primera línea de impresión separadamente para cada origen de papel y para cada menú. línea de impresión (TOF) Antes de iniciar la función TOF (y cuando se utiliza papel continuo) debería ajustar la posición de corte (descrito anteriormente). Ajustar Aliment.
Introducción rápida Ajustes ➤ Ajustar la distancia de La impresora está provista de una función de ajuste automático de la distancia de cabeza de cabeza de impresión impresión al espesor del papel utilizado (función AGA). En el modo Setup se puede introducir un valor de corrección para la distancia de cabeza determinada automaticamente. Por medio de esta corrección se modifica el aspecto de la escritura y la fuerza de percusión para papel en copias múltiples.
Ajustes Introducción rápida ➤ Seleccionar densidad Con el pulsador CPP se puede ajustar en el modo Setup el número de caracteres por pulgada y fuente para la impresión. Con el pulsador Font se puede seleccionar la fuente. Ajustar Aliment. Menú Char 1 2 Font 3 4 Presione el pulsador Setup, seguido del pulsador Char (4).
Introducción rápida Pagina di stato Pagina di stato Status Print 1 2 3 La pagina di stato contiene tutte le regolazioni selezionate del menu, il software di controllo installato ed i generatori di carattere. Online 4 Setup Verificare che la carta in bianco è inserita nella fonte di carta valida (regolazione di difetto: Trattor1). Tenere premuto il tasto 4 per ca. 5 secondi. Dopo che la compilazione dell'inizio lo stampatore tiri la carta nella posizione di stampa e comincia a stampare.
Introducción rápida Datos técnicos Datos técnicos Especificaciones de la impresora Tecnología de impresión En serie con cabeza de impresión de 24 agujas Anchura de impresión Impresora estrecha: 80 caratteri 10 cpi Impresora ancha: 136 caratteri 10 cpi Velocidad de impresión (en modo bidireccional) DPQ 500 cps en modo 10 cpp CPQ 225 cps en modo 10 cpp NLQ 180 cps en modo 10 cpp LQ 90 cps en modo 10 cpp Rendimiento de impresión 430 páginas/h; 7,2 páginas/min (ECMA) Densidad de caracteres 5 / 6 / 7
Accesorios ➤ Especificaciones del papel Introducción rápida Papel continuo tractor1 Papel simple Copias múltiples (requieren pruebas individuales) Peso de papel Copias Espesor de formulario (máx.) 60–120 g/m2 1+5 0,60 mm Alimentación hojas sueltas Hoja suelta Copias múltiples (requieren pruebas individuales) Peso de papel Copias Espesor de formulario 80–120 g/m2 1+5 0,60 mm Formularios en copias múltiples Sólo se pueden manejar formularios del tipo encolado por los cantos de cabeza.
“All rights reserved. Translations, reprinting or copying by any means of this manual complete or in part or in any different form requires our explicit approval. We reserve the right to make changes to this manual without notice. All care has been taken to ensure accuracy of information contained in this manual. However, we cannot accept responsibility for any errors or damages resulting from errors or inaccuracies of information herein.” ,, Alle Rechte vorbehalten.
TALLY REPRESENTATIVES GERMANY UNITED KINGDOM DASCOM Europe GmbH Heuweg 3 D-89079 Ulm Deutschland Tel.: +49 (0) 731 2075 0 Fax: +49 (0) 731 2075 100 www.dascom.com DASCOM GB Ltd ViewPoint, Basing View, Basingstoke, Hampshire RG21 4RG, England Phone: +44 (0) 1256 481481 Fax: +44 (0) 1256 481400 www.dascom.com RUSSIA and CIS DASCOM Europe GmbH Representation Moscow Leninsky Prospekt 95a, Office 322 119313 Moscow, Russian Federation Phone: +7 (495) 984 70 65 Fax: +7 (495) 984 56 42 www.dascom.