Quick Start Guide Kurzanleitung Guide de démarrage rapide Guida di avvio rapida Guía de instalación T2150S Cut device
Important Information This equipment generates and uses radio frequency energy and if not installed and used properly, that is, in accordance with the manufacturer's instructions, may cause interference in radio and television reception. It has been type tested and found to comply with the limits for class B computing devices in accordance with the specification in subpart J of part 15 of FCC rules, which are designed to provide reasonable protection against such interference in a residential installation.
Cutter-en.book Seite 1 Donnerstag, 3.
Cutter-en.book Seite 2 Donnerstag, 3.
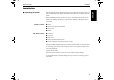
Cutter-en.book Seite 1 Donnerstag, 3. Mai 2007 9:42 09 Introduction Introduction This Quick start guide describes the cut device for fanfold paper for your printer.
Cutter-en.book Seite 2 Donnerstag, 3. Mai 2007 9:42 09 Introduction Quick start guide ` Important safety instructions Read the following instructions carefully before putting the printer into operation in order to protect yourself from injury and avoid damage to the device. ■ Keep this Quick start guide always readily accessible. ■ Avoid exposing the cut device to high temperature or direct sunlight. ■ Keep all liquids away from the cut device.
Cutter-en.book Seite 3 Donnerstag, 3. Mai 2007 9:42 09 Quick start guide Installation ` Unpacking the printer Place the shipping carton containing the printer on a table near the place where you want to install the printer. Make sure that the TOP indication or symbols point upwards. Before installing the printer and the cut device, check that all the items are contained in the package. Should any components be missing or damaged, contact your dealer.
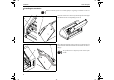
Cutter-en.book Seite 4 Donnerstag, 3. Mai 2007 9:42 09 Installation Quick start guide ` Installing the cut device Make sure that the printer is switched off before beginning to install the cut device. STOP Insert the cut device in such a way that the pin c on the right side slides into the corresponding recess d. c d e Move down the left side of the cut device, so that the pin e on the left side slides downwards into the slot f as far as it will go.
Cutter-en.book Seite 5 Donnerstag, 3. Mai 2007 9:42 09 Installation Subsequently move the cut device forward as far as it will go. ENGLISH Quick start guide Connect the connection cable to the corresponding connector of the printer.
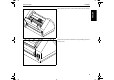
Cutter-en.book Seite 6 Donnerstag, 3. Mai 2007 9:42 09 Installation Quick start guide Insert the top cover supplied with the cut device at an angle of 90 degrees relative to the printer top side. Be sure to insert the two tabs on the cover into the recesses provided for this purpose on the printer. Fold down the top cover. 90° Place the rear cover at the rear of the printer as shown in the picture and push it downwards until it is fixed.
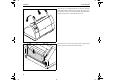
Cutter-en.book Seite 7 Donnerstag, 3. Mai 2007 9:42 09 Quick start guide The optional paper tray has to be attached on the rear cover. If you have already installed the cover, you must remove it before. Therefore push the rear cover upwards a little and remove it. Fasten the optional paper tray with the three screws and the three washers by means of the allen key. Use the two knurled screws to fasten the paper stopper in the desired position on the paper tray.
Cutter-en.book Seite 8 Donnerstag, 3. Mai 2007 9:42 09 Handling and settings Quick start guide Handling and settings ` Changing the paper type The printer is able to process either single sheets or fanfold paper. Only fanfold paper can be cutted. If the printer is set for single-sheet mode, you will need to change the paper type. This example shows how to select tractor 1 (the recommended paper source). You can select tractor 2 or tractor 3 in the same way.
Cutter-en.book Seite 9 Donnerstag, 3. Mai 2007 9:42 09 ` Loading paper Handling and settings Only use paper which is suitable for this printer. For more information und additional details, refer to the standard Quick start guide and/or the User guide on the Online CD-ROM. Raise the front cover. Open the left and right-hand tractor flaps. If necessary, you can remove the bottom cover in order to facilitate loading fanfold paper.
Cutter-en.book Seite 10 Donnerstag, 3. Mai 2007 9:42 09 Handling and settings Quick start guide Close the tractor flap. Open the coloured latching lever c and align the tractor in such a way that the first printing position matches the X mark on the printer housing. Then lock the lever. STOP Don’t remove the green clips d mounted besides the tractors, because otherwise a paper jam may occur. Align the right-hand tractor to the paper width. Insert the paper.
Cutter-en.book Seite 11 Donnerstag, 3. Mai 2007 9:42 09 Online 1 Handling and settings Tractor1 Load 2 3 4 Online Setup Switch on the printer. The active paper source (Tractor1) is displayed in the LCD. Paper is automatically fed when the printer is in Online status and receives data from the computer. Press the Load key to load paper before printing. This example shows how to load paper in tractor 1. Of course, you can also use tractor 2 or tractor 3 in the same way.
Cutter-en.book Seite 12 Donnerstag, 3. Mai 2007 9:42 09 Handling and settings Adjust Menu 1 2 Quick start guide Paperway Char 3 4 1 Cut 2 3 4 CutAdj= 00/72" * Set < > Exit 1 2 3 Online Setup Press the Cut key. TOF Head Press the Adjust key. 4 Online Setup Online Setup Set the desired cutting position by pressing the < or > key. You can select a value between -99/72" (cutting position up) and +98/72" (cutting position down); 1/72" is equivalent to approx. 0.35 mm.
Cutter-en.book Seite 13 Donnerstag, 3. Mai 2007 9:42 09 Handling and settings Synchronizing the cut position when using different paper ways If you use different paper ways it is possible that minor divergences of the adjusted cut position occur when switching between the paper ways. You can eliminate these divergences from the adjusted cut position by means of the parameter Sync.Lab in the test menu of the printer. In this case you have to use paper with a black label on the back.
Cutter-en.book Seite 14 Donnerstag, 3. Mai 2007 9:42 09 Handling and settings Quick start guide Sync.Label=Off * Set < > Exit 1 2 3 4 Press the < (2) or > (3) key to switch the parameter to On. Confirm the setting by pressing the Set (1) key. Online Setup If you use paper without the required label on the back after activating the parameter Sync.Label, an error message Load error appears in the display, printing is not possible.
Cutter-en.book Seite 15 Donnerstag, 3. Mai 2007 9:42 09 Quick start guide With the cut device installed, the AutoCut parameter appears in place of the AutoTear parameter in the menu. Parameter group Parameter AutoCut Description The Auto View, the Auto Cut, the Cut at TOF or the Cut on Formfeed functions can be optionally selected. ViewCut=Off* With ViewCut=Off selected, the paper is neither fed automatically to the View position nor cut.
Cutter-en.book Seite 16 Donnerstag, 3. Mai 2007 9:42 09 Additional programming sequence Quick start guide Additional programming sequence With the cut device installed, an escape sequence for cutting at the current line is available in addition to the programming sequences described in the optionally available Programming Manual. Data structure ASCII ESC ,,[ ,,{ hex 1B 5B n 7B dec. 27 91 n 123 Parameters For the ESC [ n { function, the following parameters are available for n: n hex.
Cutter-en.book Seite 17 Donnerstag, 3. Mai 2007 9:42 09 Quick start guide Specifications Specifications ENGLISH ` Cut device specifications Cutting width 254 mm max. Cutting accuracy 1 mm Parallelism of cutting <2 mm Cutting duration After positioning, 0,5 sec.
Cutter-en.book Seite 18 Donnerstag, 3. Mai 2007 9:42 09 Paper label Paper label Quick start guide Arrangement on the back of paper, left, topside Position Distance to top paper edge: at least 15 mm (0.59") Distance to left paper edge: 20 mm (0.
Laban-Schneider.book Seite 1 Donnerstag, 3.
Laban-Schneider.book Seite 2 Donnerstag, 3.
Laban-Schneider.book Seite 1 Donnerstag, 3. Mai 2007 9:57 09 Kurzanleitung Einleitung Einleitung Diese Kurzanleitung beschreibt die Schneideeinrichtung Ihres Druckers für Endlospapier.
Laban-Schneider.book Seite 2 Donnerstag, 3. Mai 2007 9:57 09 Einleitung Kurzanleitung ` Wichtige Sicherheitshinweise Lesen Sie die folgenden Hinweise genau durch, bevor Sie den Drucker in Betrieb nehmen. Dadurch schützen Sie sich und vermeiden Schäden an dem Gerät. ■ Bewahren Sie diese Kurzanleitung an einem jederzeit zugänglichen Ort auf. ■ Die Schneideeinrichtung weder hohen Temperaturen noch direktem Sonnen- licht aussetzen. ■ Keine Flüssigkeiten mit der Schneideeinrichtung in Berührung bringen.
Laban-Schneider.book Seite 3 Donnerstag, 3. Mai 2007 9:57 09 Kurzanleitung Installation Installation ` Drucker auspacken Den verpackten Drucker auf einen Tisch stellen, der sich in der Nähe des späteren Aufstellorts befindet. Darauf achten, daß die Symbole für ,,Oben“ in die richtige Richtung zeigen. Druckerkarton DEUTSCH Stellen Sie vor der Installation des Druckers und der Schneideeinrichtung sicher, dass alle benötigten Bestandteile in der Verpackung sind.
Laban-Schneider.book Seite 4 Donnerstag, 3. Mai 2007 9:57 09 Installation Kurzanleitung ` Schneideeinrichtung anbringen STOP Stellen Sie sicher, daß der Drucker ausgeschaltet ist, bevor Sie mit der Installation der Schneideeinrichtung beginnen. c Die Schneideeinrichtung von links oben aus so einsetzen, daß der Zapfen ➀ auf der rechten Seite in die dafür vorgesehene Öffnung ➁ gleitet.
Laban-Schneider.book Seite 5 Donnerstag, 3. Mai 2007 9:57 09 Installation Anschließend die Schneideeinrichtung vollständig nach vorn schwenken. DEUTSCH Kurzanleitung Das Anschlußkabel mit der dafür vorgesehenen Buchse am Drucker verbinden.
Laban-Schneider.book Seite 6 Donnerstag, 3. Mai 2007 9:57 09 Installation Kurzanleitung Die mit dem Schneidegerät gelieferte obere Abdeckung im Winkel von 90 Grad zur Druckeroberseite einsetzen. Darauf achten, daß die beiden Nasen an der Abdeckung in die dafür vorgesehenen Öffnungen am Drucker eingesetzt werden. Die Abdeckung nach unten klappen. 90° Die hintere Abdeckung wie im Bild gezeigt an der Druckerrückseite platzieren und nach unten schieben bis sie fixiert ist.
Laban-Schneider.book Seite 7 Donnerstag, 3. Mai 2007 9:57 09 Kurzanleitung Die optionale Papierablage wird an der hinteren Abdeckung befestigt. Wurde diese bereits installiert, muß sie zuvor abgenommen werden. Dazu die hintere Abdeckung etwas nach oben schieben und abnehmen. Die optionale Papierablage mit den drei Schrauben und den drei Unterlegscheiben mit Hilfe des Imbusschlüssels an der hinteren Abdeckung befestigen.
Laban-Schneider.book Seite 8 Donnerstag, 3. Mai 2007 9:57 09 Handhabung und Einstellungen Kurzanleitung Handhabung und Einstellungen ` Papierart wechseln Der Drucker kann entweder Einzelblätter oder Endlospapier verarbeiten. Wird die Schneideeinrichtung benutzt, kann nur Endlospapier verwendet werden. Ist der Drucker für Einzelblattbetrieb eingestellt, muß die Papierart gewechselt werden. Das folgende Beispiel beschreibt die Anwahl von Traktor 1 (dem empfohlenen Papierweg).
Laban-Schneider.book Seite 9 Donnerstag, 3. Mai 2007 9:57 09 ` Papier einlegen Handhabung und Einstellungen Bitte nur für diesen Drucker geeignetes Papier verwenden. Einzelheiten dazu und weitere Details zum Einlegen von Papier siehe die Standardkurzanleitung und/ oder das Benutzerhandbuch auf der Online-CD-ROM. Die vordere Abdeckung nach oben klappen. DEUTSCH Kurzanleitung Die rechte und linke Traktorklappe öffnen.
Laban-Schneider.book Seite 10 Donnerstag, 3. Mai 2007 9:57 09 Handhabung und Einstellungen Kurzanleitung Die Traktorklappe schließen. Den farbigen Verriegelungshebel c öffnen und den Traktor so ausrichten, da die erste Druckposition mit Markierung X auf dem Gehäuse bereinstimmt. Anschließend den Hebel wieder arretieren. STOP Entfernen Sie die neben den Traktoren angebrachten grünen Clips ➁ nicht, da sonst ein Papierstau auftreten kann. Den rechten Traktor auf Papierbreite ausrichten. Papier einlegen.
Laban-Schneider.book Seite 11 Donnerstag, 3. Mai 2007 9:57 09 Kurzanleitung 1 Traktor1 Load 3 2 4 Online Setup Den Drucker einschalten. Der aktive Einzugsschacht (Traktor1) erscheint in der Anzeige. Wenn der Drucker Online ist und Daten vom Computer erhält, wird das Papier automatisch eingezogen. Um Papier vor Druckbeginn einzuziehen, die Taste Load drücken. In diesem Beispiel wird gezeigt, wie Sie Papier in den Traktor 1 einlegen (dem empfohlenen Papierweg).
Laban-Schneider.book Seite 12 Donnerstag, 3. Mai 2007 9:57 09 Handhabung und Einstellungen Adjust Menü 1 2 Pap.Weg Char 3 Die Taste Adjust drücken. Online 4 Setup Die Taste Cut drücken. TOF Kopf 1 Cut 2 3 2 3 Online 4 CutAdj= 00/72" * Setze< > Exit 1 Kurzanleitung Setup Online 4 Setup Durch Drücken der Taste < oder > die gewünschte Abschneideposition einstellen.
Laban-Schneider.book Seite 13 Donnerstag, 3. Mai 2007 9:57 09 Kurzanleitung Handhabung und Einstellungen Wenn Sie unterschiedliche Papierwege verwenden ist es möglich, da beim Umschalten zwischen den Papierwegen geringfügige Abweichungen von der eingestellten Abschneideposition auftreten. Diese Abweichungen können mit Hilfe des Parameters Sync.Lab im Testmenü des Druckers beseitigt werden.
Laban-Schneider.book Seite 14 Donnerstag, 3. Mai 2007 9:57 09 Handhabung und Einstellungen Sync.Label=Aus * Setze < > Exit 1 2 3 4 Kurzanleitung Durch Drücken der Taste < (2) oder > (3) den Parameter auf Ein stellen. Die Eingabe durch Drücken der Taste Setze (1) bestätigen. Online Setup Wenn Sie nach der Aktivierung des Parameters Sync.Label Papier ohne die erforderliche Markierung auf der Rückseite verwenden, erscheint die Fehlermeldung Ladefehler im Display, es kann nicht gedruckt werden.
Laban-Schneider.book Seite 15 Donnerstag, 3. Mai 2007 9:57 09 Kurzanleitung Bei installierter Schneideeinrichtung erscheint in den Menüeinstellungen statt des Parameters AutoTear der Parameter AutoCut. Parametergruppe Parameter AutoCut Beschreibung Die Auto-Sicht-, die AutoCut-, die Cut at TOF- oder die Schneiden bei FF-Funktion können wahlweise eingestellt werden. SichtSchneid=Aus* Bei SichtSchneid=Aus wird das Papier weder automatisch auf die Sicht-Position gefahren noch geschnitten.
Laban-Schneider.book Seite 16 Donnerstag, 3. Mai 2007 9:57 09 Zusätzliche Programmiersequenz Kurzanleitung Zusätzliche Programmiersequenz Bei installierter Schneideeinrichtung steht – zusätzlich zu den Programmiersequenzen, die in Ihrem optional erhältlichen Programmierhandbuch beschrieben sind – eine weitere Sequenz zum Schneiden an der aktuellen Zeile zur Verfügung. Datenstruktur ASCII ESC ,,[ ,,{ hex 1B 5B n 7B dec.
Laban-Schneider.book Seite 17 Donnerstag, 3. Mai 2007 9:57 09 Kurzanleitung Technische Daten ` Spezifikation der Schneideeinrichtung Schnittbreite max. 254 mm Schnittgenauigkeit 1 mm Parallelität des Schnitts <2 mm Schnittdauer nach Positionierung ca. 0,5 sec.
Laban-Schneider.book Seite 18 Donnerstag, 3.
Cutter-fr.book Seite 1 Donnerstag, 3.
Cutter-fr.book Seite 2 Donnerstag, 3.
Cutter-fr.book Seite 1 Donnerstag, 3. Mai 2007 9:45 09 Guide de démarrage rapide Introduction Introduction Le présent manuel d’utilisation décrit le dispositif de coupe de votre imprimante à papier continu.
Cutter-fr.book Seite 2 Donnerstag, 3. Mai 2007 9:45 09 Introduction Guide de démarrage rapide ` Consignes de sécurité Lire avec soin les instructions suivantes avant de mettre l’imprimante en service pour éviter les blessures et de des endommagements éventuels de l’imprimante. ■ Veiller à ce que le présent Manuel d’utilisation soit toujours bien accessible. ■ Ne pas exposer le dispositif de coupe ni aux hautes températures, ni aux rayons directs du soleil.
Cutter-fr.book Seite 3 Donnerstag, 3. Mai 2007 9:45 09 Guide de démarrage rapide Installation Installation ` Déballage de l’imprimante Poser l’imprimante emballée sur une table se trouvant à proximité du lieu d’installation. Veiller à ce que les symboles “Haut” se trouvent dans le bon sens. Avant l'installation de l'imprimante et du dispositif de coupe, s'assurer que tous les composants nécessaires sont dans l'emballage. En cas d’endommagements ou d’accessoires manquants, en informer le vendeur.
Cutter-fr.book Seite 4 Donnerstag, 3. Mai 2007 9:45 09 Installation Guide de démarrage rapide ` Mise en place du dispositif de coupe STOP S’assurer que l’imprimante est hors tension avant de commencer avec l’installation du dispositif de coupe. c Mettre le dispositif de coupe en place, depuis le haut à gauche, de manière à ce que le tenon c glisse sur le côté droit dans l'orifice prévu d à cet effet.
Cutter-fr.book Seite 5 Donnerstag, 3. Mai 2007 9:45 09 Installation Ensuite, faire pivoter le dispositif de coupe entièrement vers l'avant. Relier le câble de raccordement à la prise d’imprimante prévue à cet effet.
Cutter-fr.book Seite 6 Donnerstag, 3. Mai 2007 9:45 09 Installation Guide de démarrage rapide Placer le capot supérieur à l’endroit à un angle de 90 degrés par rapport à la partie supérieure de l’imprimante. S’assurer que les deux ergots du capot supérieur entre dans les orifices prévus à cet effet sur l’imprimante. Rabattre le capot supérieur vers le bas. 90° Placer le recouvrement arrière, comme indiqué dans l'illustration, au dos de l'imprimante, et le pousser vers le bas jusqu'à ce qu'il soit fixé.
Cutter-fr.book Seite 7 Donnerstag, 3. Mai 2007 9:45 09 ` Bac récepteur de papier en option Installation Le bac récepteur de papier en option est fixé sur le recouvrement arrière. Si celuici a déjà été installé, il faut d'abord le retirer. Pour cela, pousser légèrement le recouvrement arrière vers le haut et le retirer. Fixer le bac récepteur de papier en option sur le recouvrement arrière, avec les trois vis et les trois rondelles, à l'aide de la clé pour vis à six pans creux.
Cutter-fr.book Seite 8 Donnerstag, 3. Mai 2007 9:45 09 Manipulation et réglages Guide de démarrage rapide Manipulation et réglages ` Changement de type de papier L’imprimante peut traiter soit les feuilles individuelles, soit le papier en continu. Si le dispositif de coupe est utilisé, seul du papier en continu peut être utiliseé. Si l’imprimante est réglée en mode feuille à feuille, le type de papier doit être modifié. L’exemple suivant montre la sélection de l’entraîneur 1.
Cutter-fr.book Seite 9 Donnerstag, 3. Mai 2007 9:45 09 Guide de démarrage rapide N’utiliser que du papier approprié pour cette imprimante. Pour plus de détails et informations sur l’insertion du papier, voir le guide de démarrage rapide standard et/ou le guide d’utilisation sur le CD-ROM-Online. Rabattre le capot avant vers le haut. FRANÇAIS ` Insertion du papier Manipulation et réglages Ouvrir les volets d’entraîneur de droite et de gauche.
Cutter-fr.book Seite 10 Donnerstag, 3. Mai 2007 9:45 09 Manipulation et réglages Guide de démarrage rapide Fermer le volet d’entraîneur. Maintenir enfoncé le levier de couleur posé sur ressort c pour déverrouiller l’entraîneur. Procéder au réglage de façon à ce que la première position d’impres sion corresponde au repère X sur le boîtier. Relâcher le levier pour verrouiller l’entraîneur.
Cutter-fr.book Seite 11 Donnerstag, 3. Mai 2007 9:45 09 Guide de démarrage rapide Online 1 Trac1 Load 3 2 4 Manipulation et réglages Online Setup Mettre l’imprimante sous tension. Le bac d’alimentation (entraîneur 1) actif apparaît sur l’écran. Quand l’imprimante est Online et reçoit des données de l’ordinateur, le papier est automatiquement inséré. Pour insérer le papier avant le début de l’impression, appuyer sur la touche Load.
Cutter-fr.book Seite 12 Donnerstag, 3. Mai 2007 9:45 09 Manipulation et réglages Ajuster Chem-Pap Menu Char 1 2 3 4 Guide de démarrage rapide Appuyer sur la touche Ajuster. Online Setup Appuyer sur la touche Cut. TOF Tête 1 Cut 2 3 4 Ajust.C= 00/72"* Valid < > Quit 1 2 3 4 Online Setup Online Setup L’appui sur la touche < ou > permet de régler la position de coupe souhaitée.
Cutter-fr.book Seite 13 Donnerstag, 3. Mai 2007 9:45 09 Guide de démarrage rapide Manipulation et réglages Synchroniser la position de coupe lorsque vous changez de chemin de papier Si vous utilisez différents chemins de papier, il peut y avoir de petites divergences par rapport à la position de coupe réglée lorsque vous commutez entre les chemins de papier. Ces divergences peuvent être éliminées à l’aide du paramètre Sync.Lab dans le menu de test de l’imprimante.
Cutter-fr.book Seite 14 Donnerstag, 3. Mai 2007 9:45 09 Manipulation et réglages Sync.Label=Non * Valid< > Quit 1 2 3 4 Guide de démarrage rapide Régler le paramètre sur Oui en appuyant sur la touche < (2) ou > (3). Valider le réglage en appuyant sur la touche Valid (1). Online Setup Si, après avoir activé le paramètre Sync.Label, vous utilisez du papier sans marquage au verso, le message d’erreur Pas de papier apparaît à l’écran, il n’est pas possible d’imprimer.
Cutter-fr.book Seite 15 Donnerstag, 3. Mai 2007 9:45 09 Guide de démarrage rapide Quand le dispositif de coupe est installé, un paramètre AutoCut apparaît dans les options de menu au lieu du paramètre CoupeAut. Groupe de paramètres Paramètres AutoCut Description Il est possible de régler au choix les fonctions VUEAuto, AutoCut, Découpe sur TOF ou Découpe sur FF. VUECoupe=Non* Avec VUECoupe=Non le papier n’est ni amené en position View, ni coupé.
Cutter-fr.book Seite 16 Donnerstag, 3. Mai 2007 9:45 09 Séquence de programmation supplementaire Guide de démarrage rapide Séquence de programmation supplementaire Quand le dispositif de coupe est installé – en plus des séquences de programmation décrite dans le manuel de programmation disponible en option – une autre séquence de coupe à la ligne actuelle est disponible. Structure des données ASCII ESC ,,[ ,,{ hex 1B 5B n 7B dec.
Cutter-fr.book Seite 17 Donnerstag, 3. Mai 2007 9:45 09 Guide de démarrage rapide Caractéristiques techniques Caractéristiques techniques Largeur de coupe max. 254 mm Précision de coupe 1 mm Parallélisme de la coupe <2 mm Durée de coupe 0,5 sec.
Cutter-fr.book Seite 18 Donnerstag, 3.
Cutter-it.book Seite 1 Donnerstag, 3.
Cutter-it.book Seite 2 Donnerstag, 3.
Cutter-it.book Seite 1 Donnerstag, 3. Mai 2007 9:50 09 Guida di avvio rapida Introduzione Introduzione La presente Guida di avvio rapida descrive la taglierina della stampante a moduli continui.
Cutter-it.book Seite 2 Donnerstag, 3. Mai 2007 9:50 09 Introduzione Guida di avvio rapida ` Norme di sicurezza Prima di mettere in funzione la stampante, leggere attentamente le seguenti istruzioni per evitare lesioni personali e danni alla stampante. ■ Tenere sempre il presente manuale a portata di mano. ■ Evitare di esporre la taglierina ad alte temperature o alla luce diretta del sole. ■ Fare attenzione a non versare liquidi sulla taglierina. ■ Non esporre la taglierina a urti, colpi o vibrazioni.
Cutter-it.book Seite 3 Donnerstag, 3. Mai 2007 9:50 09 Guida di avvio rapida Installazione Installazione ` Estrazione della stampante dall’imballo Collocare la stampante ancora imballata sul piano di lavoro, in corrispondenza del luogo di installazione. Accertarsi che i simboli ”Alto” siano orientati correttamente. Prima di installare la stampante e il dispositivo di taglio, assicurarsi che nella confezione siano presenti tutti i pezzi necessari.
Cutter-it.book Seite 4 Donnerstag, 3. Mai 2007 9:50 09 Installazione Guida di avvio rapida ` Installazione della taglierina STOP Assicurarsi che la stampante sia spenta prima di cominciare a installare la taglierina. Inserire il dispositivo di taglio da sinistra in alto, affinché il perno c sul lato destro si inserisca nell’apposita apertura d. c d e Spostare verso il basso il dispositivo di taglio, affinché il perno e sul lato sinistro scorra verso il basso nel binario f fino alla battuta.
Cutter-it.book Seite 5 Donnerstag, 3. Mai 2007 9:50 09 Installazione Quindi, spostare il dispositivo di taglio completamente in avanti. Collegare il cavo con l’apposito connettore alla stampante.
Cutter-it.book Seite 6 Donnerstag, 3. Mai 2007 9:50 09 Installazione Guida di avvio rapida Installare la copertura superiore posizionandolo a 90° rispetto al lato superiore della stampante. A questo proposito, fare attenzione che le due sporgenze presenti su la copertura si inseriscano nelle apposite cavità presenti sulla stampante. Abbassare quindi la copertura superiore.
Cutter-it.book Seite 7 Donnerstag, 3. Mai 2007 9:50 09 ` Vassoio carta opzionale Installazione Il vassoio carta opzionale viene fissato alla copertura posteriore. Se questa è già installata, deve essere rimossa, spostandola leggermente verso l’alto. Fissare il vassoio carta opzionale alla copertura posteriore con le tre viti e le tre rondelle servendosi di una brugola. Fissare il dispositivo di arresto carta nella posizione desiderata con le due viti zigrinate sul vassoio.
Cutter-it.book Seite 8 Donnerstag, 3. Mai 2007 9:50 09 Manutenzione e impostazioni Guida di avvio rapida Manutenzione e impostazioni ` Cambio del tipo di carta La stampante può utilizzare sia fogli singoli sia moduli continui. Una volta installata la taglierina, si possono utilizzare esclusivamente i moduli continui. Se la stampante è impostata sul funzionamento a fogli singoli, è necessario modificare l’impostazione del tipo di carta.
Cutter-it.book Seite 9 Donnerstag, 3. Mai 2007 9:50 09 Guida di avvio rapida Si raccomanda di utilizzare un tipo di carta idoneo per la stampante. Per ulteriori dettagli relativamente all’inserimento della carta, fare riferimento alla guida di avvio rapida standard e/o al manuale dell’utente su CD ROM online. Sollevare il coperchio anteriore. Aprire i coperchietti destro e sinistro dei trascinamoduli.
Cutter-it.book Seite 10 Donnerstag, 3. Mai 2007 9:50 09 Manutenzione e impostazioni Guida di avvio rapida Chiudere i coperchietti dei trascinamoduli. Sganciare le levette colorate c e disporre il trascinamoduli in modo da allineare la posizione di inizio stampa con il segno X presente sul corpo della stampante. Riagganciare quindi le levette STOP Non rimuovere i fermi verdi d applicati accanto ai trattori, poiché altrimenti la carta può incepparsi.
Cutter-it.book Seite 11 Donnerstag, 3. Mai 2007 9:50 09 Guida di avvio rapida Online 1 Manutenzione e impostazioni Trat1 Load 3 2 4 Online Setup Accendere la stampante. Sul display viene visualizzato il percorso carta attivo (trascinamoduli 1). Se la stampante è Online e riceve dati dal computer, provvede automaticamente ad alimentare la carta. Per alimentare la carta prima di cominciare la stampa, premere il tasto Load.
Cutter-it.book Seite 12 Donnerstag, 3. Mai 2007 9:50 09 Manutenzione e impostazioni Regolaz Dir.Cart Menu Char 1 2 3 4 Guida di avvio rapida Premere il tasto Regolaz. Online Setup Premere il tasto Cut. TOF Test. 1 Cut 2 3 4 Reg TGL= 00/72"* OK < > Esci 1 2 3 4 Online Setup Online Setup Definire la posizione di taglio desiderata premendo i tasti < e > .
Cutter-it.book Seite 13 Donnerstag, 3. Mai 2007 9:50 09 Guida di avvio rapida In caso di impiego di diversi percorsi carta è possibile che durante la commutazione tra i percorsi carta si verifichino lievi spostamenti rispetto alla posizione di taglio regolata. Questo spostamenti possono essere eliminati con l’ausilio del parametro Sync.Lab nel menu testo della stampante. Per effettuare questo è necessario tuttavia l’impiego di carta provvista sul retro di una linea di marcatura nera (Label).
Cutter-it.book Seite 14 Donnerstag, 3. Mai 2007 9:50 09 Manutenzione e impostazioni Guida di avvio rapida Premendo il tasto < (2) o > (3) posizionare il parametro su Si. Confermare con il tasto OK (1). Se dopo l’attivazione del parametro Sync.Label viene impiegata carta priva della marcatura necessaria sul retro, appare sul display la segnalazione di guasto Errore caricamento e non è possibile stampare.
Cutter-it.book Seite 15 Donnerstag, 3. Mai 2007 9:50 09 Guida di avvio rapida Una volta installata la taglierina, nelle impostazioni a menu invece del parametro Auto QTO (strappo automatico) compare il parametro AutoCut (taglio automatico). Gruppo parametri Parametro AutoCut Descrizione Si possono utilizzare le impostazioni VistaCut (visualizzazione automatica), AutoCut (taglio automatico), Tagliare al TOF (taglio a inizio modulo) oppure Tagliare al FF (taglio a comando FormFeed).
Cutter-it.book Seite 16 Donnerstag, 3. Mai 2007 9:50 09 Sequenza di programmazione supplementare Guida di avvio rapida Sequenza di programmazione supplementare Una volta installata la taglierina, oltre alle sequenze di programmazione descritte nel Manuale di Programmazione (disponibile su richiesta) è disponibile un’ulteriore sequenza di taglio in corrispondenza della riga attuale. Struttura dati ASCII ESC ,,[ ,,{ hex 1B 5B n 7B dec.
Cutter-it.book Seite 17 Donnerstag, 3. Mai 2007 9:50 09 Guida di avvio rapida Dati tecnici Dati tecnici ` Specifiche della taglierina Larghezze di taglio max. 254 mm Precisione di taglio 1 mm Parallelismo del taglio <2 mm Durata taglio 0,5 sec.
Cutter-it.book Seite 18 Donnerstag, 3.
Cutter-sp.book Seite 1 Donnerstag, 3.
Cutter-sp.book Seite 2 Donnerstag, 3.
Cutter-sp.book Seite 1 Donnerstag, 3. Mai 2007 9:53 09 Guía de instalación Introducción Introducción La presente Guía de instalación describe el dispositivo de corte de su impresora para papel continuo.
Cutter-sp.book Seite 2 Donnerstag, 3. Mai 2007 9:53 09 Introducción Guía de instalación ` Instrucciones de seguridad importantes Lea las siguientes instrucciones con esmero antes de poner en servicio la impresora, para proteger a Ud. mismo y evitar daños en el equipo. ■ Guarde las presentes instrucciones en un lugar de fácil acceso. ■ Nunca exponer el dispositivo de corte a altas temperaturas o a la luz solar directa. ■ Nunca exponer el dispositivo de corte a líquidos.
Cutter-sp.book Seite 3 Donnerstag, 3. Mai 2007 9:53 09 Guía de instalación Instalación Instalación ` Desembalar la impresora Coloque la impresora embalada sobre una mesa cerca de su lugar de instalación. Asegúrese de que los símbolos para “Arriba” apunten a la dirección correcta. Antes de instalar la impresora y el dispositivo de corte, usted deberá dejar garantizado que las unidades de embalaje contengan todos los componentes necesarios.
Cutter-sp.book Seite 4 Donnerstag, 3. Mai 2007 9:53 09 Instalación Guía de instalación ` Instalar el dispositivo de corte STOP Antes de comenzar con la instalación del dispositivo de corte, asegúrese de que la impresora esté apagada. c Colocar el dispositivo de corte desde arriba por la izquierda de tal manera que la espiga c en la parte derecha entre de forma deslizante en la apertura d prevista para tal fin.
Cutter-sp.book Seite 5 Donnerstag, 3. Mai 2007 9:53 09 Instalación A continuación, girar el dispositivo de corte completamente hacia delante. Conecte el cable de conexión al enchufe previsto para esto en la impresora.
Cutter-sp.book Seite 6 Donnerstag, 3. Mai 2007 9:53 09 Instalación Guía de instalación Coloque la cubierta arriba con cara abajo a un ángulo de 90 grados relativo al lado superior de la impresora, asegurando que las dos protrusiones de la cubierta se inserten en las aberturas previstas para ello en la impresora. Girar la cubierta arriba hacia abajo.
Cutter-sp.book Seite 7 Donnerstag, 3. Mai 2007 9:53 09 ` Depósito opcional para el papel Instalación El depósito opcional para el papel es fijado en la cubierta de atrás. Si ésta ya ha sido instalada, deberá ser desmontada primero. Para este fin, empujar la cubierta de atrás un poco hacia arriba y quitarla. Fijar el depósito opcional para el papel mediante los tres tornillos y las tres arandelas en la cubierta de atrás sirviéndose de la llave Allen.
Cutter-sp.book Seite 8 Donnerstag, 3. Mai 2007 9:53 09 Manejo y ajustes Guía de instalación Manejo y ajustes ` Cambiar el tipo de papel La impresora puede imprimir hojas sueltas o papel continuo. Si se utiliza el dispositivo de corte, puede imprimirse sólo papel continuo. Si está configurada la impresora para la impresión de hojas sueltas, es necesario cambiar el tipo de papel. El siguiente ejemplo describe la selección del tractor 1 (el origen de papel recomendado).
Cutter-sp.book Seite 9 Donnerstag, 3. Mai 2007 9:53 09 Guía de instalación Sólo utilice papel apropiado para esta impresora. Para más informaciones y más detalles acerca de la carga del papel, véase Guía de instalación estandares y/o la Guía del Usuario en el disco CD-ROM en línea. Levante la tapa delantera. Abra las abrazaderas de papel derecha e izquierda. En caso de necesidad, puede quitarse la cubierta inferior para facilitar la carga de papel continuo.
Cutter-sp.book Seite 10 Donnerstag, 3. Mai 2007 9:53 09 Manejo y ajustes Guía de instalación Cierre la abrazadera de papel. Abra la palanca colorada de fijación c y alinee el tractor de manera que la primera posición de impresión coincida con la marca X sobre la caja. A continuación, cerrar la palanca. STOP No quite los clips verdes colocados al lado de los tractores d ya que en este caso se podrían producir atascos de papel. Alinee el tractor derecho a la anchura del papel.
Cutter-sp.book Seite 11 Donnerstag, 3. Mai 2007 9:53 09 Guía de instalación Online 1 Manejo y ajustes Trac1 Load 3 2 4 Online Setup Encienda la impresora. El origen de papel activo (Trac1) aparece en el visualizador. Si la impresora está en modo Online y recibe datos del ordenador, se introduce el papel automaticamente. Para introducir el papel antes del comienzo de la impresión, presione el pulsador Load. En este ejemplo se describe la colocación de papel en el tractor 1.
Cutter-sp.book Seite 12 Donnerstag, 3. Mai 2007 9:53 09 Manejo y ajustes Guía de instalación Ajustar Papelway Menue Char 1 2 3 4 Presione el pulsador Ajustar. Online Setup Presione el pulsador Cut. TOF Ajust 1 Cut 2 3 4 CutAdj= 00/72" * Set < > Salir 1 2 3 4 Online Setup Online Setup Utilice los pulsadores < o > para ajustar la posición de corte deseada.
Cutter-sp.book Seite 13 Donnerstag, 3. Mai 2007 9:53 09 Guía de instalación Si se utilizan varios orígenes de papel, es posible que ocurran desviaciones menores de la posición de corte ajustada al cambiar el origen de papel. Pueden eliminarse estas desviaciones por medio del parámetro Sync.Lab en el menú Test de la impresora. Sin embargo, para ello se necesita papel provisto de una barra marcadora negra (label) al dorso.
Cutter-sp.book Seite 14 Donnerstag, 3. Mai 2007 9:53 09 Manejo y ajustes Guía de instalación Pulsar la tecla < (2) ó > (3) para poner el parámetro a la posición Enc.. Confirme la entrada presionando el pulsador Set (1). Si se utiliza un tipo de papel que no lleva la marca necesaria en el dorso tras activar el parámetro Sync.Label, aparece el mensaje de fallo Error Papel mal en el visualizador, y se bloquea la impresión.
Cutter-sp.book Seite 15 Donnerstag, 3. Mai 2007 9:53 09 Guía de instalación Si el dispositivo de corte está instalado, aparece un nuevo parámetro AutoCut en vez del parámetro AutoTira en el menú. Grupo de parámetros Parámetro AutoCut Descripción Se puede seleccionar una de las funciones VerCorte auto, AutoCut, Cortar al TOF o Cortar al FF a elección. VerCorte=Apg* Con VerCorte=Apg ni se transporta el papel automaticamente a la posición View ni se lo corta.
Cutter-sp.book Seite 16 Donnerstag, 3. Mai 2007 9:53 09 Secuencia adicional de programación Guía de instalación Secuencia adicional de programación Cuando está instalado el dispositivo de corte, está disponible una secuencia adicional para cortar en la línea actual – para complementar las secuencias de programación descritas en el manual de programación opcional. Estructura de datos ASCII ESC ,,[ ,,{ hex 1B 5B n 7B dec.
Cutter-sp.book Seite 17 Donnerstag, 3. Mai 2007 9:53 09 Guía de instalación Datos técnicos Datos técnicos ` Especificaciones del dispositivo de corte Anchura de corte máx. 254 mm Precisión de corte 1 mm Paralelismo del corte <2 mm Duración de corte tras posicionamiento 0,5 sec.
Cutter-sp.book Seite 18 Donnerstag, 3.
“All rights reserved. Translations, reprinting or copying by any means of this manual complete or in part or in any different form requires our explicit approval. We reserve the right to make changes to this manual without notice. All care has been taken to ensure accuracy of information contained in this manual. However, we cannot accept responsibility for any errors or damages resulting from errors or inaccuracies of information herein.” „Alle Rechte vorbehalten.
DASCOM REPRESENTATIVES GERMANY DASCOM Europe GmbH Heuweg 3 D-89079 Ulm Deutschland Tel.: +49 (0) 731 2075 0 Fax: +49 (0) 731 2075 100 www.dascom.com UNITED KINGDOM DASCOM GB Ltd ViewPoint, Basing View, Basingstoke, Hampshire RG21 4RG, England Phone: +44 (0) 1256 481481 Fax: +44 (0) 1256 481400 www.dascom.com RUSSIA and CIS DASCOM Europe GmbH Representation Moscow Leninsky Prospekt 95a, Office 322 119313 Moscow, Russian Federation Phone: +7 (495) 984 70 65 Fax: +7 (495) 984 56 42 www.dascom.