U1-multi.fm Seite 1 Montag, 19.
U1-2-multi.fm Seite 2 Dienstag, 5. Dezember 2006 11:28 11 Important Information This equipment generates and uses radio frequency energy and if not installed and used properly, that is, in accordance with the manufacturer's instructions, may cause interference in radio and television reception.
QSG2280+2380_Cutdevice_en.fm Seite 1 Donnerstag, 20. März 2008 3:22 15 Quick start guide Table of contents Introduction . . . . . . . . . . . . . . . . . . . . . . . . . . . . . . . 2 Paper types . . . . . . . . . . . . . . . . . . . . . . . . . . . . . . . . 3 Safety notes. . . . . . . . . . . . . . . . . . . . . . . . . . . . . . . . 3 Accessories . . . . . . . . . . . . . . . . . . . . . . . . . . . . . . . . 4 Installation . . . . . . . . . . . . . . . . . . . . . . . . . . . . . . . .
QSG2280+2380_Cutdevice_en.fm Seite 2 Donnerstag, 20. März 2008 3:45 15 Introduction Introduction Quick start guide This Operator’s Manual describes how to use the cut device for fanfold forms. This manual covers only the modifications or extensions as required in addition to the standard Quick Start Guide and the User Guide.
QSG2280+2380_Cutdevice_en.fm Seite 3 Donnerstag, 20. März 2008 3:22 15 Introduction ` Paper types Your printer can use both fanfold forms and single sheets. The specific paper type can be processed either via the standard paper sources (front tractor 1, optional rear tractor for the 2Tmodel, and manual sheet feeder slot) or via an optional tractor and an optional automatic single sheet feeder. However, if the cut device is installed, it is not possible to use the optional single sheet feeder.
QSG2280+2380_Cutdevice_en.fm Seite 4 Mittwoch, 13. April 2011 3:00 15 Introduction ` Accessories Quick start guide Your cut device also includes: a cover, 2 paper supports, 8 sleeves and a Safety and Documentation Note. Check that nothing has been damaged during transport and that no items are missing. Should anything be damaged or missing please contact your dealer.
QSG2280+2380_Cutdevice_en.fm Seite 5 Donnerstag, 20. März 2008 3:22 15 Quick start guide Installation ` Before beginning the installation procedure In order to use the automatic cut device in an optimum way with your printer, it is necessary to limit the left-hand printing position of the paper.
QSG2280+2380_Cutdevice_en.fm Seite 6 Donnerstag, 20. März 2008 3:22 15 Installation Quick start guide Tractor 2 (option) Mount two sleeves on the front tractor shaft and slide them completely to the left. 2 Sleeves Rear tractor (2T model) Mount one sleeve on the front tractor shaft and slide them completely to the left.
QSG2280+2380_Cutdevice_en.fm Seite 7 Donnerstag, 20. März 2008 3:22 15 Quick start guide The descriptions in the following sections require that your printer is already loaded with fan-fold forms.
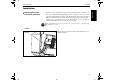
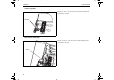
QSG2280+2380_Cutdevice_en.fm Seite 8 Donnerstag, 20. März 2008 3:22 15 Installation Quick start guide ` Installing the cut device When the fanfold paper is in the park position you can install the cut device. Proceed as follows: STOP Turn off the printer first! First remove the soundproofing cover* from your printer by tilting it at a 45 degree angle and then pulling up (A). A Then remove the front cover (B). To do this, raise the cover to an angle of 45 degrees.
QSG2280+2380_Cutdevice_en.fm Seite 9 Donnerstag, 20. März 2008 3:22 15 Installation Now place the cover supplied on the printer. This cover replaces the front cover previously removed and serves as a support for the feed mechanism. Position this cover at an angle of 45 degrees on top of the printer as shown in the figure. First place the recess on the left side of the cover in the mounting pin on the printer (n).
QSG2280+2380_Cutdevice_en.fm Seite 10 Donnerstag, 20. März 2008 3:22 15 Installation Quick start guide Flip the cover up in order to be able to easily install the cut device. Hold the cut device vertically and turn the hinges at the side of the device down to a horizontal position. STOP 10 Do not damage the foil (n).
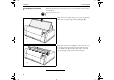
QSG2280+2380_Cutdevice_en.fm Seite 11 Donnerstag, 20. März 2008 3:22 15 Installation Now stand in front of the printer and insert the device into your printer from the top as shown in the diagram. At the same time press in the safety latches (n) on the right and left. Make sure that the two guides at the sides of the cut device fit smoothly into the two guide tracks on the inside of the printer (the diagram shows the right guide track o). Push down the cut device and let go of the latches.
QSG2280+2380_Cutdevice_en.fm Seite 12 Donnerstag, 20. März 2008 3:22 15 Installation Quick start guide Now turn the cut device all the way down. Place the two paper supports onto the track at the front of the device. From the side attach the supports one after another to the track. Adjust the supports in such a way that the paper is positioned perfectly. Individual sheets of e.g.
QSG2280+2380_Cutdevice_en.fm Seite 13 Donnerstag, 20. März 2008 3:22 15 Quick start guide Control panel operation It depends on the printer model, wether it supports the Single Sheet feature or not. The display alternates between 2 notices and indicates the saved and active sheet feeder (e.g.single sheet). The alternating display reminds you that paper can be loaded via this sheet feeder.
QSG2280+2380_Cutdevice_en.fm Seite 14 Donnerstag, 20. März 2008 3:22 15 Control panel operation Quick start guide An acoustic signal is produced in response and the set parameter is marked with an asterisk (*) in the display. The printer then switches back to the Setup menu. Press the Setup button again. Now the printer is in Offline Mode. Next transport the fanfold paper to the print position by pressing the Load (4) button.
QSG2280+2380_Cutdevice_en.fm Seite 15 Donnerstag, 20. März 2008 3:22 15 Quick start guide Control panel operation STOP The cut device will always cut the fanfold paper at the same set position. As a rule this position should be just below the perforation of the fanfold paper. Do not cut the paper above the perforation as the optimal paper flow may be adversely affected by the paper remaining above the perforation.
QSG2280+2380_Cutdevice_en.fm Seite 16 Donnerstag, 20. März 2008 3:22 15 Control panel operation Quick start guide Press the < (2) or > (3) buttons until the cutting position is just below the perforation (in our example we chose a negative value; this means that the cutting line is being repositioned to be higher). After completing the adjustment save your settings by pressing the Set (1) button.The printer now performs a form feed and cuts the paper at the position you have adjustet.
QSG2280+2380_Cutdevice_en.fm Seite 17 Donnerstag, 20. März 2008 3:22 15 Control panel operation ` Synchronizing the cut position when using different paper ways There are two different ways to synchronize the cut position: via the Sync.Label parameter or via the AED parameter. Which function is available depends on your printer model. Sync.Label parameter If you use different paper ways it is possible that minor divergences of the adjusted cut position occur when switching between the paper ways.
QSG2280+2380_Cutdevice_en.fm Seite 18 Donnerstag, 20. März 2008 3:22 15 Control panel operation Quick start guide Press the Next key (4) several times until the Sync.Lab parameter appears in the display. Press the Sync.Lab key (3) . Press the < (2) or > (3) key to switch the parameter to On. Confirm the setting by pressing the Set key (1). If you use paper without the required label on the back after activating the parameter Sync.
QSG2280+2380_Cutdevice_en.fm Seite 19 Donnerstag, 20. März 2008 3:22 15 Control panel operation AED parameter If you use different paper ways it is possible that minor divergences of the adjusted cut position occur when switching between the paper ways. You can eliminate these divergences from the adjusted cut position by means of the parameter AED in the advanced menu of the printer. This function is not available on some printer models.
QSG2280+2380_Cutdevice_en.fm Seite 20 Donnerstag, 20. März 2008 3:22 15 Control panel operation AED=Off Set < 1 2 Quick start guide Press the < (2) or > (3) key to switch the parameter to On. > Exit 3 4 Online Confirm the setting by pressing the Set key (1). Setup Unlike the Sync.Label function the AED parameter does not require special marked paper.
QSG2280+2380_Cutdevice_en.fm Seite 21 Donnerstag, 20. März 2008 3:22 15 Quick start guide Control panel operation A paper stacker is located at the front of the cut device for stacking cut fanfold paper. Remove cut fanfold paper from the paper stacker when required. Capacity: > 150 sheets.
QSG2280+2380_Cutdevice_en.fm Seite 22 Donnerstag, 20. März 2008 3:22 15 Additional menu parameters Quick start guide Additional menu parameters ` Setup menu ` Advanced menu After installation the cut device will be recognized automatically. Now an additional parameter is available within parameter group AutoCut (see also the corresponding chapter Menu Description Table in the User Guide).
QSG2280+2380_Cutdevice_en.fm Seite 23 Donnerstag, 20. März 2008 3:22 15 Quick start guide Additional programming sequence In addition to the MTPL programming sequences described in the optional Programming Manual (ID: 379 298), the sequence for cutting at the current line is available. Data structure ASCII hex. dec. ESC 1B 27 ,,[“ 5B 91 n n ,,{“ 7B 123 Parameters For the ESC [ n { sequence the following parameters are available for n: n hex. dec.
QSG2280+2380_Cutdevice_en.fm Seite 24 Donnerstag, 20. März 2008 3:22 15 Maintenance Maintenance Quick start guide Due to the paper-cutting, paper remnants may accumulate under the cutting device. Remove these cuttings at regular intervals. To do so, tilt the cutting device upwards and stroke the cuttings away from the cover underneath (see arrow).
QSG2280+2380_Cutdevice_en.fm Seite 25 Donnerstag, 20. März 2008 3:22 15 Quick start guide Technical data and paper specifications ` Cut device Cut width 400 mm (15.75") Cut height minimum form length 63.5 mm (2.5") Cut duration 1000 ms ± 10% Cutting accuracy 1 to 2 sheet-sets, ± 1 mm ≥ 3 sheet-sets, ± 2 mm (depending on the stiffness of the cross perforation) Cut device activation manually via the control panel, setting via the Setup Menu, via interface Service life appr.
QSG2280+2380_Cutdevice_en.fm Seite 26 Donnerstag, 20. März 2008 3:22 15 Technical data and paper specifications ` Paper label Quick start guide This only applies for printer models with Sync.Label function. Arrangement on the back of paper, left, topside Position Distance to top paper edge: at least 15 mm (0.59") Distance to left paper edge: 20 mm (0.79") Dimension Width: 80 mm (3.15") Height: 10 mm (0.
QSG2280+2380_de.fm Seite 1 Freitag, 21. März 2008 2:49 14 Kurzanleitung Inhaltsverzeichnis SCHNEIDEEINRICHTUNG Inhaltsverzeichnis Einleitung . . . . . . . . . . . . . . . . . . . . . . . . . . . . . . . . . 2 Papierarten . . . . . . . . . . . . . . . . . . . . . . . . . . . . . . . . 3 Sicherheitshinweise . . . . . . . . . . . . . . . . . . . . . . . . . . 3 Zubehör . . . . . . . . . . . . . . . . . . . . . . . . . . . . . . . . . . . 4 Installation . . . . . . . . . . . . . . . . . . . . . . . . . . .
QSG2280+2380_de.fm Seite 2 Freitag, 21. März 2008 2:49 14 Einleitung Einleitung Kurzanleitung Diese Bedienungsanleitung beschreibt die Handhabung der Schneideeinrichtung für Endlospapier. In diesem Handbuch werden nur Änderungen oder Erweiterungen zur Kurzanleitung und dem Benutzerhandbuch beschrieben.
QSG2280+2380_de.fm Seite 3 Freitag, 21. März 2008 2:49 14 Kurzanleitung Einleitung ` Papierarten Ihr Drucker ist für den Betrieb mit Endlos- und Einzelblattpapier ausgelegt. Die jeweilige Papierart kann entweder über die standardmäßigen Papierwege (Traktor 1 vorne, beim 2T-Modell zusätzlich der hintere Traktor, und manuelle Einzelblattzuführung) oder über einen optionalen Traktor und eine optionale automatische Einzelblattzuführung verarbeitet werden.
QSG2280+2380_de.fm Seite 4 Mittwoch, 13. April 2011 3:01 15 Einleitung ` Zubehör Kurzanleitung Mit der Schneideeinrichtung erhalten Sie zusätzlich eine Abdeckung, 2 Papierstützen, 8 Steckhülsen und ein Sicherheits- und Dokumentationshinweis. Überprüfen Sie den Verpackungsinhalt auf Transportschäden und Vollständigkeit. Sollte ein Teil beschädigt sein oder fehlen, benachrichtigen Sie bitte Ihren Händler.
QSG2280+2380_de.fm Seite 5 Freitag, 21. März 2008 2:49 14 Kurzanleitung Installation ` Bevor Sie mit der Installation beginnen Um die automatische Schneidevorrichtung optimal zusammen mit Ihrem Drucker betreiben zu können, ist es erforderlich, die linke Druckposition des Papieres zu begrenzen.
QSG2280+2380_de.fm Seite 6 Freitag, 21. März 2008 2:49 14 Installation Kurzanleitung Traktor 2 (Option) Zwei Steckhülsen auf die vordere Traktorachse stecken und ganz nach links schieben. 2 Steckhülsen Hinterer Traktor (2T-Modell) Eine Steckhülse auf die vordere Traktorachse stecken und ganz nach links schieben.
QSG2280+2380_de.fm Seite 7 Freitag, 21. März 2008 2:49 14 Kurzanleitung In den Abschnitten auf den folgenden Seiten wird davon ausgegangen, dass in Ihrem Drucker bereits Endlospapier eingelegt ist.
QSG2280+2380_de.fm Seite 8 Freitag, 21. März 2008 2:49 14 Installation Kurzanleitung ` Aufsetzen der Schneideeinrichtung Wenn sich das Endlospapier in Parkstellung befindet, können Sie die Schneideeinrichtung auf Ihren Drucker aufsetzen. Gehen Sie dazu wie folgt vor: STOP Schalten Sie zuerst den Drucker aus! Entfernen Sie an Ihrem Drucker zuerst das Schalldämmelement*, indem Sie es in einem 45-Grad-Winkel nach oben stellen und dann abheben (A). A Anschließend entfernen Sie die vordere Abdeckung (B).
QSG2280+2380_de.fm Seite 9 Freitag, 21. März 2008 2:49 14 Kurzanleitung Installation Führen Sie dann zuerst die Lochaussparung an der linken Seite der Abdeckung in den Halterungszapfen am Drucker (n). Danach können Sie die Halterung auch an ihrer rechten Seite (o) in den Zapfen am Drucker eindrücken und anschließend nach unten klappen. Klappen Sie die hintere Abdeckung senkrecht nach oben (n) und nehmen Sie sie nach oben ab (o).
QSG2280+2380_de.fm Seite 10 Freitag, 21. März 2008 2:49 14 Installation Kurzanleitung Klappen Sie die Abdeckung nach oben, um die Schneideeinrichtung problemlos einsetzen zu können. Halten Sie die Schneideeinrichtung senkrecht und drehen Sie die Bügel an den Seiten der Vorrichtung nach unten in waagerechte Position. STOP 10 Beschädigen Sie die Folie (n) nicht.
QSG2280+2380_de.fm Seite 11 Freitag, 21. März 2008 2:49 14 Kurzanleitung Installation Drücken Sie dabei die Verriegelungen (n) rechts und links nach innen.Beachten Sie, dass die beiden Gleitschienen an den Seiten der Schneideeinrichtung exakt in die beiden seitlichen Führungen im Druckerinneren gesteckt werden (im Bildausschnitt ist die rechte Führung gezeigt o). Drücken Sie die Schneideeinrichtung nach unten und entlasten Sie die Verriegelungen. Die Schneideeinrichtung ist nun arretiert.
QSG2280+2380_de.fm Seite 12 Freitag, 21. März 2008 2:49 14 Installation Kurzanleitung Klappen Sie die Schneideeinrichtung nach unten, bis sie aufliegt. Setzen Sie die 2 Papierstützen auf die vordere Schiene der Vorrichtung auf. Stecken Sie die Stützen nacheinander fest von der Seite her auf die Schiene. Richten Sie die Stützen so aus, dass das Papier optimal aufliegen kann. Das Verhaken einzelner Blätter bei einer eventuell vorhandenen Krimpung (= Druckstanzungen am Blattrand), z.B.
QSG2280+2380_de.fm Seite 13 Freitag, 21. März 2008 2:49 14 Kurzanleitung Bedienfeld und Handhabung Bedienfeld und Handhabung Es hängt vom Druckermodell ab, ob es die Einzelblatt-Funktion unterstützt oder nicht.
QSG2280+2380_de.fm Seite 14 Freitag, 21. März 2008 2:49 14 Bedienfeld und Handhabung Kurzanleitung Als Rückmeldung wird ein akustisches Signal erzeugt und im Display erscheint hinter der neu gewählten Einstellung ein Stern. Der Drucker wechselt anschließend zurück in das Setup-Menü. Drücken Sie abschließend wieder die Funktionstaste Setup. Der Drucker befindet sich jetzt im Offline-Zustand. Transportieren Sie nun das Endlospapier durch Betätigen der Taste Load (4) in Druckposition.
QSG2280+2380_de.fm Seite 15 Freitag, 21. März 2008 2:49 14 Kurzanleitung Bedienfeld und Handhabung ` Justieren der Abschneideposition Die Schneideeinrichtung wird das Endlospapier immer an einer von Ihnen einmalig festgelegten Position abschneiden. In der Regel sollte diese Position knapp unterhalb der Perforation der Endlospapierbahn liegen. Vermeiden Sie das Schneiden oberhalb der Perforation, da durch Papierüberstände an der Perforation der optimale Papierfluß beeinträchtigt werden kann.
QSG2280+2380_de.fm Seite 16 Freitag, 21. März 2008 2:49 14 Bedienfeld und Handhabung Kurzanleitung Betätigen Sie die Tasten < (2) oder > (3) solange, bis die Schneideposition knapp unterhalb der Perforation liegt (für unser Beispiel haben wir einen negativen Wert gewählt. Das entspricht einer Verlegung der Schnittkante nach oben). Nach erfolgter Justierung speichern Sie Ihre Einstellung durch Drücken der Taste Setze (1) ab.
QSG2280+2380_de.fm Seite 17 Freitag, 21. März 2008 2:49 14 Kurzanleitung Parameter Sync.Label Es gibt zwei verschiedene Arten, die Schneideposition zu synchronisieren: über den Parameter Sync.Label oder über den Parameter AED. Welche Funktion zur Verfügung steht, hängt von Ihrem Druckermodell ab. Wenn Sie unterschiedliche Papierwege verwenden ist es möglich, dass beim Umschalten zwischen den Papierwegen geringfügige Abweichungen von der eingestellten Abschneideposition auftreten.
QSG2280+2380_de.fm Seite 18 Freitag, 21. März 2008 2:49 14 Bedienfeld und Handhabung Kurzanleitung Drücken Sie die Taste Vor (4) so oft, bis die Anzeige Sync.Lab zeigt. Die Taste Sync.Lab (3) drücken. Durch Drücken der Taste < (2) oder > (3) den Parameter auf Ein stellen. Die Eingabe durch Drücken der Taste Setze (1) bestätigen. Wenn Sie nach der Aktivierung des Parameters Sync.
QSG2280+2380_de.fm Seite 19 Freitag, 21. März 2008 2:49 14 Kurzanleitung Bedienfeld und Handhabung Parameter AED Wenn Sie unterschiedliche Papierwege verwenden ist es möglich, dass beim Umschalten zwischen den Papierwegen geringfügige Abweichungen von der eingestellten Abschneideposition auftreten. Diese Abweichungen können mit Hilfe des Parameters AED im Erweiterten Menü des Druckers beseitigt werden. Nach dem Laden prüft ein Sensor das linke Transportloch des Papiers.
QSG2280+2380_de.fm Seite 20 Freitag, 21. März 2008 2:49 14 Bedienfeld und Handhabung AED=Aus Setze < 1 2 > * Exit 3 4 Kurzanleitung Durch Drücken der Taste < (2) oder > (3) den Parameter auf Ein stellen. Online Die Eingabe durch Drücken der Taste Setze (1) bestätigen. Setup Anders als bei der Sync.Label-Funktion erfordert der Parameter AED kein speziell markiertes Papier.
QSG2280+2380_de.fm Seite 21 Freitag, 21. März 2008 2:49 14 Kurzanleitung Bedienfeld und Handhabung ` Ablagefach DEUTSCH An der Vorderseite der Abschneideeinrichtung befindet sich eine Ablagemöglichkeit für abgetrenntes Endlospapier. Entnehmen Sie dem Ablagefach bei Bedarf das abgeschnittene Endlospapier. Kapazität: >150 Blatt).
QSG2280+2380_de.fm Seite 22 Freitag, 21. März 2008 2:49 14 Zusätzlicher Menüparameter Kurzanleitung Zusätzlicher Menüparameter ` Setup-Menü ` Erweitertes Menü Die Abschneideeinrichtung wird automatisch erkannt. Mit gesteckter Option erscheint im Setup-Menü ein zusätzlicher Parameter in der Parametergruppe Auto Cut (siehe hierzu das entsprechende Kapitel Menübeschreibungstabelle im Benutzerhandbuch).
QSG2280+2380_de.fm Seite 23 Freitag, 21. März 2008 2:49 14 Kurzanleitung Zusätzliche Programmiersequenz Zusätzliche Programmiersequenz Zusätzlich zu den in Ihrem optional erhältlichen Programmierhandbuch (ID-Nr. 379 298) beschriebenen MTPL-Programmiersequenzen ist die Sequenz zum Schneiden an der aktuellen Zeile verfügbar. Datenstruktur ESC 1B 27 ,,[“ 5B 91 n n ,,{“ 7B 123 DEUTSCH ASCII hex. dec. Parameter Bei der Funktion ESC [ n { stehen für n folgende Parameter zur Verfügung:: n hex. dec.
QSG2280+2380_de.fm Seite 24 Freitag, 21. März 2008 2:49 14 Wartung Wartung Kurzanleitung Durch das Schneiden des Papiers können sich Papierreste unterhalb der Schneideeinrichtung ablagern. Entfernen Sie diesen Schnittabfall in regelmäßigen Abständen. Klappen Sie hierzu die Schneideeinrichtung nach oben und streichen Sie die Schnittreste von der darunter liegenden Abdeckung (siehe Pfeil).
QSG2280+2380_de.fm Seite 25 Freitag, 21. März 2008 2:49 14 Kurzanleitung Technische Daten und Papierspezifikationen ` Schneideeinrichtung Schnittbreite 400 mm (15,75") Schnitthöhe minimale Formularlänge 63,5 mm (2,5") Schnittdauer 1000 ms ± 10% Schnittgenauigkeit 1- bis 2-lagig, ± 1 mm ≥ 3-lagig, ± 2 mm (abhängig von der der Steifigkeit der Querperforation) Aktivieren der Schneideeinrichtung manuell über Bedienfeld, Einstellung im Setup-Menü, über Schnittstelle Lebensdauer ca.
QSG2280+2380_de.fm Seite 26 Freitag, 21. März 2008 2:49 14 Technische Daten und Papierspezifikationen ` Papier-Markierung Kurzanleitung Dieser Abschnitt gilt ausschließlich für Druckermodelle, die über die Sync.LabelFunktion verfügen.
QSG2280+2380_fr.fm Seite 1 Mittwoch, 26. März 2008 5:14 17 Guide de démarrage rapide Table des matières Introduction . . . . . . . . . . . . . . . . . . . . . . . . . . . . . . . 2 Types de papier . . . . . . . . . . . . . . . . . . . . . . . . . . . . . 3 Conseils de sécurite . . . . . . . . . . . . . . . . . . . . . . . . . 3 Accessoires . . . . . . . . . . . . . . . . . . . . . . . . . . . . . . . . 4 Installation . . . . . . . . . . . . . . . . . . . . . . . . . . . . . . . . 5 Avant de commencer. .
QSG2280+2380_fr.fm Seite 2 Mittwoch, 26. März 2008 5:14 17 Introduction Introduction Guide de démarrage rapide Ce mode d’emploi décrit le maniement du couteau pour la coupe de papier en continu.
QSG2280+2380_fr.fm Seite 3 Mittwoch, 26. März 2008 5:14 17 Guide de démarrage rapide Introduction ` Types de papier Votre imprimante est équipée pour travailler avec du papier en continu et des feuilles simples. Le type de papier peut être traité soit avec les chemins de papier standard (tracteur 1 avant, tracteur arrière supplémentaire pour le modèle 2T, alimentation manuelle feuilles simples) soit avec un tracteur en option et une alimentation automatique feuilles simples en option.
QSG2280+2380_fr.fm Seite 4 Mittwoch, 13. April 2011 3:06 15 Introduction ` Accessoires Guide de démarrage rapide En plus du couteau, vous recevez un couvercle, 2 porte-papier, 8 manchons enfichables ainsi que les informations sur la sécurité et la documentation. Vérifiez que le contenu du carton soit complet et intact. Si quelque chose manquait ou était détérioré, avertissez votre vendeur.
QSG2280+2380_fr.fm Seite 5 Mittwoch, 26. März 2008 5:14 17 Guide de démarrage rapide Installation Installation ` Avant de commencer Afin d’assurer le fonctionnement optimal du coupe-papier automatique avec votre imprimante, il est nécessaire de limiter la position d’impression gauche du papier.
QSG2280+2380_fr.fm Seite 6 Mittwoch, 26. März 2008 5:14 17 Installation Guide de démarrage rapide Tracteur 2 (optionnel) Poser deux manchons enfichables sur l’axe AV du tracteur et les pousser jusqu’à la butée à gauche. 2 manchons enfichables Tracteur AR (modèle 2T) Poser un manchon enfichable sur l’axe AV du tracteur et le pousser jusqu’à la butée à gauche.
QSG2280+2380_fr.fm Seite 7 Mittwoch, 26. März 2008 5:14 17 Guide de démarrage rapide Dans nos explications suivantes, nous supposons que du papier en continu se trouve déjà dans l’imprimante. Dans le cas où il n’y aurait pas de papier en continu dans l’imprimante, veuillez l’introduire en procédant de la façon suivante: Pour le tracteur 1 et le tracteur 2 (option) comme décrit dans le Guide d’uti- lisateur au paragraphe Chargement du papier en continu.
QSG2280+2380_fr.fm Seite 8 Mittwoch, 26. März 2008 5:14 17 Installation Guide de démarrage rapide ` Pose du couteau Dès que le papier en continu se trouve en position d’attente, vous pouvez commencer à poser le couteau sur l’imprimante. Procédez de la façon suivante: STOP Débranchez tout d’abord l’imprimante! Retirez tout d’abord l’élément insonorisant* de votre imprimante en le positionnant sous un angle de 45 degrés vers le haut, puis en soulevant (A). A Retirez ensuite le capot avant (B).
QSG2280+2380_fr.fm Seite 9 Mittwoch, 26. März 2008 5:14 17 Guide de démarrage rapide Installation Installez maintenant sur l’imprimante le couvercle qui vous a été livré. Ce capot remplace le capot avant précédemment enlevé et sert de support au mécanisme d’entraîment. Positionnez ce capot sur l’imprimante sous un angle de 45 degrés vers le haut, comme indiqué sur le schéma. Relevez le capot arrière (n) à la verticale et retirez-le (o).
QSG2280+2380_fr.fm Seite 10 Mittwoch, 26. März 2008 5:14 17 Installation Guide de démarrage rapide Relevez le couvercle vers le haut afin de pouvoir positionner aisément le dispositif de coupe. Tenez le couteau droit et baissez les anses placées sur le côté de l’appareil en position horizontale. STOP 10 N’endommagez pas la plaque transparente (n).
QSG2280+2380_fr.fm Seite 11 Mittwoch, 26. März 2008 5:14 17 Guide de démarrage rapide Installation Placez-vous devant l’imprimante et posez l’appareil sur l’imprimante comme le montre le croquis. Appuyez sur les verrouillages (n) à droite et à gauche et enfoncez-les vers l’intérieur. Veillez à ce que les deux rails placés sur les côtés de l’appareil soient bien enfoncés dans les guides latéraux de l’imprimante (le guide droit est montré sur le croquis o).
QSG2280+2380_fr.fm Seite 12 Mittwoch, 26. März 2008 5:14 17 Installation Guide de démarrage rapide Faites basculer l’appareil vers le bas. Placez les deux porte-papier l’un après l’autre sur le rail avant de l’appareil, enfoncez-les en partant du côté. Ajustez les porte-papier de façon que le maintien du papier soit optimal.
QSG2280+2380_fr.fm Seite 13 Mittwoch, 26. März 2008 5:14 17 Guide de démarrage rapide Panneau de commande et maniement Panneau de commande et maniement Il est fonction du modèle d’imprimante selon que celui-ci supporte ou non la propriété «Feuille simple». L’affichage clignote entre deux messages et indique le dernier bac d’alimentation papier sélectionné et actif (par exemple “feuilles simples”).
QSG2280+2380_fr.fm Seite 14 Mittwoch, 26. März 2008 5:14 17 Panneau de commande et maniement Guide de démarrage rapide Un signal sonore retentit et à l’affichage un astérisque apparaît derrière le nouveau réglage choisi. L’imprimante retourne ensuite au menu Setup. Réappuyez alors sur la touche de fonction Setup. L’imprimante se trouve maintenant hors ligne (Offline). Il s’agit maintenant de transporter le papier en continu sur la position d’impression en appuyant sur la touche Load (4).
QSG2280+2380_fr.fm Seite 15 Mittwoch, 26. März 2008 5:14 17 Guide de démarrage rapide Panneau de commande et maniement Evitez que le découpage ait lieu au-dessous de la perforation, car le papier, en se redressant au niveau de celle-ci, peut être gêné pour avancer efficacement. Avant de fixer la position de découpage, le papier en continu doit être chargé et l’imprimante doit se trouver en Online.
QSG2280+2380_fr.fm Seite 16 Mittwoch, 26. März 2008 5:14 17 Panneau de commande et maniement Guide de démarrage rapide Pressez les touches < (2) ou > (3) jusqu’à ce que la position de découpage se situe juste sous la perforation (pour notre exemple nous avons choisi une valeur négative. Cela correspond à un déplacement vers le haut du bord de découpe). Dès que l’ajustage convient, mémorisez votre réglage par appui sur la touche Valid (1).
QSG2280+2380_fr.fm Seite 17 Mittwoch, 26. März 2008 5:14 17 Guide de démarrage rapide Si vous utilisez différents chemins de papier, il peut y avoir de petites divergences par rapport à la position de coupe réglée lorsque vous commutez entre les chemins de papier. Ces divergences peuvent être éliminées à l’aide du paramètre Sync.Lab dans le menu de test de l’imprimante. Pour cela, vous devez utiliser du papier avec une barre de marquage noire (Label) au verso.
QSG2280+2380_fr.fm Seite 18 Mittwoch, 26. März 2008 5:14 17 Panneau de commande et maniement Guide de démarrage rapide Appuyez répétitivement sur la touche Suite (4) jusqu’à ce que l’affichage indique Sync.Lab. Appuyez la touche Sync.Lab (3). Régler le paramètre sur Oui en appuyant sur la touche < (2) ou > (3). Valider le réglage en appuyant sur la touche Valid (1). Si, après avoir activé le paramètre Sync.
QSG2280+2380_fr.fm Seite 19 Mittwoch, 26. März 2008 5:14 17 Guide de démarrage rapide Panneau de commande et maniement Paramètre AED Si vous utilisez différents chemins de papier, il peut y avoir de petites divergences par rapport à la position de coupe réglée lorsque vous commutez entre les chemins de papier. Ces divergences peuvent être éliminées à l’aide du paramètre AED dans le menu de test de l’imprimante. Cette fonction n’est pas disponible sur certains modèles d’imprimante.
QSG2280+2380_fr.fm Seite 20 Mittwoch, 26. März 2008 5:14 17 Panneau de commande et maniement AED=Non Valid < 1 2 > * Quit 3 4 Guide de démarrage rapide Régler le paramètre sur Oui en appuyant sur la touche < (2) ou > (3). Online Valider le réglage en appuyant sur la touche Valid (1). Setup Contrairement à la fonction Sync.Label, le paramètre AED ne requiert pas de papier avec un marquage spécial.
QSG2280+2380_fr.fm Seite 21 Mittwoch, 26. März 2008 5:14 17 Guide de démarrage rapide Panneau de commande et maniement ` Bac de classement Videz régulièrement le ba de classement. Capacité: env. >150 feuilles. 21 Ç FRANÇAIS FRANÇAIS Un bac de classement pour le papier en continu coupé se trouve sur l’avant du dispositif de découpage.
QSG2280+2380_fr.fm Seite 22 Mittwoch, 26. März 2008 5:14 17 Paramètres de menu supplémentaires Guide de démarrage rapide Paramètres de menu supplémentaires ` Menu Setup ` Menu test/menu élargi Le dispositif de découpage est reconnu automatiquement. Quand l’option est enfichée, un paramètre supplémentaire apparaît dans le menu Setup sous le groupe CoupeAut (référez-vous au chapitre Tableau de description du menu dans le Guide d’utilisateur).
QSG2280+2380_fr.fm Seite 23 Mittwoch, 26. März 2008 5:14 17 Guide de démarrage rapide Séquence de programmation supplementaire Séquence de programmation supplementaire En plus des séquences de programmation MTPL décrites dans le manuel de programmation (ID: 379 298) disponible en option, vous disposez de la séquence de découpage à la ligne actuelle. Structure des données ASCII hex. dec. ESC 1B 27 ,,[“ 5B 91 n n ,,{“ 7B 123 Paramètres hexa. déc.
QSG2280+2380_fr.fm Seite 24 Mittwoch, 26. März 2008 5:14 17 Maintenance Maintenance Guide de démarrage rapide Lors de la coupe du papier, il est possible que des restes de papier se déposent en dessous du dispositif de coupe. Enlevez régulièrement ces déchets de coupe. Rabattez pour cela le dispositif de coupe vers le haut et supprimez les restes de coupe du revêtement placé sur le dessous (voir flèche).
QSG2280+2380_fr.fm Seite 25 Mittwoch, 26.
QSG2280+2380_fr.fm Seite 26 Donnerstag, 27. März 2008 1:13 13 Spécifications générales et spécifications du papier ` Marquage du papier Guide de démarrage rapide Ceci ne s’applique qu’aux modèles d’imprimante avec la fonction Sync.Label.
QSG2280+2380_it.fm Seite 1 Donnerstag, 27. März 2008 11:34 11 Guida di avvio rapida Indice Introduzione . . . . . . . . . . . . . . . . . . . . . . . . . . . . . . . 2 Tipi di carta . . . . . . . . . . . . . . . . . . . . . . . . . . . . . . . . 3 Avvertenze di sicurezza . . . . . . . . . . . . . . . . . . . . . . . 3 Accessori . . . . . . . . . . . . . . . . . . . . . . . . . . . . . . . . . . 4 Installazione . . . . . . . . . . . . . . . . . . . . . . . . . . . . . . . 5 Prima dell’installazione . . . .
QSG2280+2380_it.fm Seite 2 Donnerstag, 27. März 2008 11:34 11 Introduzione Introduzione Guida di avvio rapida Le presenti Istruzioni per l’operatore descrivono il maneggio della taglierina per il modulo continuo.
QSG2280+2380_it.fm Seite 3 Donnerstag, 27. März 2008 11:34 11 Guida di avvio rapida Introduzione ` Tipi di carta La stampante è predisposta per il funzionamento con moduli continui e fogli singoli. Il tipo di carta selezionato può essere gestito attraverso i percorsi carta standard (trascinamoduli 1 anteriore, trascinamoduli posteriore aggiuntivo per il modello 2T, e alimentazione fogli singoli manuale) oppure attraverso un trascinamoduli opzionale e una guida fogli singoli automatica opzionale.
QSG2280+2380_it.fm Seite 4 Mittwoch, 13. April 2011 3:09 15 Introduzione ` Accessori Guida di avvio rapida Assieme alla taglierina Vi sono stati consegnati: una copertura, 2 supporti carta, 8 spine ad innesto, nota per la sicurezza e documentazione. Verificate che tutto sia completo e che non ci siano danni dovuti al trasporto. Nel caso in cui dovesse mancare un pezzo o risultare danneggiato, Vi preghiamo di rivolgerVi al Vostro concessionario.
QSG2280+2380_it.fm Seite 5 Donnerstag, 27. März 2008 11:34 11 Guida di avvio rapida Installazione Installazione ` Prima dell’installazione Per poter azionare in modo ottimale il dispositivo di taglio automatico insieme alla Vostra stampante è necessario limitare la posizione sinistra di stampa della carta.
QSG2280+2380_it.fm Seite 6 Donnerstag, 27. März 2008 11:34 11 Installazione Guida di avvio rapida Trattore 2 (opzionale) Inserire 2 spine ad innesto sull’asse anteriore del trattore e spingere completamente verso sinistra. 2 spine ad innesto Trattore posteriore (modello 2T) Inserire una spina ad innesto sull’asse anteriore del trattore e spingere completamente verso sinistra.
QSG2280+2380_it.fm Seite 7 Donnerstag, 27. März 2008 11:34 11 Guida di avvio rapida Le spiegazioni dei capitoli delle pagine seguenti partono dal presupposto che nella Vostra stampante sia già stato caricato il modulo continuo.
QSG2280+2380_it.fm Seite 8 Donnerstag, 27. März 2008 11:34 11 Installazione Guida di avvio rapida ` Montaggio della taglierina STOP Se il modulo contino si trova nella posizione di parcheggio potete montare la taglierina sulla stampante. Dovete eseguire i seguenti passi: Prima dovete spegnere la stampante! Rimuovere dapprima la calotta insonorizzante* della stampante, e prima di prelevarlo spostarlo verso l’alto formando un angolo di 45° (A). A Rimuovere quindi il coperchio anteriore (B).
QSG2280+2380_it.fm Seite 9 Donnerstag, 27. März 2008 11:34 11 Guida di avvio rapida Installazione Mettete ora la copertura in dotazione nella stampante. Mettete ora la copertura in dotazione nella stampante, e serve da appoggio per il dispositivo convogliatore di tras porto. Agganciare il coperchio posizionandolo a 45° dall’alto, come mostrato nella figura. Introducete ora i denti di attacco della stampante (n) nelle apposite concavità della copertura.
QSG2280+2380_it.fm Seite 10 Donnerstag, 27. März 2008 11:34 11 Installazione Guida di avvio rapida Alzare il coperchio per montare la taglierina senza difficoltà. Tenete la taglierina nella posizione verticale e portate le staffe sul lato della taglierina verso il basso in posizione orizzontale. STOP 10 State attenti a non danneggiare il foglio (n).
QSG2280+2380_it.fm Seite 11 Donnerstag, 27. März 2008 11:34 11 Guida di avvio rapida Installazione MetteteVi davanti alla stampante e inserite la taglierina dall’alto nella stampante come dimostra la figura. Premete contemporaneamente all’interno gli arresti (n) a sinistra e destra. Tenete presente che le due guide di scorrimento sui lati della taglierina vanno inserite perfettamente nelle guide laterali all’interno della stampante (la figura riporta la guida destra o).
QSG2280+2380_it.fm Seite 12 Donnerstag, 27. März 2008 11:34 11 Installazione Guida di avvio rapida Appoggiate la taglierina ribaltandola verso il basso. Montate i due supporti sulla guida anteriore della taglierina inserendoli di lato, uno dopo l’altro, nella guida. Orientare i supporti in modo che sostengano la carta in maniera adeguata. Se lavorate con carta i cui bordi sono connessi a pressione, p.es.
QSG2280+2380_it.fm Seite 13 Donnerstag, 27. März 2008 11:34 11 Guida di avvio rapida Pannello operativo e maneggio Pannello operativo e maneggio La funzione Fogli singoli è supportata a seconda del modello della stampante. Il display indica alternativamente due immagini, fermandosi sulla cassetta di alimentazione carta ultimamente memorizzata ed attualmente attiva (ad es. fogli singoli).
QSG2280+2380_it.fm Seite 14 Donnerstag, 27. März 2008 11:34 11 Pannello operativo e maneggio Guida di avvio rapida La conferma da parte della macchina è un segnale acustico, accompagnato da un asterisco posto accanto al nuovo selezionamento indicato sul display. Dopodiche’ la stampante ritorna indietro sul menu di setup. Ripremete infine il tasto funzionale Setup. Ora la stampante si trova in stato Offline. Mediante il tasto Load (4) portate il modulo continuo in posizione di stampa.
QSG2280+2380_it.fm Seite 15 Donnerstag, 27. März 2008 11:34 11 Guida di avvio rapida Pannello operativo e maneggio STOP Una volta impostata, la taglierina taglierà il modulo continuo sempre alla posizione da Voi desiderata. Generalmente questa posizione dovrebbe venir fissata appena al di sotto della perforazione del modulo continuo. Evitate il taglio al disopra della perforazione, poiché in tal caso si intralcerà il flusso ottimale dei fogli dovuto ai residui di carta eventualmente risultanti.
QSG2280+2380_it.fm Seite 16 Donnerstag, 27. März 2008 11:34 11 Pannello operativo e maneggio Guida di avvio rapida Azionate ripetutamente il tasto < (2) oppure > (3) fino a che il punto di taglio si troverà appena un po’ al disotto della perforazione (nel nostro esempio abbiamo scelto un valore negativo. Ciò corrisponde ad uno sposta mento verso l’alto del bordo di taglio). Dopo l’avvenuto aggiustamento, memorizzate la Vostra scelta azionando il tasto OK (1).
QSG2280+2380_it.fm Seite 17 Donnerstag, 27. März 2008 11:34 11 Guida di avvio rapida Parametro Sync.Label La posizione di taglio può essere sincronizzata con due sistemi: con il parametro Sync.Label o mediante il parametro AED. La funzione disponibile dipende dal modello della stampante. In caso di impiego di diversi percorsi carta è possibile che durante la commutazione tra i percorsi carta si verifichino lievi spostamenti rispetto alla posizione di taglio regolata.
QSG2280+2380_it.fm Seite 18 Donnerstag, 27. März 2008 11:34 11 Pannello operativo e maneggio Guida di avvio rapida Premere il tasto Su (4) fine a quando sul display non compaia Sync.Lab. Premere il tasto Sync.Lab (3). Premendo il tasto < (2) o > (3) posizionare il parametro su Si. Confermare con il tasto OK (1). Se dopo l’attivazione del parametro Sync.
QSG2280+2380_it.fm Seite 19 Donnerstag, 27. März 2008 11:34 11 Guida di avvio rapida Pannello operativo e maneggio Parametro AED In caso di impiego di diversi percorsi carta è possibile che durante la commutazione tra i percorsi carta si verifichino lievi spostamenti rispetto alla posizione di taglio regolata. Questo spostamenti possono essere eliminati con l’ausilio del parametro AED nel menu esteso della stampante. Questa funzione non è presente in determinati modelli di stampante.
QSG2280+2380_it.fm Seite 20 Donnerstag, 27. März 2008 11:34 11 Pannello operativo e maneggio AED=No OK < 1 2 > * Esci 3 4 Guida di avvio rapida Premendo il tasto < (2) o > (3) posizionare il parametro su Si. Online Confermare con il tasto OK (1). Setup Diversamente dalla funzione Sync.Label, la funzione del parametro AED non richiede carta appositamente contrassegnata.
QSG2280+2380_it.fm Seite 21 Donnerstag, 27. März 2008 11:34 11 Guida di avvio rapida Pannello operativo e maneggio ` Deposito vassoio Sul lato anteriore della taglierina si trova un vassoio per il modulo continuo tagliato. ITALIANO Vi consigliamo di togliere dal vassoio periodicamente il modulo continuo tagliato. Capacità: > 150 fogli.
QSG2280+2380_it.fm Seite 22 Donnerstag, 27. März 2008 11:34 11 Parametro menu supplementare Guida di avvio rapida Parametro menu supplementare ` Menu setup ` Menu esteso La taglierina viene riconoscuita automaticamente. Con opzione inserita nel menu setup appare un ulteriore parametro del gruppo parametri AutoQTO (vedi anche il capitolo Tabella descrizione menu del Manuale dell’utente).
QSG2280+2380_it.fm Seite 23 Donnerstag, 27. März 2008 11:34 11 Guida di avvio rapida Sequenza di programmazione supplementare Sequenza di programmazione supplementare Oltre alle sequenze di programmazione MTPL descritte nel manuale di programmazione (ID: 379 298) (optional) è disponibile la sequenza per il taglio alla riga attuale. Struttura dati ASCII hex. dec. ESC 1B 27 ,,[“ 5B 91 n n ,,{“ 7B 123 Parametri n hex. dec.
QSG2280+2380_it.fm Seite 24 Donnerstag, 27. März 2008 11:34 11 Manutenzione Manutenzione Guida di avvio rapida Tagliando la carta, sotto al dispositivo di taglio, vi si potrebbero accumulare dei residui ritagli di carta. Allontanate regolarmente questi residui eventualmente risultanti. Per fare ciò sollevate il dispositivo di taglio e prelevate i ritagli di carta dalla copertura sottostante (vedi freccia).
QSG2280+2380_it.fm Seite 25 Donnerstag, 27.
QSG2280+2380_it.fm Seite 26 Donnerstag, 27. März 2008 11:34 11 Dati tecnici e specificazioni carta ` Marcatura carta Guida di avvio rapida Si applica solo ai modelli di stampante con funzione Sync.Label.
QSG2280+2380_sp.fm Seite 1 Donnerstag, 27. März 2008 4:00 16 Guía de instalación Table del contenido Introducción . . . . . . . . . . . . . . . . . . . . . . . . . . . . . . . 2 Tipos de papel . . . . . . . . . . . . . . . . . . . . . . . . . . . . . . 3 Indicaciones de seguridad . . . . . . . . . . . . . . . . . . . . . 3 Accesorios . . . . . . . . . . . . . . . . . . . . . . . . . . . . . . . . . 4 Instalación . . . . . . . . . . . . . . . . . . . . . . . . . . . . . . . .
QSG2280+2380_sp.fm Seite 2 Donnerstag, 27. März 2008 4:00 16 Introducción Introducción Guía de instalación Esta instrucción para el uso describe el manejo del dispositivo cortador para papel impreso contínuo. El presente manual sólo describe las modificaciones o adiciones no contenidos en las instrucciones de servicio regulares y el manual de referencia.
QSG2280+2380_sp.fm Seite 3 Donnerstag, 27. März 2008 4:00 16 Guía de instalación Introducción ` Tipos de papel Su impresora está dimensionada para el servicio con papel impreso contínuo y hojas sueltas. El tipo de papel correspondiente puede procesarse a través de la alimentación estándar de papel (tractor 1 frontal, tractor trasero opcional para el modelo 2T, y alimentación manual de hojas sueltas) o a través de un tractor opcional y un alimentador automático opcional de hojas sueltas.
QSG2280+2380_sp.fm Seite 4 Mittwoch, 13. April 2011 3:10 15 Introducción ` Accesorios Guía de instalación Adicionalmente con el dispositivo cortador recibe: una cubierta, 2 apoyos de papel, 8 manguitos, nota de seguridad y documentación. Controle el contenido del embalaje por eventuales daños de transporte y totalidad. Si una parte estuviese dañada o faltara, por favor, comuníqueselo a su distribuidor.
QSG2280+2380_sp.fm Seite 5 Donnerstag, 27. März 2008 4:00 16 Guía de instalación Instalación Instalación ` Antes de que usted empiece con la instalación STOP Para el perfecto funcionamiento del dispositivo de corte automático con su impresora, precisa limitar la posición de impresión izquierda del papel.
QSG2280+2380_sp.fm Seite 6 Donnerstag, 27. März 2008 4:00 16 Instalación Guía de instalación Tractor 2 (opcional) Colocar dos manguitos en el eje tractor frontal y deslizarlos completamente hacia la izquierda. 2 manguitos Tractor trasero (modelo 2T) Colocar un manguito en el eje tractor frontal y deslizarlo completamente hacia la izquierda.
QSG2280+2380_sp.fm Seite 7 Donnerstag, 27. März 2008 4:00 16 Guía de instalación Las secciones en las páginas siguientes parten del supuesto de que en su impresora ya este puesto papel impreso contínuo.
QSG2280+2380_sp.fm Seite 8 Donnerstag, 27. März 2008 4:00 16 Instalación Guía de instalación ` Poner del dispositivo cortador Cuando el papel impreso contínuo está en la posición park, puede poner el dispositivo corta dor encima de la impresora. Proceda de forma siguiente: STOP ¡En primer lugar, apage la impresora! Primero quite el elemento de reducción de ruido* de su impresora. Para ello, levantar hacia arriba hasta que forme un ángulo de 45 grados y luego retirar (A).
QSG2280+2380_sp.fm Seite 9 Donnerstag, 27. März 2008 4:00 16 Guía de instalación Instalación Seguidamente, introducir en la impresora la cubierta que se incluye con el suministro. Esta tapa reemplazará la tapa delantera quitada anteriormente y sirve como apoyo de la mecánica de avance. Posicione esta tapa en un ángulo de 45 grados desde arriba, como se muestra en la figura. Introducir primeramente la escotadura de la parte izquierda de la cubierta en la espiga de sujeción de la impresora (n).
QSG2280+2380_sp.fm Seite 10 Donnerstag, 27. März 2008 4:00 16 Instalación Guía de instalación Rebata hacia arriba la cubierta para permitir la fácil inserción del dispositivo cortador. Mantenga el dispositivo cortador vertical y gire los arcos al lado del dispositivo hacia abajo en la posición horizontal. STOP 10 No rompa la hoja (n).
QSG2280+2380_sp.fm Seite 11 Donnerstag, 27. März 2008 4:00 16 Guía de instalación Instalación Póngase delante de la impresora e insierte el dispositivo de arriba dentro de la impresora, como muestra el dibujo. Empuje los enganches (n) a la derecha e izquierda hacia dentro. Fíjese que las dos guias de deslizamiento en los lados del dispositivo esten puestas exactamente en las dos guias laterales en el interior de la impresora (en el recorte de la imagen se muestra el lado derecho o).
QSG2280+2380_sp.fm Seite 12 Donnerstag, 27. März 2008 4:00 16 Instalación Guía de instalación Abata el dispositivo cortado hasta que apoye. Ponga los dos apoyos de papel encima del carril delantero del dispositivo. Calze de firme los apoyos uno despues del otro por el lado encima del carril. Alinee los apoyos de manera que se puede posicionar el papel de forma óptima. La posibilidad que se enganchen por ejemplo juegos de formularios se puede evitar reduciendo la distancia entre los apoyos de papel.
QSG2280+2380_sp.fm Seite 13 Donnerstag, 27. März 2008 4:00 16 Guía de instalación Panel de control y manejo Panel de control y manejo Depende de cada modelo de impresora si éste soporta la función hoja suelta, o no la soporta. El display alterna entre 2 indicaciones y advierte el cargador que se ha memorizado por último (p.ej. hojas sueltas).
QSG2280+2380_sp.fm Seite 14 Donnerstag, 27. März 2008 4:00 16 Panel de control y manejo Guía de instalación Seguirá una señal acústica y en el display aparecerá una estrella junto al nuevo ajuste. La impresora regresa constantemente al menú Setup. Finalmente, pulse de nuevo la tecla funcional Setup. Ahora, la impresora se encuentra en el modo de servicio Offline. Transporte ahora el papel impreso contínuo en la posición de impresión a través de la tecla Load (4).
QSG2280+2380_sp.fm Seite 15 Donnerstag, 27. März 2008 4:00 16 Guía de instalación Panel de control y manejo STOP El dispositivo cortador cortará el impreso contínuo siempre en la posición que ha definido una vez. Normalmente esta posición tendria que estar justamente debajo de la perforación de la tira del papel impreso contínuo. Evite cortar el papel por encima de la perforación ya que cualquier resto de papel sobre la misma influye de manera adversa sobre el avance del papel.
QSG2280+2380_sp.fm Seite 16 Donnerstag, 27. März 2008 4:00 16 Panel de control y manejo Guía de instalación Activar las teclas < (2) o > (3) hasta que la posición de corte se encuentre justo por debajo de la perforación (para nuestro ejemplo hemos seleccionado un valor negativo. Este valor corresponde al desplazamiento del filo cortante hacia arriba). Una vez se hayan realizado los ajustes, memorice los valores pulsando para ello la tecla Set (1).
QSG2280+2380_sp.fm Seite 17 Donnerstag, 27. März 2008 4:00 16 Guía de instalación Parámetro Sync.Lab Hay dos maneras diferentes de sincronizar la posición de corte: a través del parámetro Sync.Label, o a través del parámetro AED. Dependerá de su modelo de impresora cuál de las funciones esté disponible. Si se utilizan varios orígenes de papel, es posible que ocurran desviaciones menores de la posición de corte ajustada al cambiar el origen de papel.
QSG2280+2380_sp.fm Seite 18 Donnerstag, 27. März 2008 4:00 16 Panel de control y manejo Guía de instalación Presione el pulsador Mas (4) tantas veces hasta que aparece Sync.Lab. Presione el pulsador Sync.Lab (3). Pulsar la tecla < (2) ó > (3) para poner el parámetro a la posición Enc.. Confirme la entrada presionando el pulsador Set (1). Si se utiliza un tipo de papel que no lleva la marca necesaria en el dorso tras activar el parámetro Sync.
QSG2280+2380_sp.fm Seite 19 Donnerstag, 27. März 2008 4:00 16 Guía de instalación Si se utilizan varios orígenes de papel, es posible que ocurran desviaciones menores de la posición de corte ajustada al cambiar el origen de papel. Pueden eliminarse estas desviaciones por medio del parámetro AED en el Menú ampliado de la impresora. Esta función no es instalado en algunos modelos de impresora.
QSG2280+2380_sp.fm Seite 20 Donnerstag, 27. März 2008 4:00 16 Panel de control y manejo Guía de instalación Pulsar la tecla < (2) ó > (3) para poner el parámetro a la posición Enc.. Confirme la entrada presionando el pulsador Set (1). A diferencia de la función Sync.Label, el parámetro AED no requiere el uso de papel marcado especial.
QSG2280+2380_sp.fm Seite 21 Donnerstag, 27. März 2008 4:00 16 Guía de instalación Panel de control y manejo ` Depósito de recepción En la parte delantera del dispositivo cortador hay un de pósito de recepción para papel impreso contínuo cortado. ESPAÑOL Coja regularmente el papel impreso continuo cortado del depósito de recepción. Capacidad: >150 hojas.
QSG2280+2380_sp.fm Seite 22 Donnerstag, 27. März 2008 4:00 16 Parámetro adicional Guía de instalación Parámetro adicional ` Menú setup ` Menú ampliado El dispositivo cortador se reconoce automàticamente. Con la opción instalada, en el menú setup aparece un parámetro adicional en el grupo de parámetros Auto Cut (véase capitulo lista de descripición del menú en la Guía del usuario).
QSG2280+2380_sp.fm Seite 23 Donnerstag, 27. März 2008 4:00 16 Guía de instalación Secuencia adicional de programación Secuencia adicional de programación Adicionalmente a las secuencias de programación MTPL (Nº de pieza: 379 298), descritas en su manual de programación está disponible la secuencia para cortar en la línea actual. Estructura de datos ASCII hex. dec. ESC 1B 27 ,,[“ 5B 91 n n ,,{“ 7B 123 Parámetros En la función ESC [ n{ para n son disponibles los parámetros siguientes: n hex.
QSG2280+2380_sp.fm Seite 24 Donnerstag, 27. März 2008 4:00 16 Mantenimiento Mantenimiento Guía de instalación Al cortarse el papel pueden acumularse restos de papel en la parte inferior del dispositivo de corte. Elimine dichos desechos de papel en intervalos regulares. Gira para ello totalmente hacia arriba el dispositivo de corte y elimine los residuos de corte de la cubierta situada debajo (véase la flecha).
QSG2280+2380_sp.fm Seite 25 Donnerstag, 27. März 2008 4:00 16 Guía de instalación Datos técnicos y especificaciones del papel Datos técnicos y especificaciones del papel Ancho de corte 400 mm (15.
QSG2280+2380_sp.fm Seite 26 Donnerstag, 27. März 2008 4:00 16 Datos técnicos y especificaciones del papel ` Marca sobre el papel Guía de instalación Esto solamente hace referencia a modelos de impresora con la función Sync.Label.
U3-4-multi.fm Seite 1 Donnerstag, 20. März 2008 3:27 15 “All rights reserved. Translations, reprinting or copying by any means of this manual complete or in part or in any different form requires our explicit approval. We reserve the right to make changes to this manual without notice. All care has been taken to ensure accuracy of information contained in this manual. However, we cannot accept responsibility for any errors or damages resulting from errors or inaccuracies of information herein.
DASCOM REPRESENTATIVES GERMANY DASCOM Europe GmbH Heuweg 3 D-89079 Ulm Deutschland Tel.: +49 (0) 731 2075 0 Fax: +49 (0) 731 2075 100 www.dascom.com UNITED KINGDOM DASCOM GB Ltd ViewPoint, Basing View, Basingstoke, Hampshire RG21 4RG, England Phone: +44 (0) 1256 481481 Fax: +44 (0) 1256 481400 www.dascom.com RUSSIA and CIS DASCOM Europe GmbH Representation Moscow Leninsky Prospekt 95a, Office 322 119313 Moscow, Russian Federation Phone: +7 (495) 984 70 65 Fax: +7 (495) 984 56 42 www.dascom.