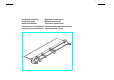
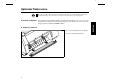
Installationsanleitung Installation guide Guide d’installation Instruzioni per l’installazione Instrucciones de instalación Optionaler Traktor vorne Optional tractor front Tracteur en option avant Trascinamoduli opzionale anteriore Tractor opcional frontal
Important Information This equipment generates and uses radio frequency energy and if not installed and used properly, that is, in accordance with the manufacturer’s instructions, may cause interference in radio and television reception. It has been type tested and found to comply with the limits for class B computing devices in accordance with the specification in subpart J of part 15 of FCC rules, which are designed to provide reasonable protection against such interference in a residential installation.
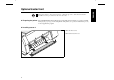
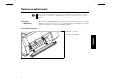
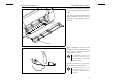
Your printer and its control panel may have a different appearance than shown in this manual. However, the procedures described are the same. ➤ Preparing the printer Select the Tractor2 parameter with the paper path quick selection feature (see operator’s manual, Changing the paper type), in the Setup menu of the printer (see operator’s manual Setup mode) or via an application program. ➤ Installing tractor 2 Raise the front cover. Remove the bottom cover.
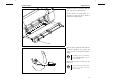
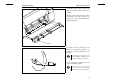
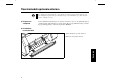
Installation guide Optional tractor Installation must be performed with the gear on the tractor on the right side. If your printer is a needle printer, it is necessary to remove the clip ➀, which is only used for ink-jet printers. ➀ Insert the tractor 2 with the rails on the left and right in parallel to the stop into the guides provided on the printer until they engage. Loading paper is described in chapter Loading paper (operaotor’s manual). Reinstall the bottom cover and close the front cover.
Optionaler Traktor vorne Das Aussehen Ihres Druckers und seines Bedienfelds kann von der Darstellung in dieser Bedienungsanleitung abweichen. Das beschriebene Vorgehen bleibt jedoch das gleiche. ➤ Drucker vorbereiten Über die Papierweg-Schnellumschaltung (siehe Bedienungsanleitung, Papierart wechseln), im ➤ Traktor 2 installieren Die vordere Abdeckung nach oben klappen. Die untere Abdeckung abnehmen.
Installationsanleitung Optionaler Traktor vorne Der Einbau muß so erfolgen, daß sich das Zahnrad am Traktor auf der rechten Seite befindet. Handelt es sich bei Ihrem Gerät um einen Nadeldrucker, müssen Sie den Clip ➀ entfernen, der nur bei Tintenstrahldruckern zum Einsatz kommt. ➀ Den Traktor 2 mit den Schienen auf der linken und rechten Seite parallel in die Führungen am Drucker einführen bis sie einrasten. Das Einlegen von Papier ist im Kapitel Papier einlegen (Bedienungsanleitung) beschrieben.
Tracteur en option avant Il se peut que votre imprimante et son panneau de commande ne correspondent pas à la description qui en est faite dans ce Manuel d’utilisation. La procédure décrite reste cependant la même. ➤ Préparer l’imprimante Sélectionnez le paramètre Tract 2 par la sélection rapide du chemin de papier (voir manuel d’utilisation, Changement du type de papier), via le menu Setup de l’imprimante (voir manuel d’utilisation, Mode Setup) ou par un programme d’application.
Guide d’installation Tracteur en option avant Montez le tracteur avec la roue dentée à droite. Si vous disposez d’une imprimante matricielle, vous devez enlevez le clip ➀ qui n’est utilisé que sur les imprimantes à jet d’encre. ➀ Insérez le tracteur 2 avec les rais à gauche et à droite parallèlement dans les guides de l’imprimante jusqu’à ce qu’ils s’enclenchent. Le chargement du papier est décrit dans le paragraphe Chargement du papier (manuel d’utilisation).
Trascinamoduli opzionale anteriore La configurazione della stampante e del pannello di controllo può presentare differenze rispetto alla figura riportata nelle presenti istruzioni per l’uso standard. Le procedure descritte restano comunque le stesse.
Instruzioni per l’installazione Trascinamoduli opzionale anteriore L’installazione va effettuata posizionando la ruota dentata del trascinamoduli sul lato destra. Se il Vostro apparecchio è una stampante ad aghi dovete rimuovere la clip ➀ che viene impiegata solo nelle stampanti a getto di inchiostro. ➀ Inserire parallelamente nelle guide sulla stampante il trascinamoduli 2 con le barre sul lato sinistro e destro fino a quando le stesse scattano in posizione.
Tractor opcional frontal El diseño de su impresora y su panel de mando puede ser diferente de lo que se muestra en las presentes instrucciones de servicio. Sin embargo, los procedimientos descritos serán los mismos.
Instrucciones de instalación Tractor opcional frontal La instalación debe efectuarse de manera que la rueda dentada del tractor se encuentra a la derecha. Si su impresora está una impresora matricial hay que quitar el clip ➀, el cual se utiliza solamente en impresoras a chorro de tinta. ➀ Insertar el tractor 2 en las guías de la impresora en paralelo con los rieles a la izquierda y a al derecha hasta que se enganchen. La carga del papel se describe en la sección Cargar papel (Instrucciones de servicio).
“All rights reserved. Translations, reprinting or copying by any means of this manual complete or in part or in any different form requires our explicit approval. We reserve the right to make changes to this manual without notice. All care has been taken to ensure accuracy of information contained in this manual. However, we cannot accept responsibility for any errors or damages resulting from errors or inaccuracies of information herein.” ,, Alle Rechte vorbehalten.
U3-4-multi.fm Seite 2 Dienstag, 15. September 2009 1:42 13 TALLY REPRESENTATIVES GERMANY UNITED KINGDOM DASCOM Europe GmbH Heuweg 3 D-89079 Ulm Deutschland Tel.: +49 (0) 731 2075 0 Fax: +49 (0) 731 2075 100 www.dascom.com DASCOM GB Ltd ViewPoint, Basing View, Basingstoke, Hampshire RG21 4RG, England Phone: +44 (0) 1256 481481 Fax: +44 (0) 1256 481400 www.dascom.