Quick Start Guide T2265+ T2280+ Matrix Printer
Umschlag-en.fm Seite 2 Montag, 1. November 2010 12:27 12 FCC Compliance Statement This equipment has been tested and found to comply with the limits for a Class B digital device, pursuant to part 15 of the FCC Rules. These limits are designed to provide reasonable protection against harmful interference in a residential installation.
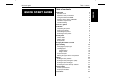
Quick start guide Table of contents QUICK START GUIDE Table of contents Introduction Symbols used Important safety instructions Using the Online-CD-ROM Contents of the Online CD-ROM Hardware requirements Troubleshooting 2 2 2 3 3 3 3 Printer at a glance 4 Installation Unpacking the printer Placing your printer Connecting the printer Switching on the printer 5 5 6 7 7 Control panel Online mode Offline mode Setup mode 8 8 8 8 Changing the ribbon cassette 9 Paper handling Changing the paper type L
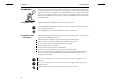
Introduction Quick start guide Introduction ! Ah ha! ➤ Symbols used STOP This quick start guide is intended as a quick introduction into working with the printer and also to enable inexperienced users to operate the device properly. It describes the most important functions of the printer and contains the essential information for your everyday work with the printer.
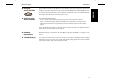
➤ Using the Online-CD-ROM Introduction First install the Adobe Acrobat Reader on your hard disk, unless the program has already been installed. To install it, follow the steps described in the README file in the READER directory. To start the online documentation, call the Explorer and double click on the START.PDF file. Then follow the instructions and menus on the screen.
Printer at a glance Quick start guide Printer at a glance View from the front Printer in tractor mode Soundproofing cover Control panel Top cover Front cover Power switch Tractors Bottom cover View from the rear Printer in single-sheet mode Paper support Rear cover Interface connectors Power cord connector 4 Single sheet feeder Paper guide
Quick start guide Installation ➤ Unpacking the printer ➃ Place your printer on a solid base. Make sure that the “Up” symbols point in the correct direction. Open the packaging, take out the accessory cassette and unpack it. Pull the printer out of the cardboard box towards you and remove the remaining packaging material. Check the printer for any visible transport damage and missing items.
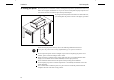
Installation Quick start guide ➤ Placing your printer Place the printer on a solid, flat, surface, ensuring that the printer is positioned in such a way that it can not topple, and that there is easy access to the control panel and paper input devices. Also ensure that there is sufficient space for the printed output. If you expect that frequent forward and reverse feeds will occur, you should place the printer as shown in the figure, if possible.
Quick start guide Installation Make sure that the printer is set to the correct voltage (e.g. 230 V in Europe, 120 V in the U.S.A.). To do this, check the plate above the power inlet at the rear of the printer. If the setting is incorrect, set the coloured switch at the rear of the printer to the correct position, using a pointed object (e.g. screwdriver, ball pen or tweezers). STOP Make sure that the printer is switched off before setting the correct voltage; otherwise severe damage may be caused.
Control panel Quick start guide Control panel The control panel and the keys are used for controlling the printer operation. The upper line of the display shows whether the printer is in Online or Offline mode and the paper path selected (Tractor1 or Single). ➤ Online mode Online 1 2 After switching on, the printer is automatically set to online mode. Only in this mode can it receive data from the computer.
Changing the ribbon cassette Changing the ribbon cassette Before opening the cover, make sure that the printer is switched on so that it can execute automatic preparations for ribbon changing (widening the print head gap). During the process of initialization after powering on, the printer checks if a ribbon cassette is installed. It also checks during the execution of a print job the operativeness of the ribbon cassette.
Changing the ribbon cassette Quick start guide Carefully slide the print head carriage to the left stop (viewed from the printer front). STOP The print head becomes hot during printing. For this reason, let it cool down before touching it. Move the coloured friction tab to the left (direction of the arrow) as shown in the figure and raise the friction mechanism.
Quick start guide Changing the ribbon cassette ENGLISH Remove the used cassette. Raise the coloured insertion tongue A.
Changing the ribbon cassette Quick start guide Remove the coloured protections A and B. Insert the coloured ribbon tension knob into the right-hand front location of the new ribbon cassette. Turn the knob in the direction of the arrow in order to take up slack of the ribbon. A B Slightly tilt the ribbon cassette forwards and thread in the ribbon between the coloured insertion tongue and the ribbon support (transparent plastic plate).
Changing the ribbon cassette Insert the coloured tension knob into one of the two locations. Turn the tension knob to take up slack in the ribbon until it is seated correctly at the bottom in the ribbon support. Press down the coloured insertion tongue A.
Changing the ribbon cassette Quick start guide Move the print head carriage backwards and forwards several times. If the ribbon is correctly seated, there must be no perceptible resistance. The ribbon should be transported during the travel from left to right. If this is not the case, you should check that the ribbon cassette is correctly inserted on the right. Press the friction mechanism down until it clicks into place. Close the front section of the top cover.
Paper handling Paper handling This section describes how to set the paper type, load fanfold paper and single sheets, transport paper and move the paper to the tear position. ➤ Changing the paper You can change the paper type either from an application program, by means of the paper path quick selection feature or in the Setup menu.
Paper handling ➤ Loading paper Quick start guide Your printer can process both fanfold paper and single sheets. For information on the supported paper sizes, please refer to page 27 (Paper specifications). You should only use those paper types which are approved for this printer. For more information, please refer to the User Guide on the Online CD-ROM. The printer by default is adjusted in such a way, that it will automatically check the width of the inserted paper before starting a print job.
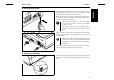
Paper handling Release the coloured latch lever of the left-hand tractor and align the tractor so that the first printing position on the paper matches the X mark on the printer housing. Lock the coloured lever again. Place fanfold paper into the left-hand tractor. Open the coloured latch lever of the right-hand tractor and align it to the paper width. Insert the fanfold paper into the right-hand tractor.
Paper handling Quick start guide Be sure to align the paper stack in parallel with the printer and that the paper flow is unobstructed. 90 Online 1 18 2 Trac1 Load 3 4 Online Setup Re-install the bottom cover. Lower the front cover. Switch the printer on. The active paper source (Traktor1) appears in the display. The paper is automatically loaded when the printer is in online mode and receives data from the computer. Press the Load (4) key to load paper before starting the printout.
Quick start guide Paper handling Some printer models are designed for fanfold paper operation only and therefore do not feature a single sheet feeder. The front cover can therefore not be opened on these models. Make sure that the printer is set to single sheet mode. If necessary, change the paper type (see page 15, Changing the paper type). Press the latch at the middle of the front cover. The single sheet input tray opens downwards.
Paper handling Quick start guide Insert the single sheet as far into the input tray as possible. Press the Online key to set the printer to ready status. The sheet is automatically loaded when the printer is in online mode and receives data from the computer. Press the Load (4) key to load paper before starting the printout. ➤ Paper transport Offline Park 1 20 2 Trac1 LF/FF 3 4 Loaded paper (fanfold paper/single sheets) can be transported in the printer in several ways.
Quick start guide Paper handling ➤ Moving the paper to You can use the Tear key to move the paper to the tear position. Online 1 2 Trac1 Tear 3 4 Online Setup Swing the soundproofing cover towards the front. Make sure that the printer is in online mode. If necessary, press the Online key. Press the Tear (4) key. The printer moves the perforation edge of the fanfold paper to the tear edge of the top cover (see below).
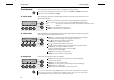
Settings Quick start guide Settings This section describes how to set the tear position, the first printing line, the print head gap as well as the font selection and the character density. ➤ Setting the tear If the tear position of the paper is not aligned with the tear edge of the top cover of the printer, you can adjust it. position Adjust Menu 1 2 Paperway Char 3 4 Online Setup Press the Tear (4) key. The printer performs a form feed.
Quick start guide Settings printing line (TOF) You can use the TOF function for setting the position of the first printing line for each paper source and each menu individually. Before using the TOF function (if fanfold paper is used), you should first set the tear position (see above). Adjust Menu 1 Paperway Char 3 2 4 Online Setup Press the TOF (3) key. The printer performs a form feed.
Settings Quick start guide FormAdj= 17/72" Set < > Exit 1 3 2 4 ➤ Setting the print head gap Online Setup Confirm the input by pressing the Set (1) key. Press the Setup key. The printer returns to the initial status. The setting made will be retained after switching off the printer. For more details, please refer to the User Guide on the Online CD-ROM. The printer features automatic print head gap adjustment to the thickness of the paper used.
Quick start guide Settings density and font Adjust Menu 1 2 Font Paperway Char 3 4 You can use the CPI (= Characters Per Inch) key in setup mode to select the number of characters per inch to be printed. You can use the Font key to select resident fonts. ENGLISH ➤ Selecting character Press the Setup key, then the Char (4) key. Online Setup Press the CPI (3) or Font (2) key (in our example, press CPI).
Technical data Quick start guide Technical data Printer specifications Type T2265+ Printing method Serial with 24-needle print head Printing width 136 characters at 10 cpi Print speed HSQ (Matrix 12 x 10) DPQ (Matrix 12 x 12) CPQ (Matrix 24 x 12) NLQ (Matrix 24 x 18) LQ (Matrix 24 x 36) (bidirectional mode, 10 cpi) 700 cps 600 cps 300 cps 200 cps 100 cps (bidirectional mode, 10 cpi) 800 cps 667 cps 333 cps 222 cps 111 cps Throughput (ECMA 132) 610 pages/h 10.2 pages/min 680 pages/h 11.
➤ Paper specifications Accessories Fanfold paper Tractor1 Continuous single forms Single set of forms (requires individual testing) Single sheet feeder Single sheets Single set of forms (requires individual testing) Sets of forms Paper weight No. of copies 60–120 g/m2 1 + 6 (T2265+) 1 + 5 (T2280+) Form thickness (max.) 1 + 8 (T2265+MC) 0.60 mm Paper weight No. of copies Form thickness (max.) 80–120 g/m2 1+5 0.60 mm Sets of forms can only be processed if the top edge is bound.
“All rights reserved. Translations, reprinting or copying by any means of this manual complete or in part or in any different form requires our explicit approval. We reserve the right to make changes to this manual without notice. All care has been taken to ensure accuracy of information contained in this manual. However, we cannot accept responsibility for any errors or damages resulting from errors or inaccuracies of information herein.
DASCOM REPRESENTATIVES GERMANY DASCOM Europe GmbH Heuweg 3 D-89079 Ulm Deutschland Tel.: +49 (0) 731 2075 0 Fax: +49 (0) 731 2075 100 www.dascom.com UNITED KINGDOM DASCOM GB Ltd ViewPoint, Basing View, Basingstoke, Hampshire RG21 4RG, England Phone: +44 (0) 1256 481481 Fax: +44 (0) 1256 481400 www.dascom.com RUSSIA and CIS DASCOM Europe GmbH Representation Moscow Leninsky Prospekt 95a, Office 322 119313 Moscow, Russian Federation Phone: +7 (495) 984 70 65 Fax: +7 (495) 984 56 42 www.dascom.