Quick Start Guide and Tutorial Printer Network and WebPanel
Introduction It is assumed you have the following: • A working knowledge of your network system and related utilities. • Access to the supervisor or administrator account as a network administrator. Supported Environments The built-in network interface supports the following platforms and protocols: • Microsoft® Windows® NT 4.
Network IP Configuration The network interface of the printer requires an IP address. There are several ways to assign an IP address to the printer: • DHCP (A Dynamic Host Configuration Protocol server assigned IP address.) • Static (An IP address obtained from your network administrator added to the printer manually.) • BOOTP (Bootstrap Protocol server assigned IP address.) Assigning the IP Address If the printer menu is locked, please see the User Guide. 1.
2. Static assignment using the operator panel: • Press , then
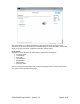
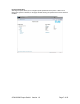
WebPanel Introduction WebPanel is an intuitive browser interface that allows you to remotely manage your network attached printer. From WebPanel, you can do virtually everything you can do from the printer's control panel. In addition, WebPanel provides full access to all of the TallyCom networking features. Before using WebPanel, you must configure your printer with an IP address, using one of the three methods discussed in the Assigning the IP Address section above.
The current status of your printer is displayed on the right hand side of the screen. This is refreshed every 20 seconds, whenever you refresh the page or click Printer Status. The left side allows you to query the printer, configure it and access network options. Printer Status Selecting this option refreshes the status display.
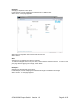
Printer Configuration Selecting this option allows you to configure specific parameters in the printer. When one of these menu options is selected, a new page will load showing the options which can be viewed or modified. © DASCOM Europe GmbH Version 1.
Example 1 Changing a dropdown menu option. In this example, we are modifying the selected font to a different font. Select “Font”. A new page appears. Select the Font dropdown menu and choose the new font. Select “Send”. Note: Changes are not applied until “Send” is selected. To reset the changed value to the prior value, select “Refresh” instead of “Send”. To return to the prior page without applying the change, select “Back”. Example 2 Changing an entered value menu option.
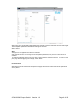
Select the Form Length field by highlighting the contents of the box and enter the new form length. The acceptable parameters are listed to the right of the field. Select “Send”. Note: Changes are not applied until “Send” is selected. If the entered value is out of range of the acceptable parameters, the previous value will be reinstated. To reset the changed value to the prior value, select “Refresh” instead of “Send”. To return to the prior page without applying the change, select “Back”.
Load Configuration Loads the settings stored in a menu into the printer as the current settings. When the Load Configuration link is selected, the following page will be displayed: Select a menu and confirm your selection by selecting the Send button. © DASCOM Europe GmbH Version 1.
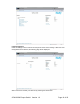
Save Configuration You can save selected printer settings in up to 5 independent menus. When the Save Configuration like is selected, the following page will be displayed: Select a menu. Select Send. Retrieve Configuration From Printer Selecting this option will save all the printer settings of all menus in a file. Uploading this file to other printers will clone the printer menu settings to the other printer.
The default name is “conf.cfg”, but it can be renamed. Saving the file to disk. This will allow it to be transferred to other printers using the “Send Configuration To Printer” option on the Actions web page. Send Configuration To Printer Selecting this option will upload a Configuration File of another printer (see “Retrieve Configuration From Printer”). The complete configuration of this source printer will be transferred to your printer.
Note: Since the printer will reboot with successful completion of this action, the user will have to reconnect to the printer through the browser. Report Selecting the Report link will open up a separate browser window and a report of the printer settings will appear. This functionality is the same as pressing the “Print” option on the control panel of the printer. Reset Printer This link does a hard reset of the printer, similar to cycling power.
After following the directions on this page, select the “Continue“ link and the following page is displayed: Using the “Browse” button, find the firmware file to download. Once the file is selected, click on the “Send” button. It is important to note the warning on this page. There will be some delay while the file is transmitted so it is important NOT to resend or click on the “Send” button until the process is complete.
Since the printer will reboot with successful completion of this action, the user will have to reconnect to the printer through the browser. TGNet Status Selecting this link will replace the information in the Printer Status area with networking information on the printer. © DASCOM Europe GmbH Version 1.
The Name, Contact and Location information is set up from the General link within the Advanced Configuration page. Advanced Configuration The Advanced Configuration page allows the user to set up and modify network connectivity information as well as setting up the password, email notification and logical printers. From this page it is also possible to Logout of TGNet and restart TGNet. The Administration page looks like this: © DASCOM Europe GmbH Version 1.
General The General page sets up the timers and the labels for name, contact and location of the printer. TCP/IP The TCP/IP Page allows the user to modify the existing TCP/IP information for the printer. After changing the particular parameters, it is necessary to restart TGNet from the Advanced Configuration page. If the IP Address is changed and the Send button selected you will disconnect from the current session and will need to reconnect at the new IP Address. © DASCOM Europe GmbH Version 1.
SNMP The SNMP page allows the user to set the Community Name and the Access. The page looks like this: © DASCOM Europe GmbH Version 1.
Password The Password page allows the user to set a password which would limit access to certain configuration and action links in WebPanel. The maximum number of characters for the password is 7. The default password is no password at all (“null“). However, “adm” is also acceptable as the default password to be compatible with the TallyCom IIF-4 and external TallyCom pocket NICs which use this as the default password.
Email Notification With the email notification link the user will be able to set up and receive email notices for error and status conditions of the printer. Up to 4 email addresses can be set. The page looks like this: The user must set up the SMTP Mail Server as well as one or more users. The Reply address can be left as is unless there is reason to have to mail to the Reply address. To activate the mail notification: • Select which notifications are to be sent out.
In this example, the online message is set to “Printer is Online”, and information on Description, Location, and Printer Name will be added to the email. In this example, the event timer is set for 10 seconds after the event occurs and will be sent only once, unless the printer is rebooted or the state changes. If the timer is set to 0, no email message will be sent, regardless of whether the user box has been selected. Selecting the “Save” button will set these values.
When selecting on of the logical printers under the Description column, the following page is displayed: © DASCOM Europe GmbH Version 1.
In this example if the Enable checkbox is checked, the pre-string of “Beginning to print job” followed by a CR/LF will print at the beginning of every job sent to this LPR Queue. At the end of the print job, the message “End of job” with a formfeed will print. Unchecking the Enable checkbox will not send the pre or post strings. The LPD Queue Name is name of the print queue that comes from the host. The Description can be changed by the user and does not have to match the LPD Queue Name.
Technical Support This link at the bottom of the page gives email links for support. Selecting one of these links will execute the mailer program associated with the browser to allow the user to send email for technical support. Logout The Logout link disconnects the browser session from the printer. Clicking on the “Home” link reestablishes the connection. Virtual Control Panel The Virtual Control Panel link is in the Printer Status area of the web page.
The Virtual Control Panel will be the active window. This window will show the current error state and display the contents of the printer’s LCD display. Selecting the buttons on the display will behave the same as if selecting the buttons on the printer itself. The LCD information on the virtual panel refreshes every 15 seconds.