Umschlag.fm Seite 1 Donnerstag, 14.
Umschlag.fm Seite 2 Donnerstag, 14. September 2000 2:00 02 Important Information This equipment generates and uses radio frequency energy and if not installed and used properly, that is, in accordance with the manufacturer's instructions, may cause interference in radio and television reception.
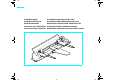
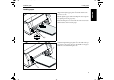
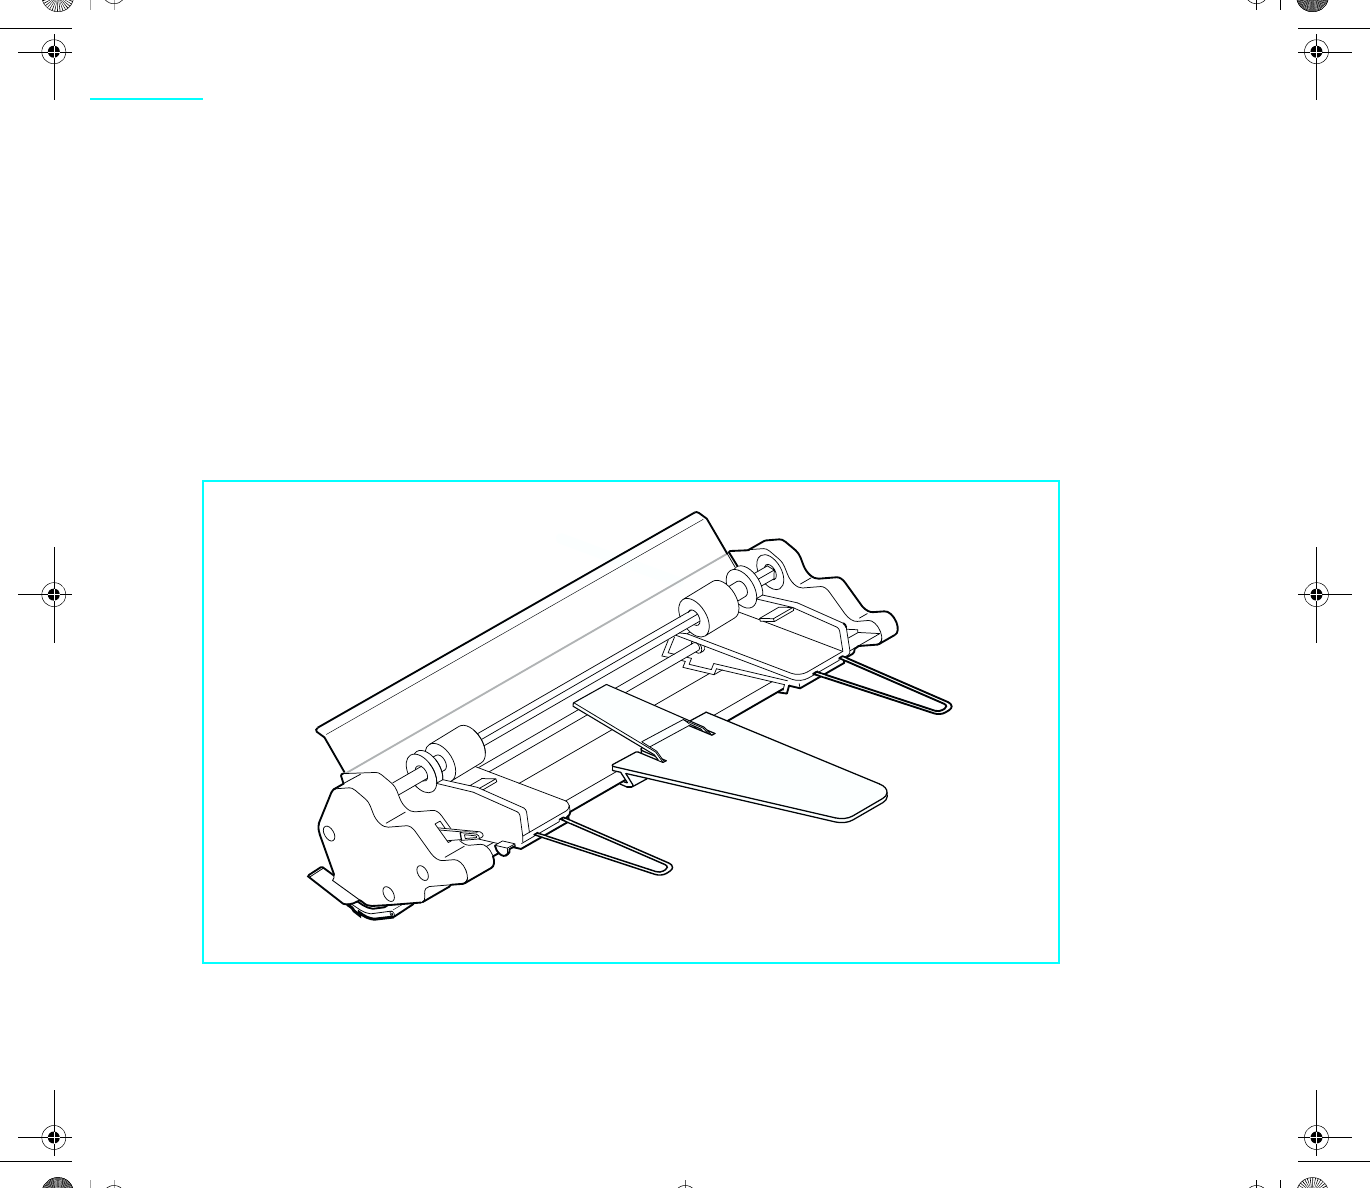
Asf-f-en.fm Seite 1 Donnerstag, 14. September 2000 2:38 02 ,QVWDOODWLRQ JXLGH ,QVWDOOLQJ WKH VKHHW IHHGHU Your printer and its control panel may have a different appearance than shown in this manual. However, the procedures described are the same. Installing the sheet feeder Mount the paper support ➀ to the holder. Insert the two paper support brackets ➁ into the openings provided in the paper guides.
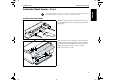
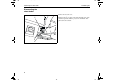
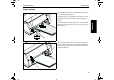
Asf-f-en.fm Seite 2 Donnerstag, 14. September 2000 2:38 02 3UHSDULQJ WKH SULQWHU ,QVWDOODWLRQ JXLGH Installation must be performed with the sheet feeder’s toothed wheel on the right. ➁ Insert the sheet feeder with the slides ➀ on the left and right in parallel into the guides provided on the printer ➁ until they click into place. Reinstall the bottom cover.
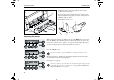
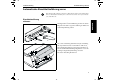
Asf-f-en.fm Seite 3 Donnerstag, 14. September 2000 2:38 02 ,QVWDOODWLRQ JXLGH /RDGLQJ SDSHU Align the left-hand paper guide ➀ with the mark on the bottom cover ➁. ➂ Fan through the paper stack and realign the sheet edges before placing it into the paper tray. Raise the fixing lever ➂ on the left side of the sheet feeder until it latches, then insert the paper. ➁ ➀ ➀ Adjust the right-hand paper guide ➀ to the width of the paper and move the paper support to the middle of the paper stack.
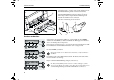
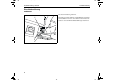
Asf-f-en.fm Seite 4 Donnerstag, 14. September 2000 2:38 02 'LVPRXQWLQJ WKH VKHHW IHHGHU ,QVWDOODWLRQ JXLGH Dismounting the sheet feeder Remove the bottom cover. ➀ ➁ 4 Push the tabs ➀ provided on the left and right ends of the metal bar upwards until the projections ➁ unlatch, then pull out the sheet feeder.
Asf-f-de.fm Seite 1 Donnerstag, 14. September 2000 2:35 02 ,QVWDOODWLRQVDQOHLWXQJ (LQ]HOEODWW]XIKUXQJ HLQEDXHQ Automatische Einzelblattzuführung vorne Das Aussehen Ihres Druckers und seines Bedienfeldes kann von der Darstellung in dieser Installationsanleitung abweichen. Das beschriebene Vorgehen bleibt jedoch das Gleiche. Die Papierstütze ➀ auf die Halterung stecken. Die beiden Bügel ➁ in die dafür vorgesehene Öffnung der linken und rechten Papierführung stecken.
Asf-f-de.fm Seite 2 Donnerstag, 14. September 2000 2:35 02 'UXFNHU YRUEHUHLWHQ ,QVWDOODWLRQVDQOHLWXQJ Der Einbau muß so erfolgen, daß sich das Zahnrad an der Einzelblattzuführung auf der rechten Seite befindet. ➁ Die Einzelblattzuführung mit den Schienen ➀ auf der linken und rechten Seite parallel in die Führungen am Drucker ➁ einführen, bis sie einrasten. Die untere Abdeckung wieder einsetzen.
Asf-f-de.fm Seite 3 Donnerstag, 14. September 2000 2:35 02 ,QVWDOODWLRQVDQOHLWXQJ 3DSLHU HLQOHJHQ Papier einlegen Die linke Papierführung ➀ an der Markierung auf der unteren Abdeckung ➁ ausrichten. ➂ Den Arretierhebel ➂ auf der linken Seite der Einzelblattzuführung bis zum Einrasten nach oben bewegen und das Papier einlegen. ➁ ➀ ➀ Die rechte Papierführung ➀ entsprechend der Papierbreite einstellen und die Papierstütze der Einzelblattzuführung mittig zum Papierstapel ausrichten.
Asf-f-de.fm Seite 4 Donnerstag, 14. September 2000 2:35 02 (LQ]HOEODWW]XIKUXQJ DXVEDXHQ ,QVWDOODWLRQVDQOHLWXQJ Einzelblattzuführung ausbauen Die untere Abdeckung entfernen. ➀ ➁ 4 Die links und rechts am Ende des Metallbügels angebrachten Druckflächen ➀ nach oben drücken, bis die Nasen ➁ ausrasten, und die Einzelzelblattzuführung herausziehen.
Asf-f-fr.fm Seite 1 Donnerstag, 14. September 2000 2:41 02 *XLGH G LQVWDOODWLRQ 3RVH GH O DOLPHQWDWLRQ IHXLOOH j IHXLOOH Alimentation feuille à feuille AV automatique Il se peut que votre imprimante et son panneau de commande ne correspondent pas à la description qui en est faite dans ce Manuel d'utilisation. La procédure décrite reste cependant la même. Pose de l’alimentation feuille à feuille Fixez le support de papier ➀ sur l’appui.
Asf-f-fr.fm Seite 2 Donnerstag, 14. September 2000 2:41 02 3UpSDUHU O LPSULPDQWH *XLGH G LQVWDOODWLRQ Effectuer la pose de telle façon que le pignon sur l'alimentation feuille à feuille soit disposé à droite. ➁ Introduire les rails de l'alimentation feuille à feuille ➀ à gauche et à droite parallèlement dans les guidages disposés sur l'imprimante ➁ jusqu'à ce qu'ils s'encliquettent. Reposer le capot inférieur.
Asf-f-fr.fm Seite 3 Donnerstag, 14. September 2000 2:41 02 *XLGH G LQVWDOODWLRQ 0LVH HQ SODFH GX SDSLHU Mise en place du papier Aligner le guide-papier gauche ➀ au repérage sur le capot inférieur ➁. ➂ Détacher les feuilles de la pile de papier les unes des autres avant de les mettre en place dans le bac à papier et aligner ensuite les bords à fleur.
Asf-f-fr.fm Seite 4 Donnerstag, 14. September 2000 2:41 02 'pSRVH GH O DOLPHQWDWLRQ IHXLOOH j IHXLOOH *XLGH G LQVWDOODWLRQ Dépose de l'alimentation feuille à feuille Déposer le capot inférieur. ➀ ➁ 4 Pousser les surfaces de pression ➀ disposées à gauche et à droite sur l'extrémité de l'étrier en métal ves le haut jusqu'à ce que les ergots ➁ se décliquettent et retirer l'alimentation feuille à feuille.
Asf-f-it.fm Seite 1 Donnerstag, 14. September 2000 2:44 02 ,QVWUX]LRQL SHU O¶LQVWDOOD]LRQH ,QVWDOOD]LRQH GHOOD JXLGD GL LQVHULPHQWR IRJOL VLQJROL Guida di inserimento fogli singoli automatica anteriore La configurazione della stampante e del pannello di controllo può presentare differenze rispetto alla figura riportata nelle presenti istruzioni per l'uso standard. Le procedure descritte restano comunque le stesse.
Asf-f-it.fm Seite 2 Donnerstag, 14. September 2000 2:44 02 3UHSDUDUH OD VWDPSDQWH ,QVWUX]LRQL SHU O¶LQVWDOOD]LRQH Procedere con l’installazione in modo che la rotella sulla guida d‘inserimento si trovi sul lato destro. ➁ Inserire la guida di inserimento per fogli singoli con i binari ➀ sul lato sinistro e destro paralleli nelle guide delle stampante ➁, finché non scatta una posizione. Riapplicare la copertura inferiore.
Asf-f-it.fm Seite 3 Donnerstag, 14. September 2000 2:44 02 ,QVWUX]LRQL SHU O¶LQVWDOOD]LRQH ,QVHULPHQWR GHOOD FDUWD Inserimento della carta Allineare la guida carta di sinistra ➀ con il contrassegno sul rivestimento inferiore ➁. ➂ “Sfogliare” accuratamente la carta prima di posizionarla nel cassetto e quindi allineare bene i bordi. Spostare verso l‘alto la leva di arresto ➂ sul lato sinistro della guida di inserimento per fogli singoli fino a bloccarla.
Asf-f-it.fm Seite 4 Donnerstag, 14. September 2000 2:44 02 6PRQWDJJLR GHOOD JXLGD GµLQVHULPHQWR SHU IRJOL VLQJROL ,QVWUX]LRQL SHU O¶LQVWDOOD]LRQH Smontaggio della guida d‘inserimento per fogli singoli Rimuovere il la copertura inferiore. ➀ ➁ 4 Spingere verso l‘alto le superfici di pressione applicate a sinistra e a destra alla fine della staffa metallica ➀ , finché le linguette non scattano ➁; quindi estrarre la guida d‘inserimento per fogli singoli.
Asf-f-sp.fm Seite 1 Donnerstag, 14. September 2000 2:46 02 ,QVWUXFFLRQHV GH LQVWDODFLyQ ,QVWDODU HO DOLPHQWDGRU GH KRMDV VXHOWDV Alimentador automático de hojas sueltas – Frente El diseño de su impresora y su panel de mando puede ser diferente de lo que se muestra en las presentes instrucciones de servicio. Sin embargo, los procedimientos descritos serán los mismos. Instalar el alimentador de hojas sueltas Insierte el soporte de papel ➀ en el soporte.
Asf-f-sp.fm Seite 2 Donnerstag, 14. September 2000 2:46 02 3UHSDUDU OD LPSUHVRUD ,QVWUXFFLRQHV GH LQVWDODFLyQ ➁ La instalación debe efectuarse de manera que la rueda dentada del alimentador de hojas sueltas se encuentre en el lado derecho. Introduzca el alimentador de hojas sueltas con las lengüetas ➀ a la izquierda y a la derecha en paralelo, en las guías en la impresora ➁ hasta que se enganchen. Reinstale la tapa inferior.
Asf-f-sp.fm Seite 3 Donnerstag, 14. September 2000 2:46 02 ,QVWUXFFLRQHV GH LQVWDODFLyQ &DUJDU SDSHO Cargar papel Alinee la guía de papel izquierda ➀ con la marca en la tapa inferior ➁. ➂ Suelte las hojas de la pila de papel y realinee los cantos antes de poner la pila en la bandeja. Levante la palanca de fijación ➂ en el lado izquierdo del alimentador de hojas sueltas hasta que se enganche, y cargue el papel.
Asf-f-sp.fm Seite 4 Donnerstag, 14. September 2000 2:46 02 'HVPRQWDU HO DOLPHQWDGRU GH KRMDV VXHOWDV ,QVWUXFFLRQHV GH LQVWDODFLyQ Desmontar el alimentador de hojas sueltas Quite la tapa inferior. ➀ ➁ 4 Empuje las placas ➀ provistas en los extremos izquierdo y derecho de la barra metálica hacia arriba hasta que se desenganchen los talones ➁ y extraiga el alimentador de hojas sueltas.
Umschlag.fm Seite 3 Donnerstag, 14. September 2000 2:32 02 “All rights reserved. Translations, reprinting or copying by any means of this manual complete or in part or in any different form requires our explicit approval. We reserve the right to make changes to this manual without notice. All care has been taken to ensure accuracy of information contained in this manual. However, we cannot accept responsibility for any errors or damages resulting from errors or inaccuracies of information herein.
Umschlag.fm Seite 4 Donnerstag, 14.