CCU Control Box RMC-180 Quick Start Guide www.datavideo-tek.
Table of Contents Warnings and Precautions ........................................................................................................... 2 Warranty ....................................................................................................................................... 3 Disposal ........................................................................................................................................ 3 Packing List ...................................................
Warnings and Precautions 1. Read all of these warnings and save them for later reference. 2. Follow all warnings and instructions marked on this unit. 3. Unplug this unit from the wall outlet before cleaning. Do not use liquid or aerosol cleaners. Use a damp cloth for cleaning. 4. Do not use this unit in or near water. 5. Do not place this unit on an unstable cart, stand, or table. The unit may fall, causing serious damage. 6.
Warranty Datavideo warrants that the equipment it manufactures shall be free from defects in material and workmanship for a period of 12 months from the date of product purchased. If equipment fails due to such defects, Datavideo will, at its option, repair or provide a replacement for the defective part or product.
Packing List 1 x USB cable USB A-USB A L:1.8M 1 x Switching adaptor DC 12V / 0.5A 1 x RMC-180 Instruction Manual Introduction The RMC-180 is special designed for remote controlling the Panasonic PTZ Camera AW-HE100 with the video calibration functions with it. One of RMC-180 can connect up to four of AW-HE100 by RJ-45 connection and up to 1,000 Meter distant away.
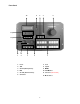
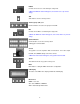
Front Panel 10 9 8 7 6 11 12 1 2 3 4 5 1. Focus 7. Lock 2. STR 8. Speed 3. CH A~D (Group Select) 9. MENU 4. IRIS 10. LCD Monitor 5. Ch A~D (Channel Select) 11. Selectors (No Function) 6. Controller 12.
FOCUS Controls camera focus is controlled by the rotary knob. # When the MANUAL switch LED light on, the camera focus is by manual setting. STR STR switch is save the camera position. Channel group A, B, C, D Channel switch is select the save group CH A~CH D. IRIS Controls camera IRIS is controlled by the rotary knob. # When the MANUAL switch LED light on, the camera IRIS is by manual setting. Channel Buttons Channel buttons is save the camera position. # See page.7 for more details.
Step by step to save camera position 1. Select group on CH A or CH B or CH C or CH D. 2. Push STR button , at same time you selected group will light on. 3. Push 1 of 4 light on button to save the camera position. Menu Setup 1. POWER CONTROL Control camera power ON / OFF. 3. WHITE BALANCE STR Save white balance status of mode A or mode B. (Please selected mode A or mode B before you into this setting) 7. SHUTTER SET Setting camera shutter mode 8. VOUT FORMAT SELECT Setting video output format 9.
12. FOCUS DIRECTION SET Setting the camera focus direction control is normal or reversed (LEFT / RIGHT). FOCUS setting has 4 kinds speed let you select: Step 1 - Push button, at same time the button LED will light on. button, the Step 2 - Push Step 3 - Push button will twinkling. button select FOCUS control speed. Step 4 - Push and turn button control the camera focus. 13. IRIS DIRECTION SET Setting the camera direction control is normal or reversed (LEFT / RIGHT).
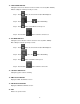
Rear Panel 1 2 3 4 5 1. Firmware Upgrade 2. RJ-45 Connect (To Camera) 3. Tally Input 4. Power input 12V 0.5A 5. Power On / Off switch Firmware Upgrade USB connect to computer for firmware upgrade. Camera connect (RJ-45) 4 RJ-45 ports connect to camera. Tally Input Send in red color tally signal to tally LED. Red means on-air. DC In Socket Connect the supplied 12V 0.5A PSU to this socket. The connection can be secured by screwing the outer fastening ring of the DC In plug to the socket.
Firmware upgrade procedure to computer. 1. Power on RMC-180, and then connect USB port 2. Push (FOCUS AUTO / MANUAL, IRIS AUTO / MANUAL, CHA-1, CHC-4 KEY) at same time. 3. Reset RMC-180 Power. 4. RMC-180 LCD will display as below: RMC-180 Boot Loader Version 0.4 5. “RMC-180_U38 “ will display on the computer monitor.
6. Into the ”RMC-180_U38”, and then delete ” bootcode.bin” file. 7. Paste “RMC180_PCBB_0v1c.bin” on the same place. 8.
Service & Support It is our goal to make your products ownership a satisfying experience. Our supporting staff is available to assist you in setting up and operating your system. Please refer to our web site www.datavideo-tek.com for answers to common questions, support requests or contact your local office below. Datavideo Global Website: www.datavideo-tek.com Datavideo Corporation Tel: +1 562 696 2324 Fax: +1 562-698-6930 E-Mail: contactus@datavideo.