
Installation manual


Maxsys and MX Series Software Administrator’s Guide 131
5. Select the Sho
w Sample Data check box if you would like sample data
displayed on the form. This provides a visual reference of how the finished
form will look.
The Data Setup fields must have been created with sample values for
this feature to work. Refer to
"Data Setup" on page 65.
6. I
f necessary, click the Map Merge Fields button to launch the Map Merge
Fields dialog. (Refer to "Mapping Merge Fields" on page 138.)
7. Select the paper stock from
the Form Stock list. The program automatically
populates the Form Size field with the default form size. (You can also right-
click and select the Data Field option.)
8. Select the Printer Tray where the paper stock will be loaded. Generally the
default Auto Selection is satisfactory. (You can also right-click and select the
Data Field option.)
9. In instances where duplex printing will be performed, make a selection from
the Duplex Print Mode list. (You can also right-click and select the Data Field
option.)
• MXi Read
y - For use with the MXi envelope inserter.
• Fl
ip on Long/Short side - As implied, the form will be flipped on the
selected side.
• E
nvelope Inserter Ready - Defines the duplex print mode based on the
fold-type (defined in the next step).
• C Fold or Half
Fold - Form will be folded on the short side.
• No Fold or Z Fold - Form will be folded on the long side.
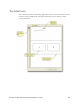
10. Select the paper
fold type from the Fold Type list. Your selection will be
reflected on the virtual form. (You can also right-click and select the Data
Field option.)