
Installation manual


232 Vision Verification Module
To create and check multiple elements on both the front and back of the
card, repeat steps 9 through 11 for each element you want to check.
Create a Card Stock Setup with an Optical Character Verification Element
This procedure can be performed at a Simulator.
1. F
rom the menu bar select Applications | Stocks | Card Stock Setup.
2. Cl
ick the New icon.
3. Enter a meaningful Description.
The rest of this procedure addresses only those Card Stock Setup
properties that apply directly to the Vision Verification module. For
information about options not mentioned here, see “Card Stock Setups”
on page 178.
4. If you changed the exposure values for card stock capture, make the same
chang
es in the Card Stock Properties (near the bottom of the General tab).
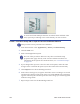
5. Cl
ick Import next to the Front Background box.
6. I
n the Choose dialog box, navigate to the folder where card images are stored
and then select the file for the front of the card. Click Choose. The card image
appears in the left pane and the aspect ratio of the image you selected appears
under the image name.
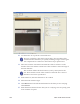
7. Repe
at steps 5 and 6 for the Rear Background box.