
Installation manual


238 Vision Verification Module
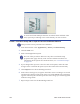
7. Move the crosshair so that the horizontal line of the crosshair is on the
baseline of the text and the vertical line of the crosshair is at the left edge of
the first character.
The crosshair defines the ideal location for the text.
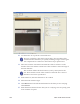
8. Click the icon to the right of the Data box and select Value.
9. Enter the characters that appear in the box you defined.
10. Se
lect the Data Contrast Type.
11. Cl
ick Browse and select the Font Filename for the data you are verifying.
Click Choose.
12. E
nter the Font Point Size for the data you are verifying. You can specify point
sizes in tenths of a point.
13. E
nter a Pass Threshold value that is as high as you can without causing too
many false rejects, and then click Test. The system will report an average
score for all the selected characters in the image and a minimum score for the
character with the lowest quality. The system also reports on recommended
scaling. If the green text is bigger or smaller than the image, then you can
change the scaling (from the Advanced Tab). Close the Test Results window.
You can change the Font Point Size and Font Filename as often as
necessary, and retest as often as necessary, to achieve good test
results.
14. On the Card Properties Verification tab, select Data Field and then select the
name of the data field.
15. C
lick the icon to the right of the Data box and select Data Field.
16. From the Data list, select the field name to compare to the pre-printing on the
card.
17. Save the Card
Setup.