
User Manual
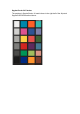


Photographing the SpyderCHECKR
Don't fill up the viewfinder frame with the target, because the sweet spot of the
lens is near the center, and away from the corners. Its best to shoot the target
with a generous amount of border and crop it down later.
Use a tripod to support the camera whenever possible. Make sure the camera
is directly in front of the target. The central axis of the lens should be in line
with the center of the SpyderCHECKR.
You can also use another tripod, or a light stand with mount adaptor, to
support the SpyderCHECKR target. The SpyderCHECKR 24 can be
supported as noted previously.
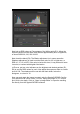
The SpyderCHECKR and the camera sensor should be parallel. Look closely
at the shape the target makes: if the rectangle is wider at the top or bottom, or
taller at one end than the other, you are not squarely in front of the target.
Autofocus produces excellent results. Fully Automatic settings are fine,
though Aperture Priority, or full Manual settings are also good for those who
are comfortable with them. It is important to shoot in the camera's RAW
format, if it offers one. Take a few frames at different settings, if you are
unsure of any of the variables.
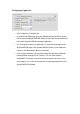
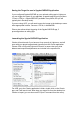
Opening the Target Shot
Download your target shot and open in Lightroom, ACR or Phocus, as you
would with any RAW image.