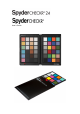
User’s Guide
SpyderCHECKR & SpyderCHECKR® 24 User’s Guide Camera Color Correction for Photo & Video Table of Contents: Introduction ..................................................................................................................... 3 Operating Requirements: ............................................................................................... 5 SpyderCHECKR Comparison Chart ............................................................................... 6 SpyderCHECKR Workflow Basics ........
Introduction Digital imaging and color management processes are evolving and becoming more streamlined. Datacolor continues its tradition of creating and supporting photographer and videographer-oriented products, leveraging its expertise in color workflow and technology to help customers express their vision, improve efficiency, and reduce costs. SpyderCHECKR™ provides a fast, reliable method of color calibrating camera, lens, and sensor combinations.
SpyderCHECKR: Challenges and Solutions Every combination of lens, camera, and sensor has a unique color signature, and this may change in different lighting conditions. And, of course, these devices don’t perceive or record color the way the human eye does. Color control and consistency requires a reference tool to help the user adapt to these variations. Adding color management at the capture stage of one’s digital workflow assures consistency and accuracy from day to day as well as from camera to camera.
The SpyderCHECKR includes: • • • SpyderCHECKR SpyderCHECKR Software CD Quick Start Guide Supported Languages: English, Spanish, French, German, Italian, Russian, Traditional Chinese, Simplified Chinese, Korean, Japanese The SpyderCHECKR 24 includes: • • • • • SpyderCHECKR 24 card SpyderCHECKR 24 slipcover SpyderCHECKR 24 software URL User´s Guide and Quick Start Guide URLs SpyderCHECKR 24 serial number Supported Languages: English, Spanish, French, German, Italian, Russian, Traditional Chinese, Simplif
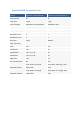
SpyderCHECKR Comparison Chart Feature Datacolor SpyderCHECKR Datacolor SpyderCHECKR 24 Patch Number 48 24 Patch Size Large Large Color Coverage Saturated & Low Saturation Saturated Colors Skintone Patches 8 2 Gray Ramp Patches 13 6 Near White Tints 3 0 Near Black Tones 3 0 Gray Face Large Medium Patch Yes Yes FadeCheckr Yes No Tripod Mount Yes, 1/4" x 20 No Cube Mount Yes, 1/4" x 20 No Rigid Case Yes No Thin, Flexible Case No Yes 31cm wide, 23 cm high, 14cm wide
SpyderCHECKR Workflow Basics The goal of SpyderCHECKR targets is to provide camera calibration that fits conveniently into your workflow, and which is easy to adjust as desired to meet your own needs. Workflow is simple: photograph the SpyderCHECKR, import the image into an approved image editor for basic adjustments, open the image in the SpyderCHECKR software, and export the ‘translation’, or preset. You can apply this preset during image editing.
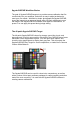
The SpyderCHECKR 24 Target The SpyderCHECKR 24 is a compact but very capable version of its larger sibling. It uses the same 24 primary patches from the right side of the SpyderCHECKR to help you create accurate camera calibrations. The reverse side of the target is a gray card and gray ramp. The double-sided card is enclosed in a polymer sleeve, for compactness.
Patch Formulation Technology The patches in SpyderCHECKR are composed of pigment-based colors with carefully formulated spectral characteristics, ideal for camera calibration in varying lighting conditions. The SpyderCHECKR also provides spectrally neutral black, white, and gray patches. The patches are durable and produced to close tolerances. A CHECKR which sees only moderate usage will last almost indefinitely.
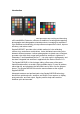
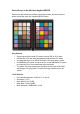
Patch Groups in the 48 Patch SpyderCHECKR Please note the reference numbers across the left side, and the reference letters across the top of the SpyderCHECKR frame. Gray Patches • • • • • Grays proceed from white (E1) down to black (E6) in 20% steps. Patches D2 to D6 are extra gray patches that provide 10% steps. A zigzag path from A1 to A6 will cover the 10% gray ramp in order. An additional 95% patch is located at D1, and an additional 5% patch is located at C6 for more detail near white and black.
SpyderCheckr 24 Patches The patches in SpyderCheckr 24 match those in the right half of the 48 patch SpyderCHECKR described above.
Getting Started With SpyderCHECKR SpyderCHECKR Software: Download, Installation, Basic Setup Download and install the SpyderCHECKR software for your platform from the Datacolor website. Before starting, make sure that you are logged onto your computer as an administrator. Run the installer. (See section on Serialization below.) This will install a folder in your Datacolor applications folder named SpyderCHECKR. In that folder you'll find an application named SpyderCHECKR.
Configuring Lightroom • Go to Lightroom > Preferences • In the External Editing tab, go to the Additional External Editor section, and choose the SpyderCHECKR Editing Preset (which was installed as part of the SpyderCHECKR software installation) • Or: set manually, and go to Application > Choose and navigate to the SpyderCHECKR app in the SpyderCHECKR folder in your Datacolor Folder (in the Applications folder on the Mac).
Configuring Phocus • Go to the Phocus > Preferences > General > Image Editor>Select. • Navigate to, and select the SpyderCHECKR app in the SpyderCHECKR folder in your Datacolor Folder (in the Applications folder in Macintosh, or the C:\program files\datacolor folder in Windows). • To use the SpyderCHECKR plugin with Phocus, set the Phocus image editor preference to the SpyderCHECKR application in the Datacolor folder.
SpyderCHECKR Setup and Workflow Mounting Options The Classic SpyderCHECKR has a standard tripod mount (1/4 inch 20 UNC thread) on the base. This allows flexible mounting at any height or angle desired. However it's also possible to place the target on a table or shelf; it will stand upright in stable locations. There is also a standard tripod stud at the top of the SpyderCHECKR spine. This can be used to mount a SpyderCUBE, but also offers further mounting options.
Photographing the SpyderCHECKR Don't fill up the viewfinder frame with the target, because the sweet spot of the lens is near the center, and away from the corners. Its best to shoot the target with a generous amount of border and crop it down later. Use a tripod to support the camera whenever possible. Make sure the camera is directly in front of the target. The central axis of the lens should be in line with the center of the SpyderCHECKR.
Adjusting the Target Shot Cropping is done with Lightroom, Phocus or ACR's crop tool. For the 48 patch SpyderCHECKR, crop to the four white dots just outside of the patch area. For the SpyderCHECKR 24, crop to inside the black border, with no background showing beyond the target. Use the rotate function of the crop tool to straighten the target image. Activating Lightroom’s lens profile function will reduce lens distortion in your target shot, but this is rarely necessary.
Next look at RGB values or Percentages of the White patch (E1). Adjust the exposure slider until the white patch lists as approximately 90% in Lightroom, or about RGB 230, 230, 230 in ACR. Next check the black (E6). The Blacks adjustment (or in some cases the Shadows adjustment) is used to set the black value to 4% in Lightroom, or RGB 10, 10, 10 in ACR. If the value is below this level, it may be best to leave it as shot, or reshoot with brighter illumination.
Saving the Target for use in SpyderCHECKR Application If you configured SpyderCHECKR as your optional editing app in Lightroom, you can trigger the export of your adjusted, cropped image by going to Menu > Photo > Edit In > SpyderCHECKR (available in any Mode, but you will typically be in Develop mode). If you are using ACR, you will need to save the image to the desktop or some other appropriate location. Save as a Tiff file, in AdobeRGB.
Processing your Target Shot In SpyderCHECKR If you captured your image and cropped appropriately the sampling squares should already be placed within the correct patches of your Target shot,. If not, you can drag on any edge or corner of the image area to adjust the fit. The colors inside the sampling squares should be a somewhat less saturated version of the patch colors.
This shows the 48 patch SpyderCHECKR image upside down. It must be oriented correctly when using the software. Once you have reviewed the location and orientation of the target image, click on the "Save Calibration To..." button and your calibration corrections will be calculated. You will have selected ACR, Lightroom, or Phocus in advance, and will now be prompted to name your new calibration preset.
SpyderCHECKR Rendering Modes In SpyderCHECKR's Preferences pane you will find a pop down list of mode choices. The three modes are described below: • • • Colorimetric mode should offer the most literal results, and is best when attempting to reproduce artwork or product colors. Saturation mode offers results, which are generally more pleasing for many types of images. Portrait mode selectively reduces the color saturation of the skintone components to make portrait processing easier.
Using your new Calibration Relaunch Lightroom, Phocus or ACR (your calibration data will NOT be available to you until you quit and restart Lightroom, Phocus or ACR), and select an image shot with the same camera or camera and lens combination. Apply your preset from the User Presets list in the Develop mode of Lightroom or from Load Settings in the pop down menu to the right of the mode name (Basic, etc.) in ACR.
Color Calibrating Cameras for Video in Lightroom SpyderCHECKR produces color correction presets for a number of applications, including Lightroom, ACR, Davinci Resolve 11, and Phocus. These presets are typically applied to still images processed in these applications. Lightroom can now catalog, clip, and even make basic adjustments to your video, the question of using SpyderCHECKR Lightroom Presets to correct color for your video cameras arises.
The resulting Preset can then be applied to a still image, and by selecting that still image and one or more video clips, the Sync Settings button can then be used to apply the color corrections to video clips. The dialog box shown below will appear, showing which of the Lightroom Development Settings can be applied to video. Be sure the Color Adjustments box is checked, so that the HSL Adjustments from SpyderCHECKR will be applied to the video clips.
Creating Multiple Lightsource Calibrations SpyderCHECKR's Tools menu contains commands for creating multiple calibrations from any two existing Lightroom or ACR calibration presets. Choose any two presets built for the same camera, and a series of three new calibration presets will be created which offer increased precision for light sources between the original sources. This function is of use mainly for advanced processes such as museum photography.
SpyderCHECKR Gray Target The inverse face of each CHECKR (SpyderCHECKR on the left, SpyderCHECKR 24 on the right, above) target sheet holds the neutral target patches. These patches consist of the same gray ramp in 10% steps or, in the case of the SpyderCHECKR 24, 20% as the color face of the target. All colored patches have been removed, to allow for improved neutral perception by the viewer. An enlarged 50% gray patch has been added for uses requiring a larger gray sample.
In-Camera Color Balancing Shoot the Gray Target face of the SpyderCHECKR in your camera's White Balance or Gray Balance mode to produce an in-camera color balance for the lighting conditions under which you have shot the CHECKR. This will assure that your initial view of images, quick exports to Jpg, or images downloaded directly to the iPad will have the intended color balance, and will assist in assuring that you do not overexpose as you shoot.
Changing between 24 and 48 Patch Targets The SpyderCHECKR software supports both the 24 and 48 patch versions of the SpyderCHECKR target, and will automatically launch configured for the target type you have purchased. If you use both targets, then switching between them occurs in SpyderCHECKR preferences.
Using SpyderCHECKR with other software The SpyderCHECKR, or SpyderCHECKR 24 target can be used with third party software products as well. To utilize it with software designed to accept the standard 24 patches, measure the patches in the appropriate order (which varies with different software) by measuring the last four columns E-H, or the entire 24 patch target in the appropriate pattern, to produce the needed patch order.