
User Manual
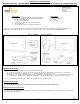
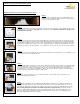
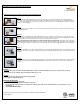

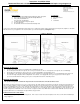
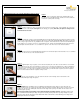
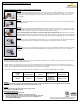


Fig. 3
Fig. 1
Fig. 5
Fig. 2
Figure 1
Top view - shows needed space between the drywall and the studs.
Receptacle side of the Mid-Size Plate should be 3” from the stud but no
more than 5” (review picture carefully).
Figure 2
Using the template supplied (see page 3 of instruction sheet), trace the opening needed. Using a drywall saw, cut a hole in
the drywall the size of the template. See Figure 1 before tracing your opening. Remember, the plates are designed to be
mounted between the studs.
Figure 3
Run the 12/2 or 14/2 w/ground UL approved electrical building wire (not included in kit) from the top opening to the bottom
opening and connect the Recessed Pro-Power Kit Cable Plate with Duplex Receptacle to the Recessed Cable Plate with
Straight Blade Inlet. Make sure the piece of wire is long enough to allow for easy installation of the receptacles. Remember
the Pro-Power Installation Kit is not part of your home’s electrical wiring system. Pull the electrical building wire through a
hole in the top cable plate electrical outlet box. Use a screwdriver to open one of the knock outs on the electrical outlet box.
Figure 4
Now pull the other end of the building wire through a hole in the bottom plate electrical outlet box. Use a screwdriver to open
one of the knock outs on the electrical outlet box
Figure 5
Using the supplied duplex receptacle, connect the hot line (black) wire to the brass colored terminal or screw and the neutral
(white) wire to the silver colored terminal or screw. Be sure to connect the grounding (green) or bare grounding wire to the
green colored terminal screw. For shock protection, this UR, UL recognized component receptacle must be properly
grounded. Caution – use copper wire only with this receptacle. Once you have wired the receptacle, screw the receptacle
into the electrical outlet box until the receptacle is firmly secured.
Fig. 4
Installation Instructions for the Top Plate with Duplex Receptacle:
888.223.7977
www.datacommelectronics.com
Installation / Instruction Sheet 45-0024-WH (Continued)
Fig. 6
Figure 6
Now use the four screws provided to secure the electrical outlet box to the mounting studs on the backside of the
Mid-Size Plate with Duplex Receptacle.
Fig. 7
Figure 7
Important: Before installing the Recessed Mid-Size Plate with Duplex Receptacle into the template opening, make sure
to pull your low voltage cables through the low voltage cable opening. If you have more than 4 cables you can remove
the flexible plate that seals the low voltage cable opening. This allows for more cables to be pulled through the opening.
After you have pulled your low voltage or A/V cables through the low voltage opening: Start with the bottom of
the Recessed Mid-Size Plate with Duplex Receptacle and slowly slide the plate into the opening. Swing the top of the
plate into position until the entire Mid-Size Plate is flush with the wall. Now screw down the screws with wings; these
wings fasten tightly against the back of the drywall.
Page 2 of 4 9/21/12