
Owner's manual
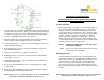
1. Place the bracket on the outside of the enclosure with the front of the bracket
facing the front of the enclosure. Align the screw hole in the bracket with one
of the slots in the side of the enclosure, adjusted the bracket for the depth of
the drywall. From inside the enclosure, push the bracket bolt through the
enclosure slot and tighten the bracket to the enclosure.
2. Optional mounting ears (Product # 70-0094) can be purchased separately
and are usually used for mounting the enclosure to metal studs.
3. Surface mounting holes – use these holes when mounting the enclosure in a
surface mounting environment.
4. Flush mounting slots – use these slots when mounting the enclosure in a
flush mounting environment.
5. Opening for metal or plastic U.L. approval receptacle box.
6. Mounting post for the screw cover – the 70-0011 Home Command Center
comes with a screw cover.
7. Mounting slots for the hinge cover – the 70-0010 Home Command Center
comes with a hinged cover.
8. Our enclosure has mounting holes for the security industry’s best selling
security boards.
9. Our enclosure has mounting holes for phone and video modules made by
DataComm Electronics and major manufacturers.
Instruction / Installation Sheet
DataComm Electronics Home Command Center Models
70-0010 and 70-0011
Location Selection
Find a central location for the panel so as to allow equal lengths of
wire to be run to locations throughout the home. The location of
the panel should be so that the surrounding temperatures do not
exceed 122º F (50º C) or go below 32º F (0º C). Exposure to high
humidity levels should be avoided so as to prevent condensation in
the panel. Locate the panel in close proximity to a 110VAC for
power requirements of amplifier or security panels. There is an
outlet knockout in the bottom of the panel for the installation of an
UL / ETL approved outlet. (Note: have a licensed electrician install
the outlet to meet current code requirements).
Caution: Consult local building and electrical codes, before
installing any equipment.
Note: There is no fire rating on this panel therefore it should
not be installed in fire rated walls.
Mounting the Panel
For flush mounting, mount the panel on a stud using metal wood
screws (allow for thickness of the drywall) and install the mounting
bracket to the enclosure (see mounting bracket instructions). For
surface mounting, screw the enclosure to the wall using metal
wood screws. Slots are provided in the 4 recessed holes in the
back of the enclosure for easy surface mounting of the enclosure.
Place grommets in knockout locations to be used for wire entry into
the panel.
DataComm Electronics, Inc. 6349 Peachtree Street Norcross, GA 30071-1725
888.223.7977 / 770.662.8205 www.datacommelectronics.com
DataComm Electronics, Inc. 6349 Peachtree Street Norcross, GA 30071-1725
888.223.7977 / 770.662.8205 www.datacommelectronics.com