
Installation manual


IQ3 Data Logger Dash Installation Manual
59
If no previously save track map exists for the newly downloaded data, the next action that must
be performed is the creation of a GPS track map. A GPS track map is the most important item
for data review, as the track map controls all of the timing functions of the logger and DataLink
II software. Without a GPS track map, no lap times, segment times or visual driving lines will be
available.
In essence, the creation of a GPS track map is the same as physically placing start / finish and
segment beacons at various points around the race course. The difference is we are re-creating
the track in the DataLink II software utilizing GPS information, then inserting (in the software)
the start / finish and segment timing points at various locations around the GPS track map.
Those timing points are also GPS plotted positions and provide timing information with the
same accuracy as trackside beacons.
GPS track map files are saved according to the name assigned by the user. Typically, the name
will reflect the name of the track or location in use. Saved GPS track map files can then be
recalled for use, according to the testing location and needs of the user. The procedures for
creating a GPS track map are quick, easy and listed in numerical order, Step 1 through Step 4.
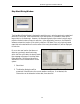
At this time, our initial run data should still be in view. To create a GPS track map, select the
Map Setup Category button, then select the GPS Trackmap Runlog tab, located at the bottom of
the DataLink II screen. The instructions are presented in order from 1 through 4.
Step 1: Select / Create GPS Map
Left click over the Select / Create GPS Map. This opens a Select/Create GPS MAP dialog box.
The user is presented with three choices, which are self explanatory:
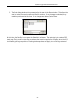
1. New (Clear) Lap File: This allows the creation of a new track map.
2. Open Different Lap File: This allows the user to load a
previously created track map.
3. Rename/Save Lap File: This allows the user to rename a
previously created track map or simply save an
existing track map.
For the initial run, we will select New Trackmap and then OK.
The Save As dialog box will now be opened for the user. Simply type the desired track or
location name (example: Road Atlanta) then select the Save button. Following this action, the
user will be returned to the DataLink II software. The Create GPS Trackmap Runlog page will
now display all of the GPS driving data. Remember, at this point the GPS data in view is all data
logged from the start until the end of recording.