Magellan® 1000i Omni-Directional Imaging Scanner Quick Reference Guide Guida Rapida Guide de Référence Rapide Guía de Referencia Rápida Schnellanleitung Referência Rápida
Datalogic Scanning, Inc. 959 Terry Street Eugene, Oregon 97402 Telephone: (541) 683-5700 Fax: (541) 345-7140 An Unpublished Work - All rights reserved. No part of the contents of this documentation or the procedures described therein may be reproduced or transmitted in any form or by any means without prior written permission of Datalogic Scanning, Inc. or its subsidiaries or affiliates ("Datalogic" or “Datalogic Scanning”).
Table of Contents English .......................................................... 1 Italiano ........................................................... 5 Español ......................................................... 9 Portugues .................................................... 13 Francais ....................................................... 17 Deutsch ....................................................... 21 Chinese ....................................................... 25 Japanese .........
NOTES ii Magellan® 1000i
DATALOGIC SCANNING, INC. MAGELLAN® END USER LICENSE AGREEMENT Notice to End User: The Datalogic Product you have acquired contains embedded Software, which is integral to the product's operation. This Software is being provided to you under license, subject to the terms and conditions of this Agreement. If you use the Datalogic Product, you will be deemed to have accepted the terms and conditions of this Agreement.
3.1 3.2 3.3 Any copying, installing, reproduction, remanufacture, reverse engineering, electronic transfer, or other use of the Software on other than the designated Datalogic Product will be a material breach of this Agreement. However, Datalogic may elect not to terminate this Agreement or the granted licenses, but instead may elect to notify End User that End User is deemed to have ordered and accepted a license for each breaching use.
.1 7.2 7.3 7.
embedded Software after termination shall constitute End User's agreement to be bound by the terms and conditions of this Agreement for such use. 11. General Provisions. 11.1 11.2 11.3 11.4 11.5 Entire Agreement; Amendment. This document contains the entire agreement between the parties relating to the licensing of the Software and supersedes all prior or contemporaneous agreements, written or oral, between the parties concerning the licensing of the Software.
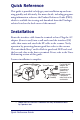
Quick Reference This guide is provided to help get your installation up-and-running quickly and efficiently. For more details, including programming information, reference the Product Reference Guide (PRG), which is available for viewing and download from the Datalogic website listed on the back cover of this manual. Installation Route the interface cable from the terminal or host.
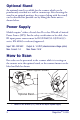
Optional Stand An optional stand is available for the scanner which can be permanently attached to a wall or countertop. After locating the stand in an optimal position, the scanner (along with the stand) can be detached for portable use by lifting the entire unit as shown below. Power Supply Models require1 either a Listed class II or class III with a Limited Power Source (LPS).
Targeted Scanning Mode In order to read a bar code (switch option only)... • press and hold the switch. An aiming pattern will appear. • with the aiming pattern fairly centered over the bar code to be read, release the switch to read the label. The scanner will not read bar codes while the switch is pressed. Targeted Scanning Mode will read bar codes in any orientation. The scanner will return to full pattern Omni Mode after a configurable time has elapsed.
3. Verify that the interface cable is securely attached to the scanner. 4. Check that the bar codes are of sufficient quality to be recognized by the scanner. Wrinkled, smudged, or torn labels can cause the scanner to not read at all. Scan known-good labels of an active symbology1 to check the scanner's read operation. 5. Ensure that the scanner's interface type is compatible with the host terminal by consulting your POS system manual and/or the Product Reference Guide.
Guida Rapida La presente guida vi aiuterà ad eseguire un'installazione rapida ed efficace. Per ulteriori dettagli, inclusi i dettagli relativi alla programmazione, consultare la Guida di Riferimento del Prodotto, che può essere consultata online e scaricata dal sito di Datalogic indicato sul retro del presente manuale. Installazione Svolgere il cavo d'interfaccia dal terminale o host.
Supporto Opzionale È disponibile un supporto opzionale che può essere attaccato permanentemente alla parete o sul bancone. Dopo aver posizionato il supporto in posizione ottimale, lo scanner e il supporto potranno essere staccati per l'utilizzo mobile sollevando l'intera unità come illustrato in basso. Alimentazione Questi modelli1 devono essere alimentati con alimentatori omologati di classe II o classe III LPS (Limited Power Source, sorgente di corrente limitata).
Modalità di Scansione a Bersaglio Per utilizzare lo scanner con il pulsante opzione: • tenere premuto il pulsante. Apparirà un mirino luminoso. • Posizionare il mirino luminoso al centro del codice a barre da leggere e rilasciare il pulsante opzione per eseguire la lettura. Lo scanner non legge i codici, se il pulsante è premuto. La modalità di scansione bersaglio consente di leggere codici orientati in qualunque verso. Lo scanner ritornerà in modalità Omni dopo un periodo di tempo impostabile.
3. Verificare che il cavo d'interfaccia sia saldamente collegato allo scanner. 4. Controllare che i codici a barre siano di qualità sufficientemente leggibile per lo scanner. Etichette piegate, strappate o sbavate potrebbero non essere leggibili. Utilizzare etichette sicuramente leggibili che appartenengono ad un sistema di simbologia1 utilizzato per controllare il funziomento dello scanner in lettura. 5.
Guía de Referencia Rápida La finalidad de esta guía es ayudarle a instalar el equipo de forma rápida y eficiente. Para obtener más datos, incluida información de programación, consulte la Guía de referencia del producto (PRG) que podrá ver y descargar de la página Web de Datalogic, cuya dirección aparece en la contracubierta de este manual. Instalación Encamine el cable de interfaz desde el terminal o el equipo central.
Soporte Opcional Existe un soporte opcional para el escáner que puede acoplarse de forma permanente a una pared o a un mostrador. Después de colocar el soporte en la posición óptima, se podrá desmontar el escáner (junto con el soporte) si desea trasladarlo de lugar. Para ello, solo tiene que elevar la unidad completa, tal y como muestra la imagen. Suministro Eléctrico Se require fuente limitada1 de alimentación (LPS) alistada en la clase II o la clase III para estos modelos.
Modo de Exploración de Objetivo Para leer un código de barras (solo opción de interruptor)... • Mantenga pulsado el interruptor. Aparecerá un haz para apuntar. • Centre el haz para apuntar lo más posible sobre el código de barras que vaya a leer y suelte el interruptor para leer la etiqueta. El escáner no leerá códigos de barras mientras el interruptor permanezca pulsado. El modo de exploración de objetivo leerá los códigos de barras en cualquier dirección.
3. Compruebe que el cable de la interfaz está perfectamente acoplado al escáner. 4. Compruebe que los códigos de barras tienen la calidad suficiente para ser reconocidos por el escáner. El escáner no leerá etiquetas arrugadas, emborronadas o rasgadas. Para comprobar el funcionamiento de la función de lectura del escáner, explore etiquetas que contengan una simbología activa en buen estado1. 5. Asegúrese de que el tipo de interfaz del escáner es compatible con el terminal central.
Referência Rápida Este guia é fornecido para ajudar a ter sua instalação funcionando rápida e eficientemente. Para obter maiores detalhes, incluindo informações de programação, consultar o Guia de Referência do Produto (PRG), que está disponível para visualização e download a partir do web-site Datalogic listado na contracapa deste manual. Instalação Rotear o cabo de interface a partir do terminal ou do host. Ligar o adaptador C.A.
Suporte Opcional Um suporte opcional está disponível para o leitor, que pode ser conectado permanentemente a uma parede ou um balcão. Após localizar o balcão em uma boa posição , o leitor (paralelo ao balcão) pode ser destacado para uso portátil, levantando a unidade como mostrado abaixo. Adaptador C.A / C.C. Modelos podem ser classificados1 como Classe II ou Classe III, com Fonte de Energia Limitada (LPS).
Modo de Leitura Direcionada Para ler um código de barra (somente opção de butão)... • Pressionar e segurar o butão. Um padrão almejado irá aparecer. • Com o padrão almejado centrado no código de barra para ser lido, soltar o butão para ler a etiqueta. O leitor não irá ler códigos de barra enquanto o butão estiver pressionado. Modo de Leitura Etiquetado irá ler códigos de barra em qualquer orientação. O leitor irá retornar para o padrão total Omni Mode depois que um tempo configurável tiver passado.
3. Verificar se o cabo de interface está conectado de forma segura ao leitor. 4. Verificar se os códigos de barra são de qualidade suficiente para serem reconhecidos pelo leitor. Etiquetas dobradas, manchadas ou molhadas podem fazer com que o leitor não as leia. Fazer o scan de etiquetas boas de uma simbologia1 para verificar a operação de leitura do leitor. 5.
Guide de Référence Rapide Ce guide est fourni afin de vous aider à installer rapidement et efficacement votre lecteur de codes à barres. Pour plus de détails concernant les informations sur la programmation, consultez le Guide de Référence du Produit qui est disponible soit pour lecture soit pour téléchargement à partir du site Internet Datalogic indiqué au dos de ce manuel. Installation Acheminez le câble d'interface à partir du terminal ou de l'ordinateur hôte.
Support Facultatif Un support facultatif est disponible pour le scanner qui peut être fixé en permanence à un mur ou à un comptoir. Après avoir placé le support dans une position optimale, le scanner (ainsi que le support) peuvent être détachés pour un usage portatif en levant l'unité complète comme illustré ci-dessous. Alimentation Électrique Modèles1 référencés Classe II et Classe III nécessitant une alimentation externe (Limited Power Source).
Mode Saisie Ciblée Afin de saisir un code-barre (option commutation uniquement)... • appuyez et maintenez la pression sur le bouton de commutation. Un rayon de visée apparaîtra. • centrez bien le rayon de visée au-dessus du codes à barres qui doit être saisi, puis relâchez le bouton pour lire l'étiquette. Le scanner ne lira pas les codes à barres tant que le bouton sera enfoncé. Le Mode de Saisie Ciblée lira les codes à barres dans n'importe quel sens.
3. Vérifiez que le câble d'interface est connecté correctement au lecteur. 4. Contrôlez que la qualité des codes à barres est suffisante pour que ceux-ci soient reconnus par le scanner. Les étiquettes pliées, sales ou déchirées peuvent empêcher le scanner de lire les codes. Saisissez des étiquettes correctes avec une symbologie1 active afin de vérifier que le scanner effectue l'opération de saisie correctement. 5.
Schnellanleitung Diese Anleitung soll eine schnelle und effiziente Installation und Inbetriebnahme ermöglichen. Weitere Einzelheiten, u.a. zur Programmierung, entnehmen Sie dem Produktleitfaden (Product Reference Guide, PRG), der zum Anzeigen und Herunterladen auf der DatalogicWebseite verfügbar ist (siehe Rückseite dieses Leitfadens). Installation Verlegen Sie das Interfacekabel vom Haupt- oder Endgerät.
Optionaler Ständer Zu dem Scanner gibt es einen optionalen Sockel zur dauerhaften Befestigung an einer Wand oder Ladentheke. Nachdem Sie den Sockel optimal positioniert haben, können Sie den Scanner (mit Sockel) für freihändigen Einsatz abnehmen, indem Sie das gesamte Gerät wie unten dargestellt anheben. Stromversorgung Die Modelle1 erfordern eine Stromquelle der Klasse II oder III mit einer Leistungsbegrenzung (LPS).
Zielscanmodus So lesen Sie einen Barcode ein (nur optionaler Schalter): • Schalter gedrückt halten Ein Zielmuster wird angezeigt. • Zielmuster entsprechend über dem einzulesenden Barcode ausrichten und Schalter zum Scannen des Etiketts loslassen. Bei gedrücktem Schalter werden die Barcodes vom Scanner nicht eingelesen. Mit dem Zielscanmodus werden Barcodes in jeder Ausrichtung eingelesen.
3. Sicherstellen, dass das Interfacekabel am Scanner richtig angeschlossen ist. 4. Sicherstellen, dass die Barcodes ausreichende Qualität aufweisen, um vom Scanner erkannt zu werden. Zerknitterte, beschmierte, oder angerissene Etiketten machen ein Einlesen unmöglich. Scannen Sie garantiert gute Etiketten mit aktiver Symbologie1, um die Einlesefunktion des Scanners zu überprüfen. 5.
快速参考 提供本指南帮助您迅速有效地安装和运行。欲知详情, 包括编程信息,请参阅产品参考指南(PRG),可以从本指南封 底列出的Datalogic网站浏览和下载该指南。 安装 对从终端或主机来的接口电缆进行布线。将AC适配器(如 果使用了的话)插入墙壁上的电源插座和(I/F)电缆接口,然 后布线并将I/F电缆连接到扫描器。用已知的好条形码进行检 查。扫描器的喇叭 1 应该鸣响并且/或者它的LED应该闪烁以表示读数正确, 同时将条码数据发送到主机或者终端。如果无鸣响或者 不闪烁,参阅本指南的故障检修部分。 2 至此,扫 描器安装完毕。 1 蜂鸣器和LED的状态可选,并可由先前用户禁止。 快速参考 25
可选用机座 可使用可选机座将扫描器永久地装在墙壁或柜台上。将 机座放在一个最佳位置后,可以像图例所示的那样举起整个 扫描器(与机座一起)进行使用。 电源 有些型号要求使用所列出的第2类或者LPS电源3对扫描 器进行直接供电。电源块要求class II或class III有限电源。 为保证安全证书有效,class III输入源必须满足 IEC/EN60950-1(EN 60335-series, EN 60065 or relevant) 标准。 输入:100-240 VAC 输出:5 - 14 VDC 最大电流:1.
瞄准扫描模式 为了读条码 (仅适用于开关型) ,应该: • 压下开关并保持,进入瞄准模式。 • 在瞄准模式下对准要读取的条码,松开开关读标签。 • 注意 在开关被按着时扫描器不会读 条码。 瞄准扫描模式能在任意方向上 读条码。 在一定时间之后扫描器将返回 到全向模式。 故障处理 如果扫描器不能正常工作,应当进行以下检查: 1. 如果扫描器使用外部电源供电而外部电源发生故障,则扫 描器不会工作。用已知的能正常工作的电源进行替换并重 新进行试验。 2.
3. 核查接口电缆是否牢固地与扫描器相连接。 4. 检查条码质量是否完好以便能让扫描器识别。起皱纹的、 弄脏的、或者撕坏的标签可能导致扫描器根本无法读出。 扫描已知完好的标签来检查扫描器的读操作。 5. 查阅POS系统手册和/或者产品参考指南确保扫描器的接 口类型与主机终端兼容。 如果扫描器仍然不能正常工作,可与本地供应商或者PSC 用户支持服务中心联系。 符合法规声明 本设备符合第15章有关规定。其操作符合以下条件: 1. 本设备不会引起有害的干扰;同时 2.
クイック・リファレンス このガイドでは、迅速かつ効率的にインストール手順を実行するため の情報を提供します。プログラミング情報を含む詳細については、製 品リファレンス・ガイド (PRG) を参照してください。PRG は、このマ ニュアルの背表紙に記載されている Datalogic Web サイトからダウン ロードすることができます。 インストール インターフェース・ケーブルをターミナルまたはホストに接続します。 必要に応じて AC アダプタを壁コンセントおよびインターフェース (I/F) ケーブルに接続し、I/F ケーブルをスキャナに接続します。状 態のよいバーコードをスキャンし、正しく作動するか確認してくださ い。ユニットはビープ音 1 を発するか、読み取り正常 LED を点滅させ、 ホストまたはターミナルにバーコード・データを送信します。正しく 作動しない場合は、このガイドのトラブルシューティング・セクショ ンを参照してください。 これで、スキャナのインストールが完了しました。 Ȁ 1 ビーパーおよび LED の動作は選択可能です。また、以前のユーザーにより無効にさ れている場合があります。 ク
オプションのスタンド オプションのスタンドを使用すると、壁面または台上にスキャナを固 定することができます。スタンドを最適な位置に配置した後でも、図 のようにユニット全体を持ち上げることにより、スタンドを取り付け たままスキャナを手持ちで使用することができます。 電源 一部のモデルは 2 、ユニットに直接電源を必要とします。 このモデルはリステッドクラス II かクラス III のどちらかの限られた電源 (LPS)を必要とします。安全証明が有効であるためには、クラス III の入力 電源が IEC/EN60950-1(EN 60335 シリーズ、EN60065、もしくは同等)に承認 されなければならなりません。 入力: 100 - 240 VAC 出力: 5 -14 VDC 最大. 電流: 1.0A 最大.
目標スキャニング・モード バーコードを読み取るには (スイッチ・オプション使用の場合のみ) … • • スイッチを押したままにします。照準パターンが表示されま す。 照準パターンを読み取るバーコードの中央に当て、スイッチ を放してラベルを読み取ります。 注記 スイッチを押したままの状態では、スキ ャナはバーコードを読み取りません。 目標スキャニング・モードでは、任意の 向きのバーコードを読み取ることができ ます。 設定時間を過ぎると、スキャナはフル・ パターン・オムニ・モードに戻ります。 トラブルシューティング スキャナが正しく作動しない場合は、以下の確認作業を行ってく ださい。 1. 2.
3. 4. 5. インターフェース・ケーブルがスキャナにしっかりと接続さ れていることを確認してください。 バーコードの状態がスキャナで認識するのに十分な状態であ ることを確認してください。ラベルにしわ、汚れ、破れなど があると、スキャナでまったく読み取れない場合があります。 有効なシンボル体系 3 が印刷された状態のよいラベルをスキ ャンして、スキャナの読み取り機能をテストしてください。 スキャナのインターフェースのタイプとホストターミナルと の互換性を確認してください。確認方法は、POS システムマ ニュアルまたはスキャナの製品ガイドを参照してください。 上記の方法を実行してもスキャナが正しく作動しない場合は、お近く のサプライヤーまたは PSC カスタマーサポートサービスまでご連絡く ださい。 3 さまざまなバーコード体系ごとに、スキャナでの読み取りを有効または無効にする ことができます。 適合性について 本製品は、VCCI に適合しています。操作は以下の条件に従います。 1. 2.
NOTES
NOTES
DECLARATION OF CONFORMITY Datalogic hereby declares that the equipment specified below has been tested and found compliant to the following directives and standards.
Australia Japan Datalogic Scanning Pty Ltd Telephone: [61] (2) 9870 3200 australia.scanning@datalogic.com Datalogic Scanning KK Telephone: 81 (0)3 3491 6761 japan.scanning@datalogic.com France and Benelux Latin America Datalogic Scanning Sarl Telephone: [33].01.64.86.71.00 france.scanning@datalogic.com Datalogic Scanning, Inc Telephone: (305) 591-3222 latinamerica.scanning@datalogic.com Germany Singapore Datalogic Scanning GmbH Telephone: 49 (0) 61 51/93 58-0 germany.scanning@datalogic.