
Installation manual

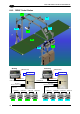
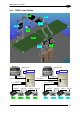


REDUNDANT SYSTEMS
49
6
6.4.1 Master Working Controller
After the Net and Scanner setting, complete the Working configuration as follows:
1. Redundancy Parameters> Enable = checked.
2. Redundancy Parameters> Topology Redundancy Role = Master Working.
3. Data Communication Settings> Built-in Ethernet> Line Parameters> IP_address Active =
insert the IP address of your Master Working.
4. Data Communication Settings> Built-in Ethernet> Line Parameters> IP_address Stand-by
= insert the IP address of your Master Protecting.
NOTE
The IP_address Active must be different from the IP_address Stand-by.
The two IP_addresses must be on the same sub-net.
5. Data Communication Settings> Built-in Ethernet> Line Parameters> IP_netmask = insert
the IP netmask.
6. If it is necessary set parameter: Data Communication Settings> Built-in Ethernet> Line
Parameters> IP_ gateway = insert the IP gateway.
7. If it is necessary set parameter: Data Communication Settings> Built-in Ethernet> Line
Parameters> IP_ dns1 = insert the IP dns1.
8. If it is necessary set parameter: Data Communication Settings> Built-in Ethernet> Line
Parameters> IP_ dns2 = insert the IP dns2.
For the use of WebSentinel it’s necessary to set the parameters below:
9. Data Communication Settings> Built-in Ethernet> Services> WebSentinel Client Enable =
checked.
10. Data Communication Settings> Built-in Ethernet> Services> UserSocket#3 Status =
checked.
NOTE
When a UserSocket# is used with WebSentinel, Data Tx must be unchecked.
11. Digital I/O Setting> Digital Output Lines Setting> Output 6> Use = Redundancy.
NOTE
Only one Controller (the Working or the Protecting) will have the OUT-6 On.
This output is used to inform the Host about which is the Active Controller:
OUT-6 On = Controller is Active
OUT-6 Off = Controller is in Stand By
12. Send the configuration to the Working Controller: Send with Options + Environmental
Parameters.
13. Save the configuration on the PC.