
Installation manual

DS2400N REFERENCE MANUAL
18
2
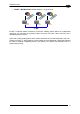
2.2.1 How To Setup/Configure the Scanner Network
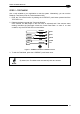
A complete ID-NET™ scanner network can be rapidly setup, as follows:
Mounting & Connection
1. Mechanically mount/install all the readers (refer to par. 3.2 and 3.2.5).
2.
Wire ID-NET™ (refer to par. 4.3 or 5.3).
3.
Connect the planned Master scanner to a PC by means of the Genius™ configuration
software.
4. Power up the entire system.
Configuration
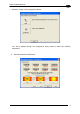
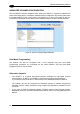
1. Launch Genius™.
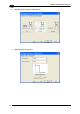
2. From the Genius™ Device Menu select “Local Device Network Settings” and program the
Role of the Master scanner (Synchronized or Multidata).
This procedure requires the Network Baud Rate be the same for all Slaves and Master,
(500 kbs is the default value). It can be changed after network setup using Genius™
through the Master scanner. See also the alternative procedure in the note below.
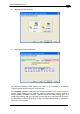
3. At the prompt to "Send updated Network configuration to the Local Device" (Master)
choose "Yes".
4. Then run the NET-AUTOSET procedure from the Icon in the Devices Area. Genius™
sets all slave scanners according to the Master Role (Synchronized or Multidata), and
assigns each a random address. If necessary, this address can be changed through the
Network Wizard.
5. Configure the System parameters via Genius™.
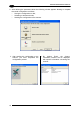
6. If using the CBX connection box equipped with a BM100 Backup module, perform
System Backup at the Master.
The scanner network is ready.
NOTE
If necessary, the ID-NET™ baudrate can be set individually on each Slave
scanner to match the Master. Connect each Slave to Genius™ and set the
Reading System Layout > Network Baudrate parameter. Then follow the
procedure above.
NOTE
An alternative method of programming scanner address and role
assignment can be accomplished by using the "Connectivity Programming
Barcodes" (refer to the "Setup Procedure Using Programming Barcodes"
document on the product CD).