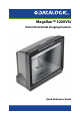
MagellanTM 3200VSi Omni-Directional Imaging Scanner Quick Reference Guide
Datalogic Scanning, Inc. 959 Terry Street Eugene, Oregon 97402 USA Telephone: (541) 683-5700 Fax: (541) 345-7140 An Unpublished Work - All rights reserved. No part of the contents of this documentation or the procedures described therein may be reproduced or transmitted in any form or by any means without prior written permission of Datalogic Scanning, Inc. or its subsidiaries or affiliates ("Datalogic" or “Datalogic Scanning”).
Table of Contents Quick Reference......................................................................................... 1 Labeling and Nomenclature ................................................................. 1 Installation ................................................................................................... 2 Power Supply ....................................................................................3 How to Scan ...................................................................
NOTES ii MagellanTM 3200VSi
DATALOGIC SCANNING, INC. MAGELLANTM END USER LICENSE AGREEMENT Notice to End User: The Datalogic Product you have acquired contains embedded Software, which is integral to the product's operation. This Software is being provided to you under license, subject to the terms and conditions of this Agreement. If you use the Datalogic Product, you will be deemed to have accepted the terms and conditions of this Agreement.
other person or organization, for purposes other than as expressly provided in this Agreement, without Datalogic's prior written consent. 3. Transfers, Support. 3.1 3.2 3.3 Any copying, installing, reproduction, remanufacture, reverse engineering, electronic transfer, or other use of the Software on other than the designated Datalogic Product will be a material breach of this Agreement.
CIFICALLY DISCLAIMS THE IMPLIED WARRANTIES OF MERCHANTABILITY AND FITNESS FOR A PARTICULAR PURPOSE. 7. Infringement. 7.1 7.2 7.3 7.
embedded software and shall return to Datalogic or destroy all non-embedded software covered by this Agreement, and shall furnish Datalogic with a certificate of compliance with this provision signed by an officer or authorized representative of End User. For embedded software, End User agrees to sign a waiver prepared by Datalogic concerning further use of the embedded Software.
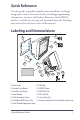
Quick Reference Use this guide to quickly complete your installation and begin using your scanner. For more details, including programming information, reference the Product Reference Guide (PRG), which is available for viewing and download from the Datalogic website listed on the back cover of this manual. Labeling and Nomenclature 2 1 3 4 5 6 7 8 9 1. Back Cover 2. Scanner Push Button 3. Camera Push Button 4. Scan Window 5. Cable Connector Cover 6. Checkpoint EAS Wire Cavity 7.
Installation Connect the scanner to the host (terminal) using the interface (I/ F) cable as shown below. A cable from an older existing installation can be re-used if it uses Power Off the Terminal (POT), unless it is a USB POT cable. If external power is used/needed, plug the AC Adapter into the AC wall outlet, then connect it to the I/F cable as shown in ‘b’ and ‘c’ of the illustration. Scan some known-good bar code samples to verify correct operation.
Power Supply Models require1 either a Listed class II or class III with a Limited Power Source (LPS). For the safety certification to be valid, class III input power sources must be IEC/EN60950-1 (EN 60335series, EN 60065 or relevant) approved. Input: 100 - 240 VAC Max. Current: 1.5 A Output: 12 VDC Max. Power: 18 W How to Scan Bar codes can either be presented to the scanner’s window or pushed past it using a “sweep” technique.
Troubleshooting Use this table to resolve common problems. PROBLEM SOLUTION Exchange the power supply with a known Scanner does not power-on good power supply and retest operation. Consult your technical support personnel or refer to your host system manual to verify the proper interface type, cable and conNo communication with the host nection port(s) for the scanner. Verify the interface cable is securely attached to the host and the scanner. Make sure the window is clean.
Productivity Index Reporting™ Option Your scanner may be equipped with the optional Productivity Index Reporting™ feature. This feature allows for data collection on the readability index of bar codes scanned by the scanner. This data may be transmitted to the POS Terminal where it may be easily sorted for action by the MIS department to improve bar code quality at the front end.
Table 1. Scanner Push Button Functions PRESS DURATION FUNCTION COMMENT Increments volume Press the push button momentarily to increase speaker volume. When the loudest volume is reached, a repeated press of the push button cycles volume back to the lowest setting, then volume increases on subsequent press(es). Four volume levels are available. Increments tone Press the push button for approximately 2 seconds, then release. Each time this is done, the beeper will sound at one of three tones.
LED and Beeper Indicators The scanner’s beeper sounds and its green LED illuminates to indicate various functions or errors on the scanner. The tables below list these indications. An exception to the behaviors listed in the tables is that the scanner’s functions are programmable, and may or may not be turned on. For example, certain indications, such as the power-up beep can be disabled using programming barcode labels. Table 2.
Table 2. Green LED Indications LED INDICATION INDICATION COMMENT Diagnostics Varies (see Error Codes on page 9 for more information) The LED can provide diagnostic feedback if the scanner discovers a problem during SelfTest. Prog. Mode See Host Disable above. The scanner is in Programming Mode. Table 3. Beeper Functions BEEPER INDICATION COMMENT Single beep The Power-On LED indication is a configurable feature which can be enabled or disabled.
Error Codes If an error is detected, the scanner will sound a long low tone (for three seconds) and flash its LED, indicating a failure. When this occurs, press the Scanner Push button to hear the error code. If it is configured to do so, the scanner will sound a series of beeps corresponding to the error code and/or flash its LED simultaneous to the beeps. The table below describes what these codes mean and what action should be taken for each.
NOTES 10 MagellanTM 3200VSi
Going Green Thank you for using the bar code mask on the opposite side of this page. This manual has been formatted to minimize the quantity of pages needed to provide all of the programming bar codes available for this product.
Bar Code Mask Cut a hole in this page and remove it from the manual as indicated to create a sleeve through which bar codes (starting on the following page) can be individually viewed and scanned. It is important that only one bar code at a time be presented to the scanner. 1 2 3 1. Bar Code Mask Sheet 3. Manual (folded) 2.
Programming Upon completing the physical connection between the reader and its host, proceed directly to the Programming Bar Codes table below to locate the interface type the reader is connected to (for example: RS-232, Keyboard Wedge, USB, etc.). Use the Bar Code Mask on the preceding page to isolate the bar code you intend to scan. Scan a Start/End bar code once to enter Programming Mode.
START / END IBM 4683 Port 5B IBM 4683 Port 9B IBM 4683 Port 17 USB-OEM 14 MagellanTM 3200VSi
START / END USB Keyboard USB COM Interface Keyboard Wedge A (PC/XT w/alternate Key Encoding) NOTE Quick Reference Guide If other than Keyboard Wedge A with USA keyboard is needed, see the PRG or On Screen Programming for additional options.
FCC Statement This Equipment has been tested and found to comply with the limits for a Class B digital device, pursuant to part 15 of the FCC Rules. These limits are designed to provide reasonable protection against harmful interference in a residential installation. This equipment generates uses and can radiate radio frequency energy and, if not installed and used in accordance with these instructions, may cause harmful interference to radio communications.
Warranty Datalogic warrants to Customer that this product will be free from defects in materials and workmanship for a period of 3 years from product shipment. In order to obtain service under this Warranty, Customer must notify Datalogic of the claimed defect before the expiration of the Warranty period and obtain from Datalogic a return authorization number for return of the product to designated Datalogic service center.
ered under Warranty. If a product is determined to be not repairable customer will be notified and product may be returned to customer at their request. A minimum repair fee may be charged. Limitation of Liability DATALOGIC's REPAIR OR REPLACEMENT OF DEFECTIVE PRODUCT AS SET FORTH ABOVE IS THE CUSTOMER’S SOLE AND EXCLUSIVE REMEDY ON ACCOUNT OF CLAIMS OF BREACH OF WARRANTY OR PRODUCT DEFECT.
EUROPEAN DECLARATION OF CONFORMITY Datalogic Scanning, Inc. hereby declares that the aparatus specified below has been tested and found compliant to the following European Council Directives and Harmonized Standards. Equipment Barcode Scanning Equipment Type: Apparatus: MagellanTM 3200VSi and MagellanTM 3300HSi Manufactured Datalogic Scanning, Inc. by: 959 Terry St. Eugene, OR USA Ph: 541-683-5700 Datalogic Scanning Slovakia s.r.o.
Australia Japan Datalogic Scanning Pty Ltd Telephone: [61] (2) 9870 3200 australia.scanning@datalogic.com Datalogic Scanning KK Telephone: 81 (0)3 3491 6761 japan.scanning@datalogic.com France and Benelux Latin America Datalogic Scanning SAS Telephone: [33].01.64.86.71.00 france.scanning@datalogic.com Datalogic Scanning, Inc Telephone: (305) 591-3222 latinamerica.scanning@datalogic.com Germany Singapore Datalogic Scanning GmbH Telephone: 49 (0) 61 51/93 58-0 germany.scanning@datalogic.