
Product specifications


UPC-A
Product Reference Guide 83
UPC-A — continued
Code I.D. Selection
The Code I.D. for this symbology consists of one or two user-selectable ASCII
characters. It can be appended previous to or following the transmitted UPC-A
bar code data depending on how this feature is enabled.
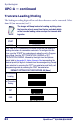
Example: Setting the UPC-A Code I.D.
To configure this feature:
1. Determine which character(s) you would like to use to represent the
UPC-A symbology. Reference
Appendix A, ASCII Conversion Chart, to find
the corresponding hex values for your chosen character(s). In this exam-
ple we’ll set a Code I.D. of “A” to represent UPC-A. The value from the
table corresponding to ‘A’ is 41. This value will be used in a step to fol-
low.
2. Scan the START bar code
3. Scan the SET UPC-A CODE I.D. bar code.
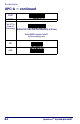
4. Turn to
Appendix B, Alpha-Numeric Pad and scan the bar codes ‘4’ and ‘1’
(the value 41 determined in an earlier step to represent a Code I.D. of
‘A’).
5. Scan the SET bar code to accept the digits scanned.
6. Turn to the
Data Editing chapter and scan the CODE ID POSITION:
BEFORE BAR CODE DATA label.
7. Scan the END bar code to exit Programming Mode.
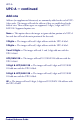
8. The resulting message string for scanned UPC-A labels would appear as
follows:
Scanned bar code data: 0123456789123
Resulting message string output: A0123456789123
NOTE
Features configured using the
Data Editing chapter are
universal and will affect all symbologies.