
Technical data
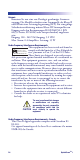
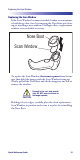
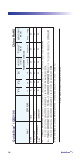
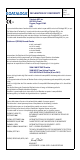
Table Of Contents
- QuickScanTM i
- Software Product Policy
- Connect/Disconnect Cable
- Connect Host Interface
- Aim and Scan
- Parts of the Imager
- Scanning Modes
- Troubleshooting
- LED and Beeper Indications
- Programming Barcodes
- Ergonomic Recommendations
- Regulatory Information
- Replacing the Scan Window
- Imager Labeling
- Datalogic ADC Limited Factory Warranty
Replacing the Scan Window
Quick Reference Guide 15
Replacing the Scan Window
If the Scan Window becomes scratched, broken or contaminat-
ed with heavy dust, fix it by removing the Nose Boot and clean-
ing or installing a new window. Datalogic offers a replacement
window as an orderable accessory.
To replace the Scan Window, first remove power from the im-
ager then hold the imager with the Scan Window facing up.
Gently pull off the Nose Boot and tilt the imager to one side to
remove the window.
Holding it by its edges, carefully place the clean replacement
Scan Window in position and secure it in place by reinstalling
the Nose Boot.
CAUTION
Proceed to the next step immedi-
ately. DO NOT leave the interior of
the imager exposed.
Nose Boot
Scan Window