Rhino TM 10 User Manual
Datalogic Mobile S.r.l. Via S. Vitalino 13 40012 - Lippo di Calderara di Reno Bologna - Italy Rhino™10 User's Manual Software Version: 1.0.x Part Number: 822001160 Ed.: 12/2011 Datalogic Mobile, Inc. Eugene, OR 97402 U.S.A. http://www.mobile.datalogic.com © 2011 Datalogic Mobile, Inc. • All rights reserved. • Protected to the fullest extent under U.S. and international laws. • Copying or altering of this document is prohibited without express written consent from Datalogic Mobile, Inc.
Contents Safety Information .......................................................................................................................................................1 Service and Support ...................................................................................................................................................1 Web Support.......................................................................................................................................................
< page intentionally left blank>
Rhino™ 10 User Manual Safety Information Your safety is extremely important. Read and follow all warnings and cautions in this document before installing, handling, and operating Datalogic equipment. You can be seriously injured, and equipment and data can be damaged if you do not follow the safety warnings and cautions. Warning: Warnings alert you to procedures that involve some amount of personal risk and may require special training or tools.
User Manual Rhino™ 10 The Rhino™ 10 Vehicle Computer The Datalogic Rhino™ 10 is a rugged Vehicle Computer designed for real-time data collection applications in warehousing, distribution, work-in-process, time and attendance, and stationary applications. Use this chapter to familiarize yourself with the Rhino™ 10 Vehicle Computer.
Rhino™ 10 User Manual Keypad The Rhino™ 10 has a 3 button Keypad on the lower front of the unit, Down, Up and Power. A LED on the keypad indicates the power state of the Rhino. Down Up Power Using the Power Button Press the Power ( ) button for 5 seconds to put the Rhino™ 10 into Suspend mode. In Suspend mode, the Rhino™ 10 continues to supply power to all memory, but turns off power to most hardware.
User Manual Rhino™ 10 Adjusting the Screen Brightness To adjust the screen brightness: Press UP button to increases the brightness. Press Down button to decreases the brightness. You can also adjust the brightness settings by going to Start > Settings > Control Panel > Backlight. Move the track bar pointer to the brightness level desired. Adjusting the Volume To adjust the volume Press and hold the Power button then press the UP button to increases the volume.
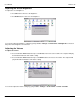
Rhino™ 10 User Manual Using the Touch-Screen The Rhino™ 10 has a 10.4 inch color VGA display with a resolution of 640 x 480 pixels with a touch-screen. The default display that appears when you turn on the Rhino™ 10 is the Windows Embedded CE 6.0 standard screen. This screen appears unless you have an application installed to automatically run on the Rhino™ 10. Navigating the Touch-Screen You can use the stylus accessory or a finger to navigate the touch screen.
User Manual Rhino™ 10 Resetting the Rhino™ 10 There are several reset methods for the Rhino™ 10. A warm boot terminates an unresponsive application and clears the working RAM, but preserves the RAM and flash file systems. Registry is restored from persistent memory if available or returned to factory default. A cold boot forces all applications to close, completely reinitializing the system. It clears the working RAM and RAM file system, but the flash file system is preserved.
Rhino™ 10 User Manual Connecting a USB Scanner 1. Loosen the screws on the USB retainer and move the retainer away from the USB connector. 2. Plug the cable into one of the USB ports. Depending on the scanner you are attaching, you may hear a series of beeps and the Good Read light may flash. 3. Slide the USB retainer toward the connector until it is firmly against the USB connector. Tighten the two screws. 4.
User Manual Rhino™ 10 3. Select the tab for the port you want to use. Set the parameters to match the device you are connecting. Termination characters are stripped from the data sent by the scanner and new termination characters are added as defined in the checkboxes. These settings are common for all ports. You can check the configuration by sending data from your device (scan a label). If the data is received with no errors it is shown in the Test Data text box.
Rhino™ 10 User Manual If you want to temporarily disable ScanWedge, click Exit. A confirmation dialog will ask if you really want to disable ScanWedge. The next time you start ScanWedge it will restore the ports as you configured them. ScanWedge will also resume on the next boot. Verify that your scanner is working by opening any application that accepts keyboard data, such as WordPad, then scan a barcode label and the data will appear in the application. Bluetooth 1. Select the Bluetooth Tab.
User Manual Rhino™ 10 4. Once the scanner is in discovery mode, simply tap “Scan” on the Bluetooth tab. After a few seconds a list of all available Bluetooth device names will be displayed in the Devices list box. 5. Select the device you want to pair with the Rhino™ 10 and tap “Pair”. If the scanner has security enabled an Authentication Request dialog will appear. You can use an attached keyboard or use the SIP to enter the PIN.
Rhino™ 10 User Manual 6. Once the scanner is paired, you can test it by scanning a label and examining the Test Data box. At this point, you should save the configuration. Once the pairing has been saved ScanWedge will attempt to re-pair with the scanner on each power up or whenever ScanWedge is restarted. When the dialog appears simply tap Scan to re-pair with the scanner.
User Manual Rhino™ 10 Increasing Memory Storage You can use an SD card to increase file storage and install software. The Rhino™ 10 currently supports SD and SDHC cards that hold up to 32 GB of information. The SD card slot is located on the top of the Rhino™ 10 under the left top cover. See the Installation manual on how to install a SD memory card. Once installed, the SD Memory card is treated by WinCE as a Hard Disk called StorageCard.
Rhino™ 10 User Manual The following is a partial list of programs that are on your Rhino™ 10, in the order they appear in the Start menu.
User Manual Rhino™ 10 The Keyboard and Large Keyboard selections are standard Microsoft keyboards, and work just as a standard keyboard. The small input panel works best with a stylus while the Large Keyboard works best with a finger. The Numeric Keypad takes up less space on the screen, and allows inputting numeric data. Clicking SHIFT on the Numeric Keypad will shift the SIP into function key mode allowing the user to input F1-F12.
Rhino™ 10 User Manual Vertical Keypad provides the same functionality as the Numeric Keypad, but in a vertical orientation. Typing With the Onscreen Keyboard On the soft keyboard that is displayed, tap the keys with your stylus or finger. To type lowercase letters, tap the keys. To type a single uppercase letter or symbol, tap the Shift key. To type multiple uppercase letters or symbols, tap the CAP key. Selecting Typed Text If you want to edit or format typed text, you must select it first.
User Manual Rhino™ 10 2. Connect the null modem cable on COM1 of the Host. 3. Configure ActiveSync to use COM1. The following settings should be applied in the ActiveSync Connection Settings dialog box: On Rhino™ 10 1. Make sure no other application is using the COM1 port. In particular, check if ScanWedge is running and if so, open the dialog and Exit. 2. Navigate to \Windows and locate ActiveSyncLauncher. 3. Connect the serial cable to Com1 (the right most DB9) 4. Double tap ActiveSyncLauncher.
Rhino™ 10 User Manual 5. When connected, the dialog box will close and the ActiveSync icon will appear in the system tray. Troubleshooting Host doesn’t recognize when the serial cable is connected, or doesn’t respond. If a previous host application left the COM1 port in an unknown state.
User Manual Rhino™ 10 Setting Up 802.11 Radio Communications The Rhino™ 10 has an internal 802.11 b/g radio from Summit Data Communications. The Rhino™ 10 uses the Summit Client Utility (SCU) to configure the radio. Go to http://www.summitdatacom.com for latest version of the Summit Users guide. Click on the Support - > Documentation tab and select the User Guide for Windows CE.NET. If you know the setup parameters you need, you can login as an administrator.
Rhino™ 10 User Manual Developing a Windows CE Application To develop applications for the Rhino™ 10, all you need is Visual Studio 2005 (or newer) Express or Professional and a network connection. There are several books available on developing applications for Windows CE devices (books on Windows Mobile are also useful). Please note that the Rhino™ 10 comes with .NET Compact Framework 3.5 preinstalled.
User Manual Rhino™ 10 Developing server applications for use with Remote Desktop Protocol The Rhino™ 10 supports Microsoft Remote Desktop Protocol (RDP). RDP allows the Rhino™ 10 to connect to a server and automatically execute server based applications using the Rhino™ 10 as a remote interface device. All of the features in the Rhino™ 10 are available to the server application.
Rhino™ 10 User Manual 3. Once you have copied the necessary files to your SD card, insert the SD card into the Rhino™ 10. Note the SD Card slot is contained inside the upper left cover of the Rhino. 4. Navigate to the StorageCard folder on the Rhino 10 and run your application. Installing Applications Using Network Transfer 1. Open Internet Explorer 2. Enter the URL of a server on your Network, e.g.: \\MyServer\Files. 3. Navigate to the folder you need and select the file you want to transfer.
User Manual Rhino™ 10 How AutoStart Uses Wceload If you intend to create highly interactive installers, you should either install the CABs manually or review the section on “Interactive CAB Install” in this chapter. In certain environments, CAB files will be deleted after execution. To prevent the CAB file from being deleted, write protect the file before copying the file onto the device. CAB files are installed by AutoStart using the Wceload.exe application.
Rhino™ 10 User Manual Autostart.ini is a text file that AutoStart will run upon startup of the Rhino, and after any CAB files are installed. This file should be placed in the \FlashDisk folder. AutoStart will run the Autostart.ini file on each reboot of the device. Line Formatting Each line of the Autostart.ini can consist of Autostart options, an executable, and any command line arguments. < Autostart option(s)> Sample: - \windows\pword.exe \file.
User Manual Rhino™ 10 Cold Reset Only: This will cause the line to execute only after a Cold Reset. An empty line will be treated as a comment line. Combining Options Autostart options can be combined together as shown in the following sample: ?- \Windows\Pword.exe This line would: Request confirmation before executing the line. The next line would not be processed before the confirmation is answered. Run the next line without waiting on the current line to complete execution.
Rhino™ 10 User Manual AutoStart Query Options Parentheses are used to surround the given field and make it very clear what the value of the field is. The following table describes the results of each choice: AutoStart Query actions Button Action Yes The current line will execute. No The current line will not execute. AutoStart will continue parsing the Autostart.ini. Cancel The current line will not execute and AutoStart will discontinue parsing the Autostart.ini. Autostart.
User Manual Rhino™ 10 Troubleshooting the Rhino If you send the Rhino™ 10 in for service, it is your responsibility to save the computer data and configuration. Datalogic is responsible only for ensuring that the hardware matches the original configuration when repairing or replacing the computer. Problems While Operating the Rhino™ 10 Problem You press Power and nothing happens. Solution • Make sure you are connected to a power supply (the green LED should be on or blinking).
Rhino™ 10 User Manual Problems with Wireless Connectivity Problem Solution When you turn on the Rhino™ 10 after it was suspended for a while (10 to 15 minutes or longer) and it no longer sends or receives messages over the network. The host may have deactivated or lost your current terminal emulation session. In a TCP/IP direct connect network, you need to turn off the “Keep Alive” message (if possible) from the host so that the TCP session is maintained while a Rhino™ 10 is suspended.
User Manual Rhino™ 10 3. Use the Datalogic Image Updater to install the software on the Rhino™ 10 Flash Memory. Download the upgrade files 1. Start your web browser and go to the Datalogic web site at www.mobile.datalogic.com 2. Go to Support > Downloads. 3. Select Rhino™ 10 from the list. 4. Download the file onto the local computer, external storage device, or shared network drive to be used for the upgrade.
Rhino™ 10 User Manual Cleaning the Screen To keep the Rhino™ 10 in good working order, you may need to clean the screen whenever necessary depending on the environment in which you use the computer. Use a soft lint-free cloth or paper towel The cloth may be used dry or lightly damped with a mild cleaner or Ethanol.
User Manual Rhino™ 10 SAFETY REGULATIONS Read this manual carefully before performing any type of connection to the Rhino™ 10 vehicle computer. NOTE The user is responsible for any damages caused by incorrect use of the equipment or by inobservance of the indication supplied in this manual. General Safety Rules Use only the components supplied by the manufacturer for the specific Rhino™ 10 being used.
Rhino™ 10 User Manual United States FCC Class B This equipment has been tested and found to comply with the limits for a Class B digital device, pursuant to Part 15 of the FCC Rules. These limits are designed to provide reasonable protection against harmful interference when the equipment is operated in a residential environment. This equipment generates uses and can radiate radio frequency energy.
User Manual Rhino™ 10 WEEE Compliance Informazione degli utenti ai sensi della Direttiva Europea 2002/96/EC L’apparecchiatura che riporta il simbolo del bidone barrato deve essere smaltita, alla fine della sua vita utile, separatamente dai rifiuti urbani.
Rhino™ 10 User Manual Para obtener una información más detallada sobre la eliminación, por favor, póngase en contacto con el proveedor donde lo compró o consultar la sección dedicada en el Web site www.mobile.datalogic.com. Benutzerinformation bezüglich Richtlinie 2002/96/EC der europäischen Kommission Am Ende des Gerätelebenszyklus darf das Produkt nicht über den städtischen Hausmüll entsorgt werden. Eine entsprechende Mülltrennung ist erforderlich.
User Manual Rhino™ 10 Appendix A – Specifications Physical and Environmental Specifications Description Height: 9.2 in (23.4 cm) Width: 10.7 in (27.3 cm) Depth: 2.0 in (5.2 cm), 2.6 in (6.6 cm) at connectors Weight: 5.5 lbs (2.5 kg) Operating Voltage: 12-60 VDC input Backup: Rechargeable Nickel Metal Hydride Electrical rating: 12V 4A max, 48V 1A Operating temperature: Rhino™ 10: -10° to 50° C (14° to 122°F) Low temp.
Rhino™ 10 User Manual Datalogic Mobile S.r.l. Via S. Vitalino, 13 11 40012 - Lippo di Calderara Bologna - Italy dichiara che Rhino™ 10 modelli con funzionalità radio 802.11b/g sono conformi alle Direttive del Consiglio Europeo sottoelencate: declares that the Rhino™ 10 models with 802.11b/g radio feature are in conformity with the requirements of the European Council Directives listed below: déclare que le Rhino™ 10 modèles avec 802.
www.mobile.datalogic.com World wide Sales Network available from: www.mobile.datalogic.com/contacts Datalogic Mobile S.r.l. Via S. Vitalino, 13 40012 Lippo di Calderara di Reno Bologna - Italy Telephone: (+39) 051-3147011 Fax: (+39) 051-3147561 ©2011 Datalogic Mobile S.r.l.