
User's Manual


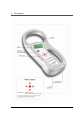

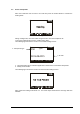


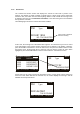

Table Of Contents
- Contents:
- 1 Description
- 2 Operation
- 3 Managing the menu
- 4 Connect your R-PO7470 to a PC
- 5 Battery managment
- 6 Take care of your reader
- 7 Specifications
- 8 Regulations
- 9 Technical supplement – Console commands
- 9.1 Introduction
- 9.2 How to connect the R-PO7470 to a PC through USB
- 9.3 How to connect the R-PO7470 to a PC through BlueTooth
- 9.4 Console commands description
- 9.4.1 Get firmware version command
- 9.4.2 Read remotely command
- 9.4.3 Sets the date’s year
- 9.4.4 Sets the date’s month
- 9.4.5 Sets the date’s day of the month
- 9.4.6 Sets the date’s day of the week
- 9.4.7 Sets the current date format
- 9.4.8 Gets the current date format
- 9.4.9 Gets the current date
- 9.4.10 Sets the time’s hour
- 9.4.11 Sets the time’s minute
- 9.4.12 Sets the time’s second
- 9.4.13 Gets the current time
- 9.4.14 Clears the memory’s data
- 9.4.15 Downloads the memory’s data
- 9.4.16 Clears the message area
- 9.4.17 Write a message to the display
- 9.4.18 Sets the “store in memory” function
- 9.4.19 Gets the “store in memory” function status
- 9.4.20 Sets the “memory hit” function
- 9.4.21 Gets the “memory hit” function
- 9.4.22 Sets the “selected hit” function
- 9.4.23 Gets the “selected hit” function
- 9.4.24 Sets the “reading beep” function
- 9.4.25 Gets the “reading beep” function status
- 9.4.26 Sets the “key beep” function
- 9.4.27 Gets the “key beep” function status
- 9.4.28 Sets the reading timeout
- 9.4.29 Gets the reading timeout
- 9.4.30 Sets the shutdown timeout
- 9.4.31 Gets the shutdown timeout
- 9.4.32 Sets the VCP baud rate
- 9.4.33 Gets the VCP baud rate
- 9.4.34 Sets the “auto shutdown” function
- 9.4.35 Gets the “auto shutdown” function status
- 9.4.36 Firmware update function
- 9.4.37 Character length function

2 Operation
Although the R-PO7470 has been designed to plug and play, we recommend you read this manual
carefully in order to take advantage of all its features and functions.
2.1 Power on the R-PO7470
Slide your hand between the base unit and the handle. Use your thumb to press the START
button which is located on the upper left corner of the panel.
The display shows the following start-up figure:
R-PO7470 V1.0
Under the Datamars logo you can see the name of the reader and the firmware version.
After a few seconds this main screen shot appears:
2. Connected to power net
6. Bluetooth connection OK
1. Battery level
3. Clock
5. Weekday Day
4. Date
1. Check the battery level, which should read more than 6% vitality to read a transponder.
The battery level shows the discharge level as well as the charge level during charge mode.
2. While the reader is connected to the power net, in charge mode, the reader disables the
reading mode; therefore it is not possible to read a transponder. The other functionalities are
fully active.
3. Clock time is in 24 hour mode.
4. Date format can be selected between EURO/USA.
5. Clock weekday.
6. Bluetooth connection established and ready to use.
R-PO7470 Manual – v. 1.1 – August 2008 5