
User's Manual


XTend Max Reader User Manual – v. 0.2 December 2012 7
3 Menu management
A number of different settings can be customized to the user’s preference.
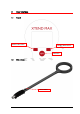
Press the SELECT LEFT button from the scanner’s control panel in order to open the settings menu.
Press the SELECT RIGHT button from the scanner’s control panel in order to exit the settings menu.
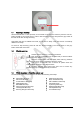
3.1 Settings
Setup Icon
Continue to press SELECT LEFT button until the green selection is on the setup icon, and
then press the ON button in the center of the control panel to confirm your selection.
You can continue to scroll using the directional navigation arrows; the blue highlight indicates
a given selection; confirm you selections by pressing the ON button in the center of the
control panel.
Continue to follow the instructions below for more information on the available settings.
Once you are done, press the SELECT RIGHT button from scanner’s control panel to exit the
setup menu.
3.1.1 Auto shutdown
The auto shutdown setting defines the maximum amount time that the scanner remains powered on
while inactive before automatically switching off. This helps to conserve the battery life. The following
values are available:
Default: 60 sec. (1 min)
Maximum: 240 sec. (4 min)
Minimum: 10 sec.
3.1.2 Reading timeout
The reading timeout setting defines the maximum amount of time that the scanner will stay in reading
mode to try detect a microchip once a scan has been initiated. The following values are available:
Default: 30 sec.
Maximum: 60 sec. (1 min)
Minimum: 1 sec.
3.2 Information
Info Icon
The user can determine which version of Xtend Max they are using, which firmware version is loaded
and other important information as follows:
Press the left navigation button from scanner’s control panel to open the menu.
Continue to press the left navigation button until the green selection is on the Information
icon, and then press the red “On” button in the center of the control panel to confirm your
selection.