Operators Manual
Copyright Information CG Triumvirate is a trademark of Agfa Corporation. CG Times based upon Times New Roman under license from the Monotype Corporation. Windows is a registered trademark of the Microsoft Corporation. All other brand and product names are trademarks, service marks, registered trademarks, or registered service marks of their respective companies.
Agency Compliance and Approvals UL60950-1; 1st Edition CSA C22.2 No. 60950-1-03 1st Edition EN60950-1 (2001) 1st Edition IEC60950-1 (2001) 1st Edition The manufacturer declares under sole responsibility that this product conforms to the following standards or other normative documents: EMC: EN 55022 (1993) Class A EN 50024 (1998) Safety: This product complies with the requirements of EN 60950-1, 1st Edition WARNING!: This is a Class A product.
Contents 1 Getting Started 1.1 Introduction................................................................................................. 1 1.2 Unpacking ................................................................................................... 1 2 Printer Setup 2.1 Power Connection......................................................................................... 3 2.2 Interface Connection..................................................................................... 4 2.
ii
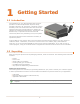
1 Getting Started 1 1..1 1 IIn nttrro od du uccttiio on n Congratulations on your MP Compact4 Mark II printer purchase. The MP Compact4 Mark II printer family, hereafter referred to as ‘the printer’, blends the rugged durability of die-cast construction with state-of-the-art electronics and user-friendly features to redefine the standard in industrial thermal printers. The printer’s USB, RS232 serial, or optional wired and wireless LAN connectivity allows easy interfacing to any host system.
2
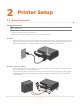
2 Printer Setup 2 2..1 1 P Po ow we err C Co on nn ne eccttiio on n Power Connections Before connecting Power or interface cables to the printer, ensure the Power On/Off Switch is in the ‘Off’ position. Place the printer on a firm, level surface. Ensure that the Power Switch on the Printer is in the ‘Off’ position. AC Model Connect the AC Power Cord to the receptacle on the back of the Printer, and then plug the AC Power Cord into a properly grounded outlet.
2 2..2 2 IIn ntte errffa acce eC Co on nn ne eccttiio on n The printer can be connected to the host via the USB, serial, wired Ethernet, or optional wireless. The printer will automatically connect to the first port that delivers valid data. Once established, the printer’s power must be cycled ‘Off’ and ‘On’ to change an interface connection.
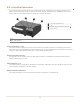
2 2..3 3 LLo oa ad diin ng g LLa ab be ellss Load media into the printer as follows: 1. Rotate the Printhead Latch clockwise to the unlocked position. AC Models 2. Printhead Latch DC Models Remove the Media Hub Guide: AC Models: Move the Thumb-Latch to the released position and then slide the Media Hub Guide off the Media Hub. Media Hub Guide Thumb-Latch Media Hub DC Models: Loosen the Media Guide Handle and slide the Media Hub Guide off the Media Hub.
3. Unravel approximately 12” of labels from the Label Roll. Slide the labels and Label Roll into the printer from the side as shown. 4. Label Roll Reinstall the Media Hub Guide onto the Media Hub. Be sure the Media Hub Guide is lightly touching the edge of the Label Roll. Secure the Media Hub Guide: AC Models: Move the Thumb-Latch to the locked position DC Models: Tighten the Media Guide Handle, do not over-tighten.
3 Printer Operation 3 3..1 1 F Frro on ntt P Pa an ne ell The printer is equipped with a single multi-function Control Button and tri-color Status Light. 3.1.1 Status Light Control Button Status Light Conditions (Green) (Yellow) (Red) (Red Flashing) 3.1.2 Ready to print. Printer is in Hex Dump Mode, see Section 3.1.3. Out of stock\labels or printer jam. Clear the printer jam or reload labels as necessary; press the Control Button to clear.
3.1.3 Configuration Label Initiation of this mode causes the printer to print its Configuration Label and to begin the Hex Dump Mode. The Configuration Label provides valuable printer information including the firmware version, memory allocations, enabled options, communications settings, and label-counter data. To print the Configuration Label: 1. Be sure the printer is properly loaded with media (at least 4 inches wide), and that the power to the printer is off. 2. Turn on the printer. 3.
3 3..2 2 W Wiin nd do ow wss D Drriiv ve err The Windows driver is located on the Accessories CD-Rom included with your printer. For the latest version please visit our web site at www.datamax-oneil.com. Installing the Windows Driver: Place the Accessories CD-Rom included with your printer into your computers CD-Rom drive. Once the CD-Rom starts select your printer model and then select "Install Windows Driver" from the menu. When prompted, select your printer from the list, (e.g. MP Compact4 Mark II).
3 3..3 Te 3 P erra Prriin aT Te errm ntte m)) err C Co on nffiig gu urra attiio on nU Uttiilliitty y ((T TeraTerm (located on the Accessories CD-ROM) is a Windows based configuration utility that allows the user to make changes to the existing printer setup via a direct connection to the host serial port, or any port with a Windows driver assigned to it.
5. Select Setup>Terminal> from the top dropdown menu. In the ‘Transmit’ drop down box, change this setting to “CR+LF”. Also check the box ‘Local Echo’. Then click ‘OK’. 6. The command to enter the Config Menu is !A . Use the Arrow keys and the Enter key to select menus and to toggle and select settings. Use the Esc key to exit menus. You can also use the keyboard commands shown at the bottom of the window.
12
Maintenance and Adjustments 4 4 4..1 1 C Clle ea an niin ng g IIn ntte errv va allss This section details the cleaning, adjusting, and troubleshooting tips for the printer. The following table outlines the recommended maintenance schedule for the various printer parts. Area Method Interval Printhead Turn off the printer before cleaning the printhead. Use solvent* on a cotton swab to clean the printhead from end to end. After every roll of media. Platen Roller Turn the power off.
4 4..2 2 C Clle ea an niin ng g tth he eP Prriin ntth he ea ad d If print quality declines (symptoms include non-compliant bar codes, print dropouts, and streaks; see sample label below), the typical cause is debris build-up on the printhead. Furthermore, when the build-up is not removed it may lead to element failure, greatly reducing the service life of the printhead. A faulty print quality label (shown). Streaks indicate a dirty or faulty printhead. 4.2.
4.2.2 Cotton Swab Procedure To clean the printhead: 1. Turn ‘Off’ and unplug the printer. Unlock the printhead latch and remove any media installed in the printer. 2. Lower the Front Panel. Allow the printhead to cool before proceeding. 3. Using a Pen or similar tool press in on the Top Cover Release and raise the Top Cover. Front Panel Pen or similar tool Top Cover Release Top Cover 4.
4 4..3 3 P Prriin ntth he ea ad dR Re ep plla acce em me en ntt To replace a damaged or worn printhead, follow the procedure below. Printheads are fragile; use extreme care when handling and never use a sharp object on the surface. If you have questions, contact a qualified technician or Datamax-O’Neil Technical Support before proceeding. To Remove: 1. Turn ‘Off’ and unplug the printer. Unlock the printhead latch and remove any media installed in the printer. 2. Lower the Front Panel.
5. Disconnect the Printhead Cable from the rear of the Printhead. Printhead Printhead Cable To Install: 1. Connect the Printhead Cable to the rear of the Printhead. 2. Position the Printhead into the Printhead Carrier. Be sure the two Screw Heads on the Printhead are located into the Holes of the Printhead Carrier 3. While pressing down on the Printhead Carrier, install and tighten the Printhead Screw using a Phillips Screwdriver.
4 4..4 4 P Plla atte en nR Ro olllle err R Re ep plla acce em me en ntt To replace a damaged or platen roller, follow the procedure below. To Remove: 1. Turn ‘Off’ and unplug the printer. Unlock the printhead latch and remove any media installed in the printer. 2. Lower the Front Panel. 3. Using a Pen or similar tool press in on the Top Cover Release and raise the Top Cover. Front Panel Pen or similar tool Top Cover Release Top Cover 4.
5. Lift the Platen Roller Assembly up and out of the printer Platen Roller Assembly To Install: 1. Insert the new Platen Roller Assembly into position. Be sure the Belt is routed properly around the Gear, this can be viewed through the Access Hole. Platen Roller Assembly Belt Gear 2. Re-install the Platen Roller Cover. 3. Close the Top Cover, push down until it latches closed. Raise the Front Panel and replace the media, return the Printhead Latch back to the locked position. 4.
4 4..5 5 P Prriin ntth he ea ad dP Prre essssu urre eA Ad djju ussttm me en ntt To accommodate a variety of media types, printhead pressure is adjustable. This pressure is factory set to work with most media types, so this adjustment should only be performed after attempting to improve print quality through increasing the printer’s “Heat” setting or decreasing the “Print Speed” setting. When adjusting, use only the minimum pressure necessary for better imaging. To adjust: 1. Lower the Front Panel. 2.
4 4..6 6 M Me ed diia aS Se en nsso orr C Co on nffiig gu urra attiio on n To accommodate a variety of media types the printer is equipped with three sensors. A dual position transmissive sensor (for gap and notch type label media) and a reflective sensor (for “black mark” type label media).
4 4..7 7 D Do ow wn nllo oa ad diin ng gF Fiirrm mw wa arre e The operating firmware for the printer is stored in Flash memory on the Main PCB. When firmware is updated and/or new features are added, they can be downloaded to the printer as follows: 1. Identify the new version for your model of printer from our website at www.datamax-oneil.com and download it onto your computer’s hard drive. 2. Ensure that the printer is connected to the host via the serial port and that the power is ‘OFF.
A Specifications Mechanical Width 9.1” (230mm) Depth 10.2” (260mm) Height 4.1” (105mm); Compact4 4.9” (125mm); Compact4 Mobile Weight 7.7 lbs (3.5kg); Compact4 9.9 lbs (4.5kg); Compact4 Mobile Operating Temperature 41 F to 104 F (5 C to 40 C) Humidity 10% AC Input Voltage 90 - 264VAC, 47-63Hz; Compact4 24 - 48VDC; Compact4 Mobile 95% non-condensing Printing Print Method Direct Thermal Print Speed 2 – 4.
Approved Media To achieve optimum print quality and maximum printhead life, Datamax-O’Neil specifies the use of Datamax-O’Neil brand media. These supplies are specially formulated for use in our printers; use of nonDatamax-O’Neil supplies may affect the print quality, performance, and life of the printer or its components. For a current list of approved media and ribbons for use in direct thermal and thermal transfer applications, please contact a Media Representative at (407) 523-5650.
B Ethernet Setup B B..1 1 IIn nttrro od du uccttiio on n Before connecting Power or interface cables to the printer, ensure the Power On/Off Switch is in the ‘Off’ position. Connecting the Antenna (optional) > Extend the antenna then align the base to the connector located on the rear of the printer. Turn the base clockwise until fully seated and tight on the connector. > Raise and position the antenna. To avoid permanent damage, do not pull on the antenna when handling the printer..
1. After installation, from the Windows Start Menu, navigate to Programs>Imaje NetCenter and launch the program. The application will search for installed printers and display them in the following window 2. Verify the printer has obtained a valid IP address for your network. If the printer was not found or if a valid IP address was not obtained, you must use the Configuration via Serial Port procedure.
Configuration via Serial Port 1. TeraTerm (located on the Accessories CD-ROM) is a Windows based configuration utility that allows the user to make changes to the existing printer setup via a direct connection to the host serial port, or any port with a Windows driver assigned to it. See section 3.3 for installation and configuration information. 2. After the application is started the following window will appear. Navigate to the Ports>Network Settings> menu.
5. If your network requires the use of security, these settings can be found in the Ports>WLAN>WLAN Encryption> menu. 6. Once all configuration changes have been made press “CTRL-S” to save your settings and exit the menu. When prompted to restart the printer, press “Y”. 7. Once the printer has restarted, turn OFF the printer. Close the Tera Term application and remove the serial cable from the printer. 8. Turn on the printer. The printer should now connect to the configured access point or wired IP.
B B..2 2 P Prriin ntte err’’ss IIn ntte errn na all W We eb bP Pa ag ge ess Open your web browser. Type in the IP Address assigned to the printer. The following page will appear: The printer’s internal web pages are divided into multiple pages that are accessible via the navigation bar on the left-hand side. The Communication menu tab contains many items associated with the setup of the network card as well as wireless security settings.