92-2432-01 Rev.
Overview This document describes the contents, installation, and use of the Powered Internal Rewind option for the H-Class printer. After verifying the kit contents and tools required, follow the steps below to install and begin using the option. A parts listing is also included, so keep this documentation for future reference. For your safety and to avoid damaging the equipment, turn ‘Off’ power and unplug the CAUTION printer’s power cord before performing this installation.
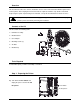
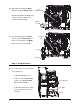
B) Press down on the Catch, then pull forward to remove the Door. Catch Door Access Cover C) Raise the Access Cover and remove your media from the printer. Then, remove the Thumbscrew and Tear Plate. (Alternately, if equipped with a Tear Plate Cutter or Present Sensor, remove that device.) Thumbscrew D) Remove the Cover Screw and the Cover Plate.
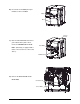
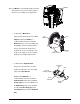
Step 2: Installing the Option Center Plate A) Align the Rewinder Assembly (Item ) to the Center Plate opening then, while carefully seating it into the Power Receptacle, insert the Rewinder Assembly. Power Receptacle Rewinder Assembly Mounting Screws B) Using the three Mounting Screws (Item ), secure the Rewinder Assembly to the Center Plate.
F) Slide a three-inch diameter Media Core onto the Core Adapter Collar. Core Adapter Collar (Note that the width of the Media Core should be at least as wide as the media you will be winding.) Media Core G) Open the Latch. Slide the Retainer (Item ) onto the Rewinder Hub so Rewinder Hub that it securely captivates the Media Core, and then close the Latch.
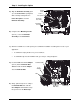
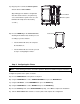
Media B) Load Media as you normally would, but extend about 20 inches (50 cm) of it from the printer – then proceed according to your application: To wind onto a Media Core – Tape Core Adapter Follow the directional arrows on the Core Adapter and wrap the Media in a counterclockwise direction around the Media Core then secure the leading edge using Tape. Rotate the Hub by hand to take up any slack in the media.
C) Plug the power cord into the AC Receptacle and turn ‘On’ the Power Switch. (Depending upon its database configuration Power Switch and other attached devices, the printer may AC Receptacle sense and enable the option. In this case, the Rewinder will slowly turn for about thirty seconds.
Removing Stock from the Internal Rewinder The Internal Rewinder allows you to wind an 8-inch (203 mm) outer diameter roll of media or liner. Proceed according to your application to remove material from the rewinder: To remove rolled media, open the Latch on the Media Retainer, remove the Media Retainer, and then slip the rolled media and core off the Core Adapter; or, To remove rolled liner material, grasp the roll, squeeze, pull, and slip the liner off the Rewinder Hub.