92-2190-01 Rev.
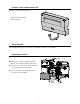
Contents of the Standard Cutter Kit This kit contains the following items: Standard Cutter Assembly Cable Assembly Tools Required The Standard Cutter Option only requires a #2 Philips screwdriver for installation. Preparing the Printer Turn the power off and unplug the printer. Remove any installed media from the printer. Open the cover and remove the Front Fascia by gently pulling it from the printer.
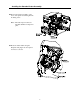
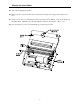
Installing the Standard Cutter Assembly Position the Cutter Assembly on the front of the printer and then tighten the mounting screw. Note: The Cutter Option cannot be installed with Present Option in place. Route the Cutter Cable along the Baseplate and plug it into the Options Connector as shown.
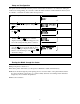
Setup and Configuration The printer will automatically sense the presence of the Cutter and allow it to be enabled for cutting the media as it is being printing. If you wish to enable the Cutter it must be enabled within the menu system. To ‘Enable’ or ‘Disable’ the Cutter follow the steps below. Verify the printer is in the ‘Ready Mode’ Press the button. Using the button scroll to ‘Printer Options’ and press the button. Using the button scroll to ‘Cutter’ and press the button.
Cleaning the Cutter Blades Turn ‘Off’ and unplug the printer. Remove the Cover Screw from the front of the Cutter Assembly and swing open the Cutter Cover Door. Using a cotton swab or a cloth dampened with isopropyl alcohol or WD-40 wipe off all debris from the Cutter Blade. Manually rotate the Cutter Blade to clean the entire surface. Allow to dry. Close the Cutter Cover Door and reinstall the previously removed screw.