92-2282-01 Rev.
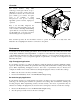
Overview The Linear Scanner, using CCD technology, interrogates labels at up to 700 times per second to ensure that your printed bar codes have the correct bar and space widths, good contrast, and quiet zones to be readable. A 32-bit Cable microprocessor and proven decoding algorithms provide accurate, high-speed, Scanner operation.
Setup and Configuration The Scanner is setup at the factory to read the bar codes on most labels. And, in most cases, further setup will not be required. However, if you need to modify the setup to meet your application, this section details the operational settings of the unit. To access these menu items, use the printer’s front panel, enter ‘MENU MODE’ and go to ‘PRINTER OPTIONS’ ‘SCANNER’ (see the I-Class Operator’s Manual for menu system navigation details). ‘MODE’ is used for Scanner detection.
‘BARCODE COUNT’ is used to set the number (1 – 99) of bar codes to be read on each label. The default setting (00) puts the Scanner in Auto Mode, which allows a variable number of bar codes to be read. Auto Mode is appropriate for most applications, however, see the note below for exceptions. Also, if doing multiple-up bar codes, see Label Layout, below.
‘FAULT HANDLING’ is used to determine the level of interaction, as well as the disposition of the label when a fault (ribbon out, paper out, unreadable barcode, etc.) occurs.
Label Layout As mentioned earlier, to be properly recognized the printed bar codes printed must be a supported symbology, have a narrow bar resolution of no less than 10 mils, and have proper quiet zone areas. Another important factor concerns label formats with multiple-up bar codes: If printing multiple-up bar codes in ordered columns where the same encoded information exists in each bar code (see below), there must be at least ¼ inch white space in the rows between these symbologies.
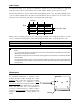
Alignment Avoiding Specular Reflection The Scanner is factory-adjusted for optimum performance. If, however, the label exit angle changes (due to, for example, the addition of a peel mechanism or an external rewinder), normally good bar codes may fail because of excessive specular reflection. A high level of reflection can “blind” the internal optics. The diagram (right) illustrates the no read specular zone, between 0 to 10 degrees off perpendicular.
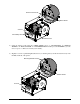
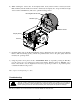
Picket Fence Barcode Ribbon Shield Scanner Print Quality Label Printhead Latch 4) Using the printer’s front panel enter ‘MENU MODE’ and go to ‘DIAGNOSTICS’ ‘OPTIONS TESTING’ ‘TEST SCANNER’ ‘ALIGNMENT TEST’ and then press the ENTER Key (see the I-Class Operator’s Manual for menu system details). 5) Slightly loosen the top Mounting Bracket Screw (see drawing below) and tilt the Scanner away from the Ribbon Shield of the printer.
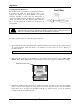
6) While watching the ‘Scan Count’ in the Display Panel, slowly tilt the Scanner forward (toward the Ribbon Shield) until the numbers increment continuously and rapidly (also, the green Indicator Light on the Scanner will illuminate). This is the optimum reading position. Mounting Bracket Screws Indicator Light Ribbon Shield Display Panel Scanner 7) Carefully tighten both of the Mounting Bracket Screws. (Ensure that the ‘Scan Count’ in the Display Panel is still incrementing rapidly.
Scanner Fault Try these solutions… The Scanner could not successfully read the bar code. Press the FEED Key to clear the fault. Examine the print quality of the label being failed (refer to the I-Class Operator’s Manual for details). If the bar code(s) appear(s) to be free of voids with sufficient quiet zone space, try the following: Note: This is a normal condition when a bar code is unreadable.
Specifications Physical Case Material Dimensions (L x H x W) Cable Length Mini DIN Connector 1 2 3 4 5 6 7 8 Steel (Black) 47 x 20 x 55 mm (1.95 x 0.78 x 2.2 in) 7.
Warranty Information Warranty Service Procedures Datamax-O’Neil warrants to Purchaser that under normal use and service, the Scanner purchased hereunder shall be free from defects in material and workmanship for a period of one year (365 days) from the date of shipment by Datamax-O’Neil. Expendable and/or consumable items or parts such as lamps and fuses, are not covered under this warranty.