92-2593-01 Rev.
Overview This document describes the installation and use of the SDIO/USB Host option for the IClass Mark II printer. Follow the steps to begin installing the option. For safety and to avoid equipment damage, turn OFF the power switch and CAUTION unplug the AC power cord from the printer before starting this installation. Contents This kit contains the following items: SDIO/USB Host Card Assembly Screw, Philips M4 (2) Locking Nut, 5.
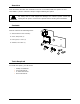
Installing the Option Install the SDIO/USB Host Card as described below: A) Turn off and disconnect the power cord from the printer. Remove the three Screws from the left side cover of the printer. B) Open the printer’s cover, loosen (do not remove) the two Screws on the inside of the printer and lift the Cover Assembly up and off the printer.
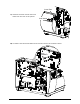
Cover Plate C) Remove the 5mm Screw and Cover Plate from the rear of the printer. 5mm Screw D) Install the two 6mm Standoffs into the main board in the locations shown.
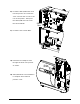
E) Install the SDIO/USB Host Card into the printer. First insert the “Port” end into the cut-out in the rear of the printer. Then pivot the SDIO/USB Host Card onto the two Standoffs. 5.5mm Nuts F) Install the two 5.5mm Nuts. G) Install the two Philips Screws through the back of the printer as shown. Philips Screws H) SDIO/USB Host Card installation is complete. Re-install the printer’s cover.