92-2199-01 Rev.
Contents of the Twinax/Coax Interface Kit Depending on which option you ordered, this kit will contain either a Twinax Interface Cable or a Coax Interface Cable in addition to the following items: Twinax/Coax Board Assy Expansion Cover Plate Connector Cover (2) 4-40 x .25 Screws (6) M4 x 12 Screws Tools Required The Twinax/Coax Interface Option only requires a #2 Philips screwdriver for installation. Preparing the Printer Turn the power off and unplug the printer.
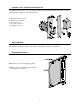
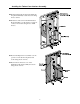
Installing the Twinax/Coax Interface Assembly Slide the Twinax/Coax Board Assembly into the printer until fully seated and secure using the two Screws. Slide the Connector from the Twinax/Coax Board Assembly over the printer’s serial port connector and secure using the two Small Screws. Position the Expansion Cover Plate over the open area on the back of the printer and secure using the two Screws.
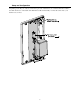
Setup and Configuration Depending on the kit you ordered, connect the 9-pin end of either the Coax or Twinax Interface Cable to the 9-Pin Connector on the back of the Twinax/Coax Board Assembly. Connect the other end to your Twinax or Coax host.