92-2266-01 Rev.
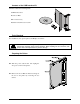
Contents of the USB Interface Kit This kit contains the following items: USB Interface Card Rear Cover Plate M4 x 12 Screws (4) Datamax-O’Neil Accessories CD Tools Required For installation, this option requires a #2 Philips screwdriver. The USB Interface is designed to protect sensitive components from damage due to electrostatic discharge during normal operation. When installing the card, however, take CAUTION proper static-control precautions to prevent damage.
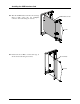
Installing the USB Interface Card Slide the USB Interface Card into the card cage until it fully seates into the backplane connector and secure using two Screws. USB Interface Card Screws Position the Cover Plate over the card cage, as shown, and secure using two Screws.
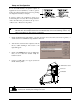
Setup and Configuration To use the USB Interface, the printer requires an Application Version (firmware) of 7.03 or greater. Verify the current Application Version by printing a Configuration Label (see sample). If needed, update the Application Version by downloading the necessary file from ftp.datamaxoneil.com. Follow the procedure in the Operator’s or Maintenance Manual for the printer. Note: The USB Interface is supported under Windows 95/98/2000/ME/XP and is not supported by Windows NT.
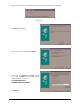
5. Plug in the AC power cord and turn ‘On’ the printer. The following screen will appear: Followed by… 6. Click Next> to continue 7. Select the top option and then click Next>. 8. Click only the ‘Specify a location:’ check box. Click on Browse and select the folder in which the drivers are located. C:\Seagull\DatamaxO’Neil\R13\Datamax-O’Neil. 9. Click Next>.
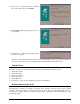
10. The screen to the right will appear confirming the location of the drivers; click Next>. 11. Click Finish. USB printing support has now been installed. 12. Now Windows will install the specific printer driver for your printer. (Windows should find and install the printer driver automatically; however, if you are prompted for a location, the drivers are in the :\Seagull\Datamax-O’Neil\R13\Datamax-O’Neil folder.