
Operator`s manual


Chapter 5 – Maintenance and Adjustments 50
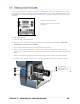
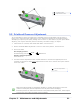
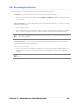
Example 1 – Over
adjustment:
Too much adjustment
produces an image
that fades across the
label. To correct this,
move the
Thumbscrew to the
right.
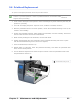
Example 2 – Correct
adjustment:
The proper adjustment
produces a complete
image with even print
contrast across the
label (see note below).
Under-adjustment can also cause problems including ribbon wrinkling, label tracking, and platen
roller and printhead wear. When changing to a different width of label, always perform this
adjustment.
5
5
5
.
.
.
4
4
4
P
P
P
r
r
r
i
i
i
n
n
n
t
t
t
h
h
h
e
e
e
a
a
a
d
d
d
B
B
B
u
u
u
r
r
r
n
n
n
L
L
L
i
i
i
n
n
n
e
e
e
A
A
A
d
d
d
j
j
j
u
u
u
s
s
s
t
t
t
m
m
m
e
e
e
n
n
n
t
t
t
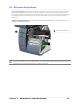
The Burn Line has been adjusted for strict compliance using 6.5-mil (.0065 inch) media, ensuring
print quality across a majority of media types. In extreme cases, however, if media of a different
thickness or rigidity is used (for example, heavy tag stock) the print quality can change.
If you have questions, contact a qualified technician or Datamax-O’Neil
Technical Support before
proceeding.
To adjust the Burn Line:
1. Load the printer with your media (and ribbon, if required).
2. Loosen the two Locking Screws approximately ¼ turn counter-clockwise.
3. Turn the Adjustment Screws counter-clockwise until the burn line is past the platen roller
vertex. Print a test label; the label should look light and uneven.
Non-display printers:
Simultaneously press the
PAU S E
+
FEED
buttons
Display-equipped printers:
See Section 4.4
4. Tighten the Locking Screws just until they are ‘snug’ (tight enough to remove any play in the
printhead assembly, yet loose enough to allow the Adjustment Screws to move the printhead).
5. Turn each
Adjustment Screw clockwise about a ¼ turn (or 1/8 turn for finer adjustments, see
note below). Print another test label and examine the print quality. Repeat this step until
labels are produced with even print contrast and acceptable print quality.
When the Locking Screws are ‘snug’, turning the Adjustment Screws counter-clockwise will NOT
move the printhead outward; if you have adjusted the printhead too far inward, restart the entire
procedure.
6. Tighten the Locking Screws then print a final test label to verify the adjustment.