
Operator`s manual


Chapter 5 – Maintenance and Adjustments 48
5
5
5
.
.
.
2
2
2
C
C
C
l
l
l
e
e
e
a
a
a
n
n
n
i
i
i
n
n
n
g
g
g
t
t
t
h
h
h
e
e
e
P
P
P
r
r
r
i
i
i
n
n
n
t
t
t
h
h
h
e
e
e
a
a
a
d
d
d
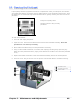
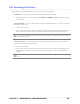
If print quality declines (symptoms include non-compliant bar codes, print dropouts, and streaks;
see sample label below), the typical cause is debris build-up on the printhead. Furthermore, when
the build-up is not removed it may lead to element failure, greatly reducing the service life of the
printhead.
Faulty Print Quality Label:
Streaks indicate a dirty or faulty
printhead.
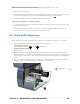
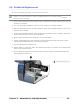
To clean the printhead:
1. Turn ‘Off’ and unplug the printer.
2. Open the cover. Unlock the Printhead Latch and raise the Printhead Assembly. Allow the
printhead to cool before proceeding.
3. Move media and ribbon away from the printhead as necessary.
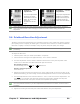
4. Using a Cotton Swab moistened, not soaked, with isopropyl alcohol gently wipe away any
build-up on the printhead surface, paying close attention to the Burn Line. Allow the printhead
to dry.
5. Replace the ribbon and media. Lower the Printhead Assembly back to the locked position.
6. Close the cover. Plug in and turn ‘On’ the printer. Feed several labels to normalize tracking.
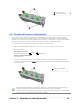
Printhead Latch
Printhead Assembly
Cotton Swab