92-2478-01 Rev.
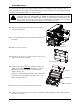
Contents of the Cutter Kit This kit contains the following item: Cutter Assembly Follow the steps listed below to install this option. Tools Required To install this option you will need a #2 Philips screwdriver. Step 1: Preparing the Printer CAUTION For your safety and to avoid damaging the equipment, turn ‘Off’ and unplug the printer before installing the Cutter. Turn ‘Off’ the power switch and unplug the printer. Open the cover. Remove any installed media from the printer.
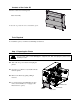
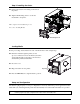
Step 2: Installing the Cutter Position the Cutter for mounting on the front of the printer. Tighten the Mounting Screw to secure the mechanism to the printer. This completes the installation process. Proceed to Loading Media. Cutter Mounting Screw Loading Media Before proceeding, ensure that the free end of the media has a clean, straight edge. Route the media through the printer (see the Operator’s Manual for more information) and then out through the Cutter’s Opening, as shown.
Cutter Maintenance To ensure peak performance, the Cutter should be cleaned on a regular basis: after each roll or box of labels. In addition to the regularly scheduled maintenance, if the performance becomes sluggish, cleaning should be performed immediately. To clean the Cutter: For your safety and to avoid damaging the equipment, turn ‘Off’ and unplug the printer before servicing the Cutter. The cutter blades are SHARP; to avoid injury, keep fingers and other body parts away from the cutting surfaces.