
User guide


DMXConfig 12
DMX Config Utility
DMXConfig (located on the Accessories CD-ROM) is a Windows
based configuration utility that allows the user to make
changes to the existing printer setup via a direct connection to the host computers serial and parallel connection. This is a
vital tool for the use and configuration of wired and wireless printer setup (especially for printers without displays).
Be sure to use the DMXConfig utility located on the Accessories CD-Rom that is included with your printer. Older versions
might not operate correctly with some printers. For the latest version please visit our web site at www.datamax-oneil.com
.
Configuration Using a Static IP Address:
Note: The following example uses the DMXConfig software utility to configure the printer. On printers equipped
with a display, the same settings can be changed using the printer’s menu system via the front panel under
COMMUNICATIONS > NIC ADAPTER.
1. Connect the host to the printer with a serial or
parallel cable.
2. Turn on the printer.
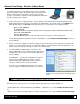
3. Launch the DMXConfig utility. Query the printer by
using the Query Printer toolbar button (top-left). This
will connect to the printer and get the current printer
settings.
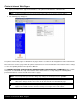
4. Next select the Network tab, click the Wired Ethernet
Configuration button. Set DHCP Status to Disable,
then set following with appropriate values for your
network:
Printer IP Address
Printer Subnet Mask
Printer Gateway
5. Send the settings to the printer using the Configure
Printer toolbar button.
6. The printer will reset and will connect to your
network at the IP address you have specified.
Once the previous steps have been successfully completed you may now return to Step 4 in section, Network Card
Setup.