
User guide


Installing the Printer Driver 13
Installing the Printer Driver
The following screen shots are taken from Windows
2000, other versions will be similar.
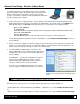
1
Start the Windows
“Add Printer Wizard”.
The following screen
should appear, click
‘Next>’.
2
Make sure that ‘Local
Printer’ is selected
and then click ‘Next’.
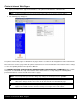
3
Select on ‘Create a
new port:’ and then
select ‘Standard
TCP/IP Port’ from the
drop down menu.
Click ‘Next’
4
Click ‘Next’.
5
In the ‘Printer Name
or IP Address:’ field
enter the IP address
of your printer. The
‘Port Name’ field does
not need to be
changed. When
finished click ‘Next’.
6
Make sure ‘Standard’
is selected and then
click ‘Next’.
7
Confirm your settings
and then click ‘Finish’.
8
Click on ‘Have Disk’.