
User guide


Card Installation 1
This document describes the installation and use of the DMXrfNet
III
and DMXNet
III
Card options for the M-Class Mark II
printers. After verifying the contents of the kit and the tools needed, follow the steps below to install and begin using the
option. Keep this documentation for future reference.
CAUTION
For your safety and to avoid equipment damage, always turn ‘Off’ power and unplug the printer’s power
cord before beginning this installation.
Contents of the Communication Card Kit
This kit contains the following items:
Communication Card
Antenna (wireless models)
Ribbon Cable
Standoffs
Follow the steps below to install these items into the printer If your card
is already installed proceed to the Overview section on page 4 .
Tools Required
To install this option you will need a #2 Phillips head screwdriver.
Only qualified service personnel should install this Option.
Firmware Update Required
If you are installing this card into an existing printer, you must upgrade the printers firmware to support this network card.
Updated firmware can be downloaded from the Datamax-O’Neil FTP site at ftp.datamax-oneil.com. Refer to the printers
operator’s manual for more information on updating the printers firmware. Be sure the firmware file that you download is:
All Models: Version 14.X or greater.
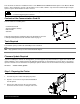
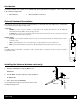
Step 1: Preparing the Printer
1. Turn ‘Off’ the power switch and unplug the printer.
2. Open the cover. Remove any installed media/ribbon
from the printer.
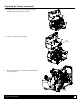
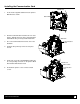
3. Remove the single Screw on the rear of the printer
and remove the two Screws securing the side cover.
Screws