
User guide


Network Setup 6
Network Card Setup - Wireless (Infrastructure Mode)
After a successful setup is made via a wired connection, the
Wireless connection (if equipped) can now be configured in
infrastructure mode using a static or DHCP issued IP address.
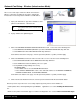
1. Open your web browser. Type in the IP Address of the
printer. The Default IP is: 192.168.10.26.
Note: If a different IP Address has been assigned
to the printer, make sure to enter the correct
IP Address.
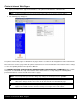
2. A page similar to the right will appear:
3. Click on the GENERIC NETWORK CONFIGURATION menu item. Locate and set the following items:
> Select WIRELESS ETHERNET (WIFI 802.11) from the NETWORK INTERFACE drop down box.
> Select DMXrfNet3 from the WIFI OPTION TYPE drop down box.
Scroll down to the bottom of the page, enter the password (default is “sysadm”) and click apply.
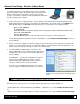
4. Click on the DMXrfNet3 menu item on the left side of the screen. Locate and set the following items:
> Select INFRASTRUCTURE from the WIRELESS TYPE drop down box.
> Set the SSID field to match the SSID of your access point.
> Set any WLAN Security Settings if necessary.
For static IP setup:
> In the DHCP section, select the DISABLED radio button.
> In the STATIC IP ADDRESSES section, enter valid static addresses for PRINTER IP ADDRESS,
PRINTER SUBNET MASK, and PRINTER GATEWAY.
Scroll down to the bottom of the page, enter the password (default is “sysadm”) and click apply.
5. Click on the Restart Network menu item, enter the password and click the Restart Network button.
Once the previous steps have been successfully completed you may now use the IP Address to:
> Install a printer driver, and start printing from your Windows
applications. See section, Installing the Printer Driver.
-or-
> Browse to the printer’s internal web pages for advanced configuration. See section, Printer’s Internal Web Pages.