
User guide


Network Setup 7
Network Card Setup - Wireless (Adhoc Mode)
To configure the wireless card in Adhoc mode, you must configure
your host computer to match the default settings of the printer. Your
wireless network type must be Adhoc. Refer to your operating
system’s or your wireless network card documentation for information
on how to configure your computer.
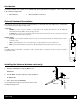
1. Power on the printer. For display printers, enter the printer’s menu and navigate to the Communications/NIC
Adapter/Quick Setup menu branch. Scroll down to the “WLAN Adhoc” menu item and press the ENTER button.
When prompted press the YES KEY. The printer will now reset set the printer to the following settings:
Wireless Mode: Enabled
IP: 192.168.10.26
SSID: MAC Address of the printer (unique value for each printer, listed on the Network Report Label).
Subnet Mask: 255.255.255.0
Gateway: 192.168.10.26
BSS: 192.168.10.1 (this is the IP of the radio card and is not to be used for data transfer)
For non-display printers these parameters must be set manually, see section Printer’s Internal Web Pages to access to
these parameters.
2. Make sure your host computer’s network IP settings are in the same range, (but not identical) to the printers IP
address. (e.g. 192.168.10.20). Also be sure that Subnet Mask is set to 255.255.255.0 and the Gateway is set to
0.0.0.0 or the host computer’s IP address, (in this case 192.168.10.20).
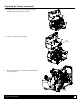
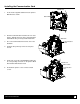
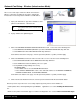
3. The default SSID is the MAC address of the printer. The
printer’s MAC address can be found on the label affixed to the
backplate of the wireless card or on the Network Report, it is
listed as “MACR”.
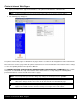
From Windows
, you may now “View Wireless Networks”.
From the list of available wireless networks select the
printer’s SSID (printers MAC Address) that you wish to
connect to and then click on the Connect button.
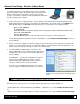
If you do not see the MACR/SSID listed be sure you have
the host computer configured for Adhoc wireless networks.
This process will vary depending on your wireless device
installed in your host computer and your operating system
version.
Note: The MAC address is case sensitive and must be in lower-case letters.
Once the previous steps have been successfully completed you may now use the IP Address to:
> Install a printer driver, and start printing from your Windows
applications. See section, Installing the Printer Driver.
-or-
> Browse to the printer’s internal web pages for advanced configuration. See section, Printer’s Internal Web Pages.