92-2477-01 Rev.
Contents of the Internal Rewinder Kit This kit contains the following items: Arc Plate, Internal Rewinder Assembly Media Clip Media Retainer Screws (3) Follow the steps listed below to install this option. Tools Required To install this option you will need a #2 Phillips head screwdriver. Step 1: Preparing the Printer Turn ‘Off’ the power switch and unplug the printer. Open the cover. Remove any installed media from the printer. Remove the Fascia by gently pulling it forward.
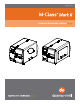
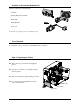
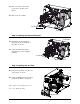
Remove the three Screws that secure the Cover Plate to the printer. Remove the Cover Plate. Screws Cover Plate Step 2: Installing the Internal Rewinder Centerplate Carefully position the Internal Rewinder into the Centerplate of the printer, as shown. Secure the Internal Rewinder using the three Screws supplied in this kit. Screws Internal Rewinder Step 3: Installing the Arc Plate Position the Arc Plate onto the front of the printer, as shown.
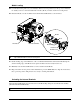
Media Loading Load media into the printer as you normally would for tear-off operation (see the Operator’s Manual for details), however, extend an additional 12 inches (30 cm) of media out the front of the printer. Route the Media over the Arc Plate and around the Internal Rewinder, as shown below. Media Media Slots Arc Plate Internal Rewinder Media Clip Retainer Thumbscrew Note: The Media Retainer can be used in place of the Media Clip for a more consistent rewound roll.