92-2551-01 Rev.
Overview This document describes the contents, installation, and use of the Label Taken Sensor option for the MP Compact printers. After verifying the contents of the kit and the tools needed, follow the steps below to install and begin using the option. For your safety and to avoid equipment damage, always turn ‘Off’ power and unplug the CAUTION printer’s power cord before beginning this installation and when performing service.
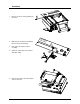
Installation 1. Remove the front cover by pulling out the shaft. 1 2. Drill out the hole with 2.5 mm drill bit. Remove any metal shavings. 3 3. Fasten the Label Taken Sensor assembly. 4. Attach the cable with screw, washer and cable clamp. 2 4 5. Connect the cable to the Label Taken Sensor connector.