User Manual
User Manual Table of Contents 1. Introduction 2. Installation 2.1 Minimum Requirements 2.2 Installation Process 3. Getting Started 3.1 Graphical User Interface 3.2 File Storage 3.3 Printer Information 3.4 Printer Status 4. Operation 4.1 Webmenu 4.2 Telnet 4.3 FTP 4.4 Network Settings 4.5 Options 4.6 Clear 4.7 Clear All 4.8 Upgrade 5. Program Menu 5.1 File 5.2 Edit 5.3.Tools 5.
User Manual Conditions © Copyright Datamax-O’Neil 2010 Thank you for choosing this product for your printer monitoring and configuration needs. Manufacturer Address: Datamax-O’Neil Corporation 4501 Parkway Commerce Boulevard Orlando, Florida USA 32808 Phone (407) 578-8007 Fax (407) 578-8377 http://www.datamax-oneil.com Conditions Datamax-O’Neil reserves the right to change specifications in both the text and illustrations without prior notice.
User Manual 1. Introduction Datamax-O’Neil NetCenter is the perfect tool for finding, managing and supervising Datamax-O’Neil printers connected to the same local area network (LAN). All printers are automatically detected and displayed in a list in the intuitive graphical user interface. The list shows network settings, firmware version, serial number and current status for each printer.
User Manual 2. Installation This section describes how to install and set up Datamax-O’Neil NetCenter once the minimum requirements have been complied. 2.1 Minimum Requirements To be able to use NetCenter the following computer configuration is needed (mainly dependent on the requirements for the Microsoft .NET Framework). Processor Operating System RAM Memory Hard Disk Additional Software Target Environment Intel Pentium class, 90 MHz or higher. Microsoft Windows XP/2000/NT4/ME/98 (Note: Windows NT 4.
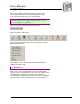
User Manual 3. Getting Started This section explains the Datamax-O’Neil NetCenter user interface. 3.1 Graphical User Interface The graphical user interface of NetCenter consists of a window displaying all MPClass Datamax-O’Neil printers in a list and a toolbar containing the available operations for each printer in that list. The available operations can also be accessed through the NetCenter program menu.
User Manual 3. Getting Started 3.1.2 Column Customization The size and order of the columns can be customized to fit your needs. To change the size of a column, simply click and drag the separator line between the column headers to a suitable position and release the mouse button. The order of the columns can be changed in the same way, simply click on a column header and drag it to a suitable position and release the mouse button. 3.1.
User Manual 3. Getting Started 3.3 Printer Information For each printer in the displayed list, the following information is available: • • • • • • • • • • Host name Printer model Firmware version Serial number MAC address DHCP setting IP Address IP Mask Gateway Status 3.4 Printer Status The list of printers changes its appearance depending on the current status of each printer. This makes it easy to find a printer not operating or disconnected.
User Manual 3. Getting Started Note that NetCenter uses system default colour settings, which may vary depending on the current colour theme used on your computer. Since there is no ‘alarm’ colour or such defined among Windows default colours, the only exception from using Windows default colours is the printer error states, which always are displayed as white text on a red background.
User Manual 4. Operation This section explains all operations that can be made on a selected printer in the list. The available operations can be accessed in three different ways, as shown below. Note : Some of the operations might be disabled, the available operations depend on the status of the selected printer or printers. 1) By using Edit and Tools from the program menu 2) by pressing the toolbar icons 3) or by selecting from the context menu, which appears when right-clicking in the list.
User Manual 4. Operation 4.2 Telnet Opens the standard Windows Telnet client and connects to the selected printer on its Telnet port (port 23). From here it is possible to send Labelpoint commands. If the selected printer already is using another port to receive Labelpoint commands then the printer will not listen on the Telnet port for Labelpoint commands until the Labelpoint command “!C” is sent to the already active port.
User Manual 4. Operation 4.4 Network Settings Opens a dialog window containing all network related printer settings. A screenshot of the dialog window is shown in figure 2. Tip : The network settings can easily be accessed by double clicking in the printer list. Figure 2. Network settings dialog From the dialog window it is easy to change the current settings for host name, domain, TCP keepalive, DHCP and IP settings. When finished, press the ‘OK’ button.
User Manual 4. Operation 4.5 Options NetCenter options can only be accessed through the program menu and will open a small dialog window as shown in figure 3. Figure 3. Options dialog There are two available options; network adapter and broadcast interval time. 4.5.1 Network Adapter If a computer is equipped with more than one network adapter this option makes it possible to select the preferred one from a list of available adapters.
User Manual 4. Operation 4.6 Clear Removes the selected printer(s) from the list. 4.7 Clear All Removes all printers from the list, no selection can be made. 4.8 Upgrade Opens a dialog window where a printer firmware configuration file can be selected, see figure 4. To be able to upgrade any printer(s) two requirements must be fulfilled. First, a NetCenter firmware bundle is needed, which can be downloaded from the Datamax-O’Neil website at www.datamax-oneil.com.
User Manual 4. Operation The default file to select in the file dialog is firmware.xml. When opened, NetCenter automatically selects the matching binary file(s) from the fimware bundle for the printer(s) selected. It is thus possible to select any combination of printers and upgrade them simultaneously as long as the printer firmware exists in the firmware bundle. Before starting the actual upgrade NetCenter will prompt the user to inform that an upgrade is about to take place.
User Manual 5. Program Menu This section explains all available options in the NetCenter program menu. 5.1 File The File menu contains options for printing the list of printers currently found. The information on the printout is the same as described in section 3.2 - Printer Information except for printer status, which is not shown. Print Print Preview Page Setup Exit Opens a print dialog Opens a print preview dialog. Opens a page setup dialog.
User Manual 5. Program Menu 5.3 Tools From this menu all operations are accessed. Access Webmenu Start Telnet Session Start FTP Serssion Upgrade Firmware Options See section 4.1 - Webmenu for more information. See section 4.2 - Telnet for more information. See section 4.3 - FTP for more information. See section 4.8 – Upgrade for more information. Opens a new dialog with NetCenter options. See section 4.5 - Options for more information. 5.4 Help Contains only the About option.