10204-003 OC-3 SERIES OF PRINTERS User Guide
TABLE OF CONTENTS OC-3 Printer Views ........................................ 1 Front and back view..................................... 1 Side views ................................................... 1 Setting up your printer.................................. 2 Unpacking your printer ................................. 2 Installing/removing the battery ..................... 3 Charging the battery .................................... 4 Loading media .............................................
TABLE OF CONTENTS
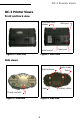
OC-3 PRINTER VIEWS OC-3 Printer Views Front and back view Printhead cover release Swivel mount Figure 1: Front view Data port Power port Figure 2: Back view Side views Radio enable Media advance Power Reset Battery status Charge contacts Figure 4: Side view Figure 3: Side view 1
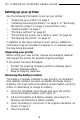
OC-3 SERIES OF PRINTERS USER'S GUIDE Setting up your printer Use the following information to set up your printer: • • • • • • "Unpacking your printer" on page 2 "Installing/removing the battery" on page 3, or "Removing the battery isolator" on page 2 (new printers only) "Loading media" on page 7 "Printing a self-test" on page 10 "Connecting the printer via a cable or radio" on page 10 "Configuring the printer" on page 11 In addition to the steps outlined in each section, additional information may be in
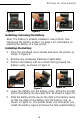
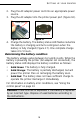
SETTING UP YOUR PRINTER Figure 5 Figure 6 Figure 7 Installing/removing the battery Note: The battery is already installed in new printers. See "Removing the battery isolator" on page 2 for information on enabling the battery in a new printer. Installing the battery 1. Press the printhead cover release and open the printer, as shown in Figure 8. 2. Remove any packaging material (if applicable). 3. Position the battery with its contacts facing toward the battery cavity, as shown in Figure 9.
OC-3 SERIES OF PRINTERS USER'S GUIDE Note: Do not force the battery into the battery cavity. When inserted properly, the battery easily slides and locks into place. If the battery does not easily slide into place, reinsert the battery. 6. Close the printer cover (Figure 13). Figure 11 7. Figure 12 Figure 13 Charge the battery (batteries are shipped uncharged). For more information, see "Charging the battery" on page 4. Removing the battery 1.
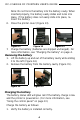
SETTING UP YOUR PRINTER 2. Plug the AC adapter power cord into an appropriate power source. 3. Plug the AC adapter into the printer power port (Figure 16). Power port Battery status Figure 16 Figure 17 4. Charge the battery. The battery status LED flashes red while the battery is charging and turns solid green when the battery is fully charged (Figure 17). One complete charge takes 4 to 5 hours. Determining the battery condition The battery voltage varies between 6.2 and 8.4 volts.
OC-3 SERIES OF PRINTERS USER'S GUIDE Caution: The operating temperature of this portable printer is 50° C. However, the operating temperature when used with Datamax-O’Neil power supply for charging the portable printer is limited to 40° C. Please charge the printer in a suitable location that meets this temperature requirement. Caution: (For US/Canada) Please only use the DatamaxO’Neil part number 220240-100 power supply with this product.
SETTING UP YOUR PRINTER Loading media The OC-3 series of printers are designed to print label media and receipt paper. The printer is configured to print labels. Media Guidelines Media width Label Media: 1” - 3.125” Receipt Paper: 1” - 3.125” Roll capacity Label Media: 2.25” diameter Receipt Paper: 2.25” Media types Linered back label media, receipt paper media * Depending on the type of media used, you may need to configure your printer. For more information, see "Configuring the printer" on page 11.
OC-3 SERIES OF PRINTERS USER'S GUIDE 3. Unlock the adjustable media cup by slowly pushing the latch away from you, as shown in Figure 20. Latch (unlocked position) Spindles Figure 20 Adjustable media cup 4. Be sure the media roll is wound tightly. Insert the media so that the core sits on the right spindle between the roll holders. 5. Slide the adjustable media cup up against the left side of the media. Ensure the core sits on the left media spindle (Figure 21). Figure 21 6.
SETTING UP YOUR PRINTER 8. Verify the media exits straight and is against the right-hand edge. Figure 22 9. Close the printer (Figure 23). The printhead cover snaps into place when completely closed. Figure 23 10. Press the media advance button once to advance to the next top of form (see Figure 4: Side view on page 1). 11. At either edge of the printer cover are serrated corners. Tear the media by pulling up and away from the printer.
OC-3 SERIES OF PRINTERS USER'S GUIDE Printing a self-test 1. Press and hold the power button for approximately three (3) seconds until printing begins. For information on button functions, see "Using the control panel" on page 13. 2. After printing begins, release the power button. A self-test label will print showing parameters, as described on page 11. Connecting the printer via a cable or radio The OC-3 printer is designed to transmit and receive data from a host terminal.
SETTING UP YOUR PRINTER Bluetooth and/or 802.11b parameters Your printer is configured with default factory settings. To determine your printer's radio configuration, print a self-test (For more information, see "Printing a self-test" on page 10). If you have multiple printers, configure them specifically for use in your environment. For proper system operation, set the following parameters on your printer and host computer: 802.
OC-3 SERIES OF PRINTERS USER'S GUIDE Using the belt clip Install the belt clip as follows: 1. Turn the printer so that its back faces you and the belt clip socket is up, as shown in Figure 26. 2. Place the belt clip over the belt clip socket such that the flat side of the belt clip swivel matches the flat side of the belt clip socket (Figure 27). 3. Press the belt clip onto the printer until the swivel is fully seated into the socket. Belt clip socket Figure 26 Belt clip swivel Figure 27 4.
USING THE CONTROL PANEL Using the control panel The tables on the following pages document the following: • Audio Indicators on page 13 • Battery Status LED on page 14 • Power Button/LED on page 15 • Media Function Button/LED on page 15 • Radio Button/LED on page 16 • Reset Button/LED on page 16 • CardReader Audio Indicators on page 16 Figure Battery Figure Power Figure Media Status LED Button/LED Function Button/LED Figure Radio Figure Button/LED Reset Button Audio Indicators Beep(s) 1 short 2 short 3
OC-3 SERIES OF PRINTERS USER'S GUIDE Battery Status LED Battery Status LED Red (solid): The battery has less than 5% power. Description Action • If A/C power is not plugged in, the printer will soon turn off. • If A/C power is plugged in, the LED flashes and charging is in progress. Orange (solid): • If A/C power is not plugged The battery in, indicates the battery has less than charge is low. 25% power. • If A/C power is plugged in, the LED flashes and charging is in progress.
USING THE CONTROL PANEL Orange, red, or When the AC adapter is None. green flash plugged into the printer's fast power port, the battery status LED flashes orange, red, or green (depending on the battery status LED color that is initially displayed) to indicate the AC adapter is plugged in. Power Button/LED Power Button Short press If printer is asleep, wakes up printer; if printer is awake, enters sleep mode. Long press (press and Prints a self-test.
OC-3 SERIES OF PRINTERS USER'S GUIDE Radio Button/LED Radio Button Short press Toggles radio power off and on. Radio LED* Blue flash - slow* Blue flash - fast* Blue flash to solid red Off RF power is on and printer is asleep. RF power is on and printer is awake. The printer is out of range of the access point and/or infrastructure and it is not correctly configured for the radio it recognizes. RF power is off.
USING A CARDREADER Using a CardReader Note: The following information applies to printers installed with the CardReader option. CardReader slot Figure 30 Figure 31 General guidelines • If you are using a magnetic CardReader, insert a card with the stripe facing toward the printer, then slowly slide the card through the CardReader slot. • To wake up the CardReader, insert a card into the CardReader slot. One short beep indicates the CardReader/ printer is awake.
OC-3 SERIES OF PRINTERS USER'S GUIDE Maintenance and troubleshooting Maintenance guidelines • Keep the printer in a cool, dry place, away from direct sunlight, high temperature, and moisture. • Do not insert foreign objects into the printer. • Do not operate the printer if it appears damaged. • Do not operate the printer when your hands or body are wet. • Do not operate the printer near water. • To reduce risk of electric shock, unplug the printer and remove the battery before cleaning.
MAINTENANCE AND TROUBLESHOOTING Troubleshooting Symptom(s) Printer does not print Media/paper jam Reduced battery capacity Media does not feed Printer does not stop at Q Mark and/or printer prints continuously Action • Verify the printer is turned on. • Recharge or replace the battery. • Verify the battery is properly installed. • Check cable connections (if applicable). • Check radio card connections.
OC-3 SERIES OF PRINTERS USER'S GUIDE Supplies Media supplies Datamax-O’Neil offers many certified grades of paper for use in the printer. Our certified supplies are guaranteed compatible — this important qualification means that rigorous performance and image life testing have been performed. Quality supplies are key to obtaining optimal image quality and print performance. Quality supplies are also the key to extending the life of the printer.
FOR MORE INFORMATION 21
OC-3 SERIES OF PRINTERS USER'S GUIDE Agency Approvals FCC Notice This equipment has been tested and found to comply with the limits for a Class B digital device, pursuant to Part 15 of the FCC Rules. These limits are designed to provide reasonable protection against harmful interference in a residential installation.
OC-3 SERIES OF PRINTERS USER'S GUIDE Copyright This manual and any examples contained herein are provided “as is” and are subject to change without notice. Datamax-O’Neil makes no warranty of any kind with regard to this manual, including, but not limited to, the implied warranties of merchantability and fitness for a particular purpose.
COPYRIGHT © 2010, DATAMAX-O’NEIL