7A300031 Rev.
Contents 1 The Printer User Interface ....................................................................................... 1 1.1 Membrane Switch Functions .................................................................................. 1 1.2 Front Panel Indicators .......................................................................................... 1 2 Charging the Printer Battery .................................................................................... 3 2.
ii
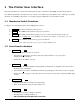
1 The Printer User Interface This guide summarizes the operation and maintenance features of Datamax-O’Neil 2000i dot matrix impact printers. Note: Printer will default to Stand By mode if no activity occurs within 30 seconds. Printer can be “waken up” by sending characters via serial/Bluetooth interface or by simply pressing the OFF button on the membrane switch. 1.1 Membrane Switch Functions See Figure 1 for a detailed description of the 2000i printer’s buttons.
Red Indicates printer is out of paper. Indicates error was encountered while reading the magnetic card. The FAULT and LOW POWER LED on simultaneously, indicate the printer is unable to print due to low battery power. Flashing Indicates printer is paused. Press FEED to resume printing, or press OFF to cancel the current print and clear any data in print buffer. Pressing the OFF switch while printing pauses the printer.
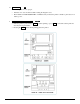
2 Charging the Printer Battery 2.1 Charging the Battery Cartridge Insert the battery Cartridge into the printer: Remove the battery door at the back of the printer, by placing a coin into the slot and pushing the cover to release the lock (see Figure 2). Install the battery cartridge in the battery compartment located at the back of the printer as shown in Figure 3.
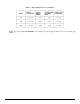
Table 1 – Typical Printer Power Consumption Refer to the options addendum (TABLE A) for complete list of printer supplies and accessories and ordering part numbers.
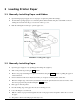
3 Loading Printer Paper 3.1 Manually Installing Paper and Ribbon Open the hinged paper supply door to load paper or replace the printer ink cartridge. Push the locking ribs in-and-up to open the paper door. To unlock the top hinged paper cover, hold the printer with both hands and place each thumb on the two locking ribs located below the grooved sections on the top cover. FIGURE 4: Loading printer paper 3.
Caution Do not REVERSE pull the paper out of the printer mechanism; this will cause permanent damage to the print head. 3.3 Replacing the Inked Ribbon Cartridge (Figure 1) Open the paper supply door to access the ribbon cartridge Insert the new ribbon cartridge in place and press at the extreme ends to secure it in place. Remove the worn out ribbon cartridge by pressing with one finger at the location labeled “EJECT” on the ribbon cartridge.
4 Auto Paper Load Operation 4.1 Auto Paper Load (Option 1) Open the hinged paper door by pushing up the two locking ribs (figure 4). Unroll a leader from the new roll (about 3 inches); do not place roll in the printer at this time. Place the paper roll in the printer. The printer is then loaded with paper and ready to use. If the printer is not already on, turn it on by pressing the ON switch. Remove any paper remaining in the printer mechanism, using the FEED switch.
8
5 Serial RS232, IrDA and XMODEM Communications 5.1 Select a Serial RS232 or IrDA Communication Interface (see Figure 1) The S2000i printers support Serial RS232 and IrDA compatible infrared communication interfaces. Refer to Table 2 for Dip Switch settings. If using RS232 you also need a cable such as Datamax-O’Neil part # 5892RJD9; this plugs into the serial connector at the rear of the printer shown in Figure 2.
FIGURE 4 – Serial Connector 5.3 RS232 Communication Interface - General Notes & DIP Switch Settings Eight-position dip switch, located to one side of the paper roll, is used to select and set the serial RS232 interface. The printer reads these switches once, on initial power-up. The functions assigned to each switch are listed in Table 2. Proper Baud Rate and protocol settings are required to communicate with a host computer.
5.4 Extended XMODEM protocol The Datamax-O’Neil XMODEM software option is designed to overcome the unreliability of data transmission using direct infrared interface. It is intended for host computers equipped with IrDA compatible physical interface and no IrDA software Stack. The Datamax-O’Neil XMODEM protocol is supported via RS232 (RS-XMODEM) or IrDA (IR-XMODEM) interface. The XMODEM option and the communication parameters are set using on board dip switches, as summarized in the table below.
12
6 Bluetooth™ Communications The printer control card communicates with the Bluetooth™ base band interface at 38,4 K Baud/sec for serial interface printers using no parity. To select the Bluetooth™ interface, Dip Switch # 6 must be ON and all other Dip Switches must be OFF. If required by the host application to enter 0 (digit zero) for PIN number while connecting to the BT module. Bluetooth settings can be changed via the AT command set (Refer to 2000i_Bluetooth Addendum on Dev. CD).
14
7 Printer Control Codes and Resident Fonts Character EOT BS HT LF VT FF CR SO SI XON AUXON XOFF NORM AUXOFF CANCEL ESC EXTEND EXTEND OFF Status All Status buffer Hex/Dec 04/04 08/08 09/09 0A/10 0B/11 0C/12 0D/13 0E/14 0F/15 11/17 12/18 13/19 14/20 15/21 18/24 1B/27 1C/28 1D/29 CONTROL ACTION End Of Text Back Space Horizontal Tab Line Feed Vertical Tab Form Feed Carriage Return Shift Out – Select double wide print Shift In – Clear double wide print Transmitter On. Printer on.
7.1 Vietnamese 8 bit character set (VSCII) Addendum The Datamax-O’Neil 2000i printers support resident Vietnamese (VSCII) character set. The VSCII characters are designed using 16H x 8W dot matrix. The character set is arranged per VSCII character code table as shown in FIGURE 1.
VSCII Characters Standard Mapping (hex) Datamax-O’Neil Mapping (hex) 0x19 0x03 0x1A 0X07 0X1C 0X10 0X1D 0X19 0X1E 0X1A 0X1F 0X1E Table (1) Additional VSCII characters saved in control code section VSCII Print Mode Use Example Example (1): The following example code can be used to enable VSCII font. Command (ESC-‘F’-‘5’): MSCOMM.OUTPUT = 0x1B MSCOMM.OUTPUT = 0x46 MSCOMM.
18
8 Troubleshooting Guide PROBLEM POSSIBLE CAUSE SOLUTION Printer will not turn on Discharged Battery Recharge battery overnight. Charge LED not lighting when AC adapter is plugged in. No AC power or AC adapter defective Check AC outlet or adapter (note: battery pack may be fully charged) Battery not charging. Battery incorrectly installed or no AC. Battery dead Check battery installation and AC adapter Change to a new battery Paper not feeding.
TABLE A - Optional printer parts and supplies Part Number Description 757059 2000i paper pack (2.2” / 57.5 mm wide, 1.5” O.D. 5 rolls) 7A100005 2000i Battery Cartridge - 5 Cells – 1400mA 767700 External 4 bays charger for 2000i 767600 Single Bay Fast Charger 157120 Battery charger adapter 2000i 120VAC/9VDC/1A 157220 Battery charger adapter 2000i 220VAC/ 9VDC/1A S2000i-UG.
9 Regulatory Notes 9.1 FCC Part 15 Class B This equipment has been tested and found to comply with the limits for a Class B digital device, pursuant to Part 15 of the FCC rules. These limits are designed to provide reasonable protection against harmful interference in a residential installation. This equipment generates, uses and can radiate radio frequency energy and, if not installed and used in accordance with the instructions, may cause harmful interference to radio communications.
22
10 Customer Support Datamax-O'Neil Americas Orlando, FL USA Monday - Friday 8:00am - 6:00pm EST Tel: 407-523-5540 Fax: 407-523-5542 tech_support@datamax-oneil.com Datamax-O’Neil EMEA Valence France Monday - Friday 0830 - 1700 GMT Tel: + 33 (0) 4 75 75 63 00 Fax: +33 (0) 4 75 82 98 38 eurotech@datamaxcorp.com Datamax-O'Neil Asia-Pacific Singapore Monday - Friday 0830 - 1730 Tel: +65 6505 2250 Fax: +65 6769 8135 tsaspa@datamax-oneil.com Bluetooth is registered trademark of Bluetooth SIG, Inc.