
User's Manual


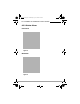
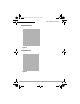
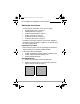
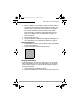
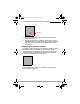
Table Of Contents

S
ETTING
U
P
Y
OUR
P
RINTER
9
3. Slide the battery into the battery cavity so that the edge of
the battery hits the battery stop as shown in Figure X. The
printer beeps one time when the first battery is installed.
Do not force the battery into the battery cavity. When
inserted properly, the battery easily slides and locks into
place. If the battery does not easily slide into place, re-
insert the battery.
4. Close the printer's cover.
5. Charge the batteries (batteries are shipped uncharged). For
more information, see
Charging the Batteries on page 9
.
Removing Batteries
1. Lift the battery up and out of the battery cavity while sliding
it to the left (Figure X).
2. Remove the battery from the battery cavity.
Charging the Batteries
If the batteries are low when the printer turns on, the battery
status LED displays red. For more information, see
Using the
Control Panel on page 17
. Perform the following procedure to
charge the batteries:
1. Verify the battery is installed correctly.
2. Plug the AC adapter into the printer's power port (Figure X).
Figure X
LP3.book Page 9 Wednesday, April 12, 2006 4:41 PM