
Instructions


UM-0085-B09 DT80 Range User Manual Page 151
RG
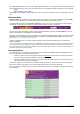
The Channel List screen lists all channels defined in the current job. For each channel, the following information is
displayed:
• Run – if green then the channel's schedule is running
• Name – channel name
• Value – channel value as at the last update (press Update to immediately update all values)
• Units
• Alarm – If the channel is an alarm channel (i.e. the channel is the quantity being tested in an ALARM or IF
command) then this column indicates the state of the alarm – active (ringing bell) or inactive (quiet bell). If the
channel is not an alarm channel then this column is blank.
• Timestamp – the time at which the indicated value was recorded
• Log – if green then logging has been enabled for the channel, and its enclosing schedule.
• Input – the channel's default (standard) name
• Schedule – the name of the schedule containing this channel
By default, working channels are not displayed in the channel list. (A working channel is one with the W channel option
specified, which means that it is not displayed, returned or logged.) However, if you tick the Show Hidden Channels
checkbox then all
channels will be displayed.
As with most other screens, the displayed information can be immediately updated by pressing Update. It can also be
set to automatically update, by selecting Auto in the upper right of the screen. You can then specify the number of
seconds between updates.
Note: automatic updates will only continue while the Channel List screen is displayed. If you select a different screen then the web
interface will stop requesting updates from the logger.
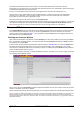
Mimics Screen
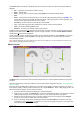
Figure 44: Mimic display screen
The Mimics screen can be used to present selected channel values in a way that resembles traditional control panel
indicators.
Up to five separate mimic screens can be defined, using the web interface configuration tool (see Customising the Web
Interface (P160)).
Each mimic screen provides space for between one and sixteen mimic displays, arranged in a grid layout, as shown in
the screenshot. Initially, all display positions will be blank, with a single Add mimic... button in each display position. The
general procedure for setting up a mimic screen is as follows:
1. First ensure that the required job is loaded and is working as required.
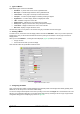
2. Create a mimic by clicking on the Add mimic... button in the desired display position. You will then fill in various
details specifying the type of mimic (bar graph, meter, etc.), the channel, and various other options.
3. Repeat the above to define more mimics. If required, existing mimics can be changed using the Configure
control. It is not necessary to define mimics for all six positions.
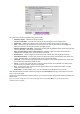
4. When you are happy that all mimics are working as required, press Save Mimics. This will save your mimic
configuration to a file on the logger
. The next time you connect to that logger (using any PC), your mimic setup
will be automatically retrieved and displayed.