
Instruction manual


19
Selecting video input formats and adjusting audio levels
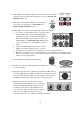
(Numbers refer to the Front Panel illustration above)
*. Verify that there is a valid source at each input you’ve connected by using the Main Source Select buttons
(4.) to select a channel and view the output on the main monitor.
For each input channel (A, B, C, D): press the top Input Format button (7.) to select the channel, then press
the bottom button to select the proper video format. DV = digital video through FireWire (a.k.a. iLink or IEEE
1394); V = composite video; S = S-video; YUV = component video.
For each input channel, use the Audio Input Selectors (22.) to engage a channel; set the level using the
rotary pot below the channel button so that the LEDs in the Audio Meters (1.) peak occasionally to +6 or +9
and there is no audible distortion. Make sure the A+V button (6.) is not lit so you can monitor and adjust
audio from channels that aren’t selected on the Main Source bus. Adjust any other audio input levels you will
be using, for example microphones, Aux in from a mixer, etc.
Use the Audio Channel Selector buttons (22.) and Faders (21.) to set the audio output levels so that there is
no audible distortion and they peak occasionally to +3 or +6.
Using Video and Audio Monitors
We’ll save the speech on how important monitoring is for another section. Suffice it to say that
without reliable video and audio monitors, you won’t be able to tell what’s what in your mix.
The SE-800 provides the ability to easily and reliably monitor video and audio at both the input and
output stages.
Each input channel video can be monitored by connecting to the channel’s Monitor Output, with
either one monitor per channel as in example set ups 2 and 3 above (page 16, 17), or to a passive switch
box as in example set up 1, page 15.
You should have a video monitor displaying the Main Output. This could be a composite monitor, for
example, connected to the V plug (Composite) in the Video Output section (11c, page10), or to the
composite output of a VCR connected to the Video Output, or even, by using Datavideo DV Repeater to
provide multiple parallel DV outputs, a DV recorder and monitor.
Input audio can be monitored at the Headphone jack (26.), using the Headphone controls (23.) to set
the level and the button to cycle through input busses. With the input bus set to Video (VCR), use the Audio
Input selectors (2.) to audition individual sources.
For output audio monitoring with headphones, set the Headphone selector to MASTER; to monitor
through an amplifier and speakers, make sure the MASTER button is lit in the Audio Faders (21.) section.
For more information, see Controls and Operations, page 22.