DVK-100 CHROMA KEY User Guide http:// www.datavideo-tek.
Contents Warnings and Precautions ----------------------------------------------------------------------------------4 Warranty -----------------------------------------------------------------------------------------------------------5 What is in the package ----------------------------------------------------------------------------------------5 Introduction -------------------------------------------------------------------------------------------------------6 Backdrops -----------------------------------
RS 232 Information ------------------------------------------------------------------------------------------------ 28 Specifications ------------------------------------------------------------------------------------------------------- 29 Optional Accessories ---------------------------------------------------------------------------------------------- 30 Service and Support ---------------------------------------------------------------------------------------------- 31 3
Warnings and Precautions 1. Read all of these warnings and save them for later reference. 2. Follow all warnings and instructions marked on this unit. 3. Unplug this unit from the wall outlet before cleaning. Do not use liquid or aerosol cleaners. Use a damp cloth for cleaning. 4. Do not use this unit in or near water. 5. Do not place this unit on an unstable cart, stand, or table. The unit may fall, causing serious damage. 6.
Warranty Datavideo warrants that the equipment it manufactures shall be free from defects in material and workmanship for a period of 12 months from the date of product purchased. If equipment fails due to such defects, Datavideo will, at its option, repair or provide a replacement for the defective part or product.
Introduction The Datavideo DVK-100 is a two camera live chroma keyer. It has many advanced features which can give excellent results even from less than perfect Chroma Key setups. Although the DVK-100 is equipped with excellent edge controls it is always best to start with the best keyable image your setup is able to produce. Please read these advisory notes before using the DVK-100 as the camera, backdrop and lighting setups all play an important role in producing the best result.
Lighting for Reflecmedia is a little different. The backdrop requires no lighting as the LiteRing, which is mounted on the camera provides all the lighting for the backdrop. A Reflecmedia setup would be more like this: More in-depth details of Reflecmedia lighting setups are available from the Reflecmedia website: www.reflecmedia .com White Balance White Balance is extremely important when setting up a chroma key studio.
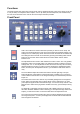
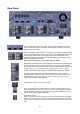
Functions The DVK-100 has three inputs (two camera inputs and one background input). Each of the inputs can be set to Y/C (S-Video) or Composite. All the outputs, one Y/C (S-Video) and two Composite, are simultaneously live. We recommend that Y/C is used for the camera inputs wherever possible. Front Panel CAM-1 and CAM-2 are used to select the input that you want to use or setup. The active input will be illuminated in red. Each camera input has individual settings.
The Color Processor Adjustments allow colour saturation, brightness, contrast and tint (NTSC only) to be adjusted for both the foreground (Cam-1 / Cam-2) and background images. The selected parameter, which will be illuminated red, is adjusted using the Adjustment Knob. Cam-1 and Cam-2 store separate values, so different colour processor settings can be used on each. The Still button enables you to grab a freeze frame image from either the background or foreground inputs. This can be useful when setting up.
Rear Panel The Input Select Switches can be set to CV (Composite Video) or S (S-Video (Y/C)). Always use S-Video if available. Set each input according to the video signal you are connecting. CAM-1 and CAM-2 Video Inputs for connecting the two foreground video images. There are Composite and S-Video Inputs, at the top and Composite and S-Video Loop Through outputs below. The S-Video input can be monitored from the Composite Video Loop Through if required.
Dip Switches / Mode Select The DVK-100 can be set to various modes using the Dip Switches. Dip Switch 1 : OFF = NTSC, ON = PAL output 2 : OFF = 0 IRE, ON = 7.5IRE input/output 3 : OFF = Fixed, ON = PAL/NTSC auto detection (Detected from the CAM-1 / CAM-2 signal) 4, 5 : RESERVED 6 : OFF = VIDEO, ON = COLOR BAR Cooling Fan. Please ensure that there is free air flow available around the fan. Blocking the fan may cause the unit to overheat.
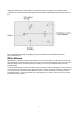
Installation Here is an example chroma key installation diagram (for an example luma key installation see page 21): The Studio Set-Up for this example would be something like this: 12
In this example both Camera 1 and Camera 2 are connected using S-Video (Y/C) cables, as this gives the best results. Camera 1 is set as a close-up of the anchorman and Camera 2 is a wider shot. The Background footage is being fed from a DVD Player, and again it is connected using S-Video. You could alternatively use a VCR or even another camera. The Output is being recorded to a DVD Recorder via an S-Video cable.
If your camera has an S-Video Out connect it to the CAM-1 S-Video Input on the rear of the DVK-100 As you are using an S-Video connection, set the CAM-1 Input Select Switch to S Input Camera 1 (CAM-1) S-Video Input Connector If your camera does not have an S-Video Out, connect the Composite Video Out (Yellow RCA/Phono) to the CAM-1 Composite Video Input on the rear of the DVK-100.
If your player has an S-Video Out connect it to the BG S-Video Input on the rear of the DVK-100 As you are using an S-Video connection, set the BG Input Select Switch to S Input Background (BG) S-Video Input Connector If your player does not have an S-Video Out, connect the Composite Video Out (Yellow RCA/Phono) to the BG Composite Video Input on the rear of the DVK-100.
Output The final connection is the output to a deck, or recorder. This could be a VCR, DVD Recorder, HDD recorder, or perhaps a DV Converter to stream to a PC for a live webcast, a distribution amplifier to several live monitors and a recorder, or simply a live monitor. The connections are much the same whatever you intend to connect to.
Using the DVK-100 With all devices and monitors connected correctly we can now look at how to operate the DVK-100. Firstly we will look at Chroma Keying. In this example we are using a Green Backdrop; the principle is exactly same if you are using a Blue Backdrop, just press Blue instead of Green. Powering Up Make sure the powercord is plugged into an appropriate mains socket, and that the socket is switched on. Switch the DVK-100 on, using the On / Off switch on the rear of the unit.
Now press the Density (Level) button. The Chroma Key and Density buttons should both be illuminated red. Again use the Adjustment Knob to eliminate as much backdrop as possible. Before Density Adjustment- After Density Adjustment- Creases and areas of shadow can be seen. The Backdrop has now become completely transparent. Edge Adjustment (Shrink) Once Density has been adjusted we should be getting a pretty good Chroma Key Effect.
Turn the Adjustment Knob; you will see the edge getting larger or smaller as you rotate the knob. Fine tune the setting until the edge is correct. Before Left Shrink Adjustment After Left Shrink Adjustment Subject Density In some circumstances you may find it is almost impossible to remove the edge from one side of your subject or the other.
Turn the Adjustment Knob; on the output monitor you will see the colour hue of the subject changing. Fine tune the setting until you have the desired effect. All of the settings we have looked at so far work together to achieve the best possible end result. It is often worth going back to the various settings (Green Keying Level, Density, Edge, Subject Density, Spill) and fine tuning, as adjusting density, for example, may have an affect on the best Green Keying Level.
With the window size adjusted correctly we can set the Green Keying Level, Density, Edge, Subject Density and Spill, to produce the finished shot. Settings Lock Once you have set all the parameters of the DVK-100 set to produce the perfect effect from both of your cameras you can lock the settings. Once locked none of the DVK-100 front panel controls will respond. To lock the DVK-100 front panel, press and hold either the CAM-1 or CAM-2 button for two seconds.
Luma Keying As well as being a Chroma Keyer the DVK-100 can also be used as a Luma Keyer. A Luma Keyer can key out luminance values. In simple terms you can remove either the white end of the grey scale, or the black end of the grey scale. If for example you have an image on a white or black background it is possible to use Luma Keying to superimpose the image over a video background. Here are two examples that show some of the possibilities.
Example Luma Key Installation Diagram. The Luma Key settings for CAM-1 and CAM-2 will be at opposite ends of the scale, on CAM-1 we want to remove white and on CAM-2 we want to remove black. Lets start with CAM-1. Press the CAM-1 button on the front of the DVK-100, once pressed it should be illuminated red. Press the Chroma Key button and the Luma button, both should be illuminated red. Luma Key has two modes and you will see if you press and hold the Luma button for two seconds it flashes.
Use the Adjustment Knob to adjust the Luma Keying level. You should see the effect on the output monitor. Set the Luma Keying Level to eliminate as much of the white background as possible. Graphics on White Background Graphics overlayed after Luma Keying Level Adjustment You can also apply Luma Key Mode 1 to fine tune the overlay. This will start to key out the darker areas of the overlay. Press and hold in the Luma button for two seconds, until it stops flashing and is illuminated constantly red.
Now we will set up the CAM-2 overlay, which has a black area we want to key out. Press the CAM-1 button on the front of the DVK-100, once pressed it should be illuminated red. Press the Chroma Key button and the Luma button, both should be illuminated red. Luma Key has two modes and you will see if you press and hold the Luma button for two seconds it flashes.
Use the Adjustment Knob to fine tune the overlay effect. You will see that in Mode 1 the darker areas gradually become more transparent, and in Mode 2 the lighter areas gradually become more transparent. If you need to reset any of the parameters to factory default, simply activate the function you want to reset by pressing the appropriate function button, and then push the adjustment knob in; after a second the parameter will reset to factory default.
To grab the freeze frame image press the Still button. The Still button will be illuminated red, it will remain red while the freeze frame is being held. You will see the Foreground or Background image freeze on the output monitor. N.B. The colour processor adjustments will not function if you are holding a freeze frame. To release the freeze frame and return to running video, press the Still button again the LED should go out. GPI Control The DVK-100 has a GPI In and Out port.
RS 232 Protocols Package Format : 00 FE CH_ID[4X] CMD[6X-DF] Param0~ParamN[3X] CRCH[5X] CRCL[5X] FF CH_ID : PC=40~47, 40=Current Camera, 41=CAM1, 42=CAM2 Panel=48~4F, 48=Current Camera, 49=CAM1, 4A=CAM2 Param Data Types : hex : 1-byte [3X] means X=0~Fh int2 : 2-bytes [3X 3Y] means XYh (signed) uint2 : 2-bytes [3X 3Y] means XYh (unsigned) int3 : 3-bytes [3X 3Y 3Z] means XYZh hex4 : 4 hex for version N.
DVKCMD_Get/SetWindowBorder 82/83 BorderOn/Off 30=off / 31=on DVKCMD_Get/SetBlankColor 86/87 R(int2=0~100)def=0 G(int2=0~100) def=70 B(int2=0~100) def=70 Specification Input 3 Inputs: CAM-1 / CAM-2 INPUT For foreground use (FG) BG INPUT For background use (BG) Each input has selectable Composite or Y/C signal: Y/C In 4-pin 75 ohm DIN Connector Composite In 75 ohm RCA connector, level: 1.
Accessories There are a number of additional Datavideo products that are ideal for use with the DVK-100. Full details of these products are available from your local Datavideo office, or from the Datavideo website: www.datavideotek.com The Datavideo DAC-100 is an ideal accessory for the DVK100 it will allow you to convert the video output to DV. The DV stream can then be recorded to a HDD Recorder such as the DN-100, or an NLE editing system, streamed to a PC for a live webcast.
Service and Support It is our goal to make your products ownership a satisfying experience. Our supporting staff is available to assist you in setting up and operating your system. Please refer to our web site www.datavideo-tek.com for answers to common questions, support requests or contact your local office below. Datavideo Corporation (USA) 12300-U East Washington Blvd., Whittier, CA 90606 USA Tel: +1 562 696 2324 contactus@datavideo.us www.datavideo.