
User guide


10
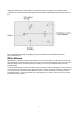
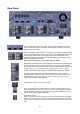
Rear Panel
The Input Select Switches can be set to CV (Composite Video) or S (S-Video
(Y/C)). Always use S-Video if available. Set each input according to the video
signal you are connecting.
CAM-1 and CAM-2 Video Inputs for connecting the two foreground video images.
There are Composite and S-Video Inputs, at the top and Composite and S-Video
Loop Through outputs below. The S-Video input can be monitored from the
Composite Video Loop Through if required. ̸» ÍóÊ·¼»± Ô±±° ̸®±«¹¸ ·- ±²´§
¿½¬·ª» ·º ¬¸» ÍóÊ·¼»± ·²°«¬ ·- «-»¼ò
ÒòÞò Ú±® ¾»-¬ ®»-«´¬- ¿´©¿§- «-» ¿² ÍóÊ·¼»± -·¹²¿´ ·º ¿ª¿·´¿¾´»ò
Background Input (BG Input) for connecting the video feed from your background
source. This could be from a VTR or DVD player for example. The Composite
and S-Video Inputs are at the top, and the Loop Through Outputs are below. The
S-Video input can be monitored from the Composite Video Loop Through if
required. ̸» ÍóÊ·¼»± Ô±±° ̸®±«¹¸ ·- ±²´§ ¿½¬·ª» ·º ¬¸» ÍóÊ·¼»± ·²°«¬ ·- «-»¼ò
The Main Video Output shows the final result of the keyer. There are two
composite outputs and one S-Video (Y/C), all three are active simultaneously. It
is advisable to connect a monitor to one of the outputs so that you can see
exactly what the DVK-100 is outputting.
Power Switch, switches the DVK-100 on/off.
DC In. Connect the power supply to the DC In, there is a locking collar on the
power supply lead which screws onto the socket to ensure a positive connection.
It is also possible to power the DVK-100 from a suitable 12V Battery Pack, but
please ensure that the power is regulated.
Grounding Terminal.
When connecting this unit to any other component, make sure that it is properly
grounded by connecting this terminal to an appropriate point. When connecting,
use the socket and be sure to use wire with a cross-sectional area of at least 1.0
mm2.